Steps to replace a node that has died for some reason, such as hardware
failure.
Steps to replace a node that has died for some reason, such as hardware failure.
You must prepare and start the replacement node, integrate it into the cluster, and
then remove the dead node. If the node is a seed node, see Replacing a dead seed node.
Procedure
Be sure to install the same version of Cassandra as is installed on the
other nodes in the cluster. See Installing prior releases.
-
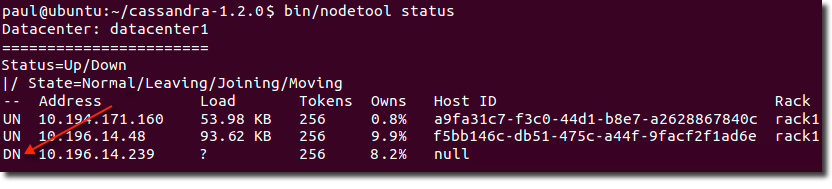
Confirm that the node is dead using nodetool
status:
The nodetool command shows a down status for the dead node (DN):
-
Note the Address of the dead node; it is used in
step 5.
-
Install Cassandra on the new node, but do not start Cassandra.
If you used the Debian/Ubuntu install, Cassandra starts automatically and you
must and stop the node and clear the data.
-
Set the following properties in the
cassandra.yaml and, depending on the snitch, the
cassandra-topology.properties or
cassandra-rackdc.properties configuration files:
- auto_bootstrap - If
this option has been set to false, you must set it to
true. This option is not listed in the default
cassandra.yaml configuration file and defaults to
true.
- cluster_name - The
name of the cluster the new node is joining.
- listen_address/broadcast_address
- May usually be left blank. Otherwise, use IP address or host name that
other Cassandra nodes use to connect to the new node.
- endpoint_snitch - The snitch
Cassandra uses for locating nodes and routing requests.
- num_tokens - The number
of vnodes to assign to the node. If the hardware capabilities vary among the
nodes in your cluster, you can assign a proportional number of vnodes to the
larger machines.
- seed_provider - The
-seeds list in this setting determines which nodes the
new node should contact to learn about the cluster and establish the gossip
process.
- Change any other non-default settings
you have made to your existing cluster in the
cassandra.yaml file and
cassandra-topology.properties or
cassandra-rackdc.properties files. Use the
diff command to find and merge (by head) any
differences between existing and new nodes.
-
Start the replacement node with the replace_address option:
-
If using a packaged install, after the new node finishes bootstrapping, remove
the option you added in step 5.
-
Wait at least 72 hours and then remove the old node's IP address from the
cassandra-topology.properties or
cassandra-rackdc.properties file.
This ensures that old node information is removed from
gossip. If removed from the property
file too soon, problems may result. Use
nodetool
gossipinfo to check the gossip status. The node is still in gossip
until LEFT status disappears.