Installing DataStax Enterprise 4.5 using GUI or Text mode

DataStax Enterprise 4.5 production installation or upgrade on any Linux-based platform using a graphical or text interface.

For a complete list of supported platforms, see DataStax Enterprise Supported Platforms. For other product installations, see Installing OpsCenter and Installing DevCenter.
Important: DataStax Enterprise 4.5 uses Cassandra 2.0.

Prerequisites

  • Root or sudo access when installing as a system service, and if installing missing system dependencies.
  • Latest version of Oracle Java SE Runtime Environment 7, not OpenJDK. See Installing Oracle JDK.
  • RedHat-compatible distributions require EPEL (Extra Packages for Enterprise Linux). For RHEL 5.x, see Installing EPEL on RHEL OS 5.x.
  • If installing on a 64-bit Oracle Linux distribution, first install the 32-bit versions of glibc libraries.

Also see Recommended production settings and the DataStax Enterprise Reference Architecture white paper.

Hardware requirements
Requirement Minimum Production
CPUs 2 16
Memory 8GB 24GB
Data directory 20GB 200GB
Commit log directory 20GB 200GB
Saved caches directory 20GB 200GB
Logs directory 20GB 200GB

For a complete list of supported platforms, see DataStax Enterprise Supported Platforms.

About the installer 

The installer installs DataStax Enterprise and the DataStax Agent. It does not install OpsCenter or DevCenter. The installer sets some but not all cassandra.yaml parameters described in the table below. It does not set dse.yaml properties. You can set the remaining parameters in the following ways:
  • Manually after installation.
  • Using the unattended install with either command line or the property file options.

    Using the property file option (--optionfile), you can specify pre-configured cassandra.yaml and dse.yaml files with the --cassandra_yaml_template filename and --dse_yaml_template filename options.

Installing under a user account

  • Root or sudo access allows the installer to set up support services on operating systems that support services, such as Debian-based or RHEL-based systems.
  • Without root or sudo access, the installer cannot set up support services because it does not have permission to create the services files.

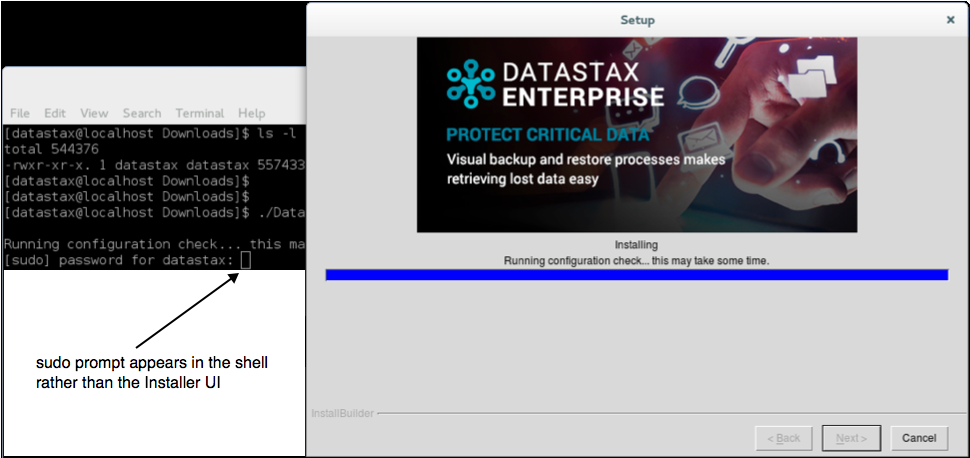
In GUI mode if gksudo or pkexec is not installed, the installer may not present a GUI sudo prompt. Subsequently the sudo prompt appears in the shell:

Procedure

Note: In the following commands, be sure to change X to an actual version number. To view the available versions, see the Release notes. The latest version of DataStax Enterprise 4.5 is 4.5.9.

  1. Download the installer for your computer from the DataStax download page.
  2. From the directory where you downloaded the install file, change the permission to executable:
    $ chmod +x DataStaxEnterprise-4.5.X-linux-x64-installer.run
  3. To view the installer help:
    $ ./DataStaxEnterprise-4.5.X-linux-x64-installer.run --help
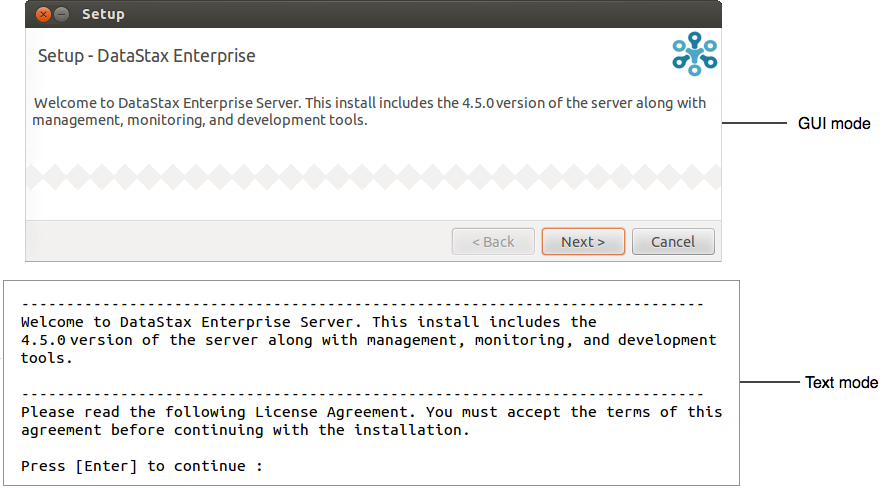
  4. Start the installation:
    $ sudo ./DataStaxEnterprise-4.5.X-linux-x64-installer.run             ## Install in GUI mode.
    $ sudo ./DataStaxEnterprise-4.5.X-linux-x64-installer.run --mode text ## Install in Text mode.

    Using the install command to set configuration parameters:

    To add configuration parameters to the installation, use the installer options described in Installer - unattended. For example:

    $ sudo ./DataStaxEnterprise-4.5.X-linux-x64-installer.run --prefix /usr/local/dse --enable_vnodes 0 ## Command line option.
    $ sudo ./DataStaxEnterprise-4.5.X-linux-x64-installer.run --optionfile ../datastax/DC4-analytics.prop ## Property file option.

    The installer launches.

  5. Follow the instructions in the setup wizard using the following table for guidance:
    Screen - Panel Recommendations and additional information
    Setup Welcome page.
    License Agreement DataStax Enterprise End User License Agreement
    Install Options
    Server Installation Directory If you use the No Services option, you can change the location of the dse directory. If you install as a service, DataStax Enterprise can only be installed in the /usr/share/dse directory.
    Install Type

    Use Simple Install for default path names and options.

    Advanced Install allows you to configure additional parameters, including:
    Update System Updates some system packages and dependencies. Does not upgrade or install major components such as Oracle Java. Set to Yes when run as root user, otherwise set to No.
    Default Interface Network interface for the DataStax Enterprise server.
    Service Setup

    No Services - installs the DataStax Enterprise server as a stand-alone process.

    Services Only - installs the DataStax Enterprise server as a service running in the background.

    Services and Utilities (Linux only) - installs the DataStax Enterprise server as a service running in the background and Cassandra utilities, such as cqlsh, sstableloader, sstablescrub, and sstableupgrade to the system path.

    Start Services After Install Select Yes to start all services when the installation is complete, or select No when additional configuration is needed after installation.
    Installation Directories (Advanced installation only)
    Agent Installation Directory For more information about the Agent, see the DataStax Agent configuration documentation.
    Node Setup
    Node Type
    The following types of nodes are available:
    Ring Name Name of the cluster.
    Seeds
    Cassandra nodes use the seed node list for finding each other and learning the topology of the ring. Do not make all nodes seed nodes. See the following:
    User Setup (Advanced installation only)
    OS User ID for Service When starting DataStax Enterprise as a service, the Cassandra and Hadoop tracker services run as this user and group. The service initialization script is located in /etc/init.d/dse. Run levels are not set by the package.
    OS User Group for Service
    Ring Options (Advanced installation only)
    Enable Vnodes Enable or disable Virtual nodes.
    Listen Address cassandra.yaml parameter: listen_address
    RPC Address cassandra.yaml parameter: rpc_address
    Directory Locations
    Data Directory cassandra.yaml parameter: data_file_directories
    Commitlog Directory cassandra.yaml parameter: commitlog_directory
    Saved Caches Directory cassandra.yaml parameter: saved_caches_directory
    Logs Directory Log data.
    Ports (Advanced installation only)
    Storage Port cassandra.yaml parameter: storage_port
    SSL Storage Port cassandra.yaml parameter: ssl_storage_port
    RPC Port cassandra.yaml parameter: rpc_port
    Setup
    DataStax Agent The network address of the OpsCenter. The agent provides an interface between DataStax OpsCenter and DataStax Enterprise.
    System Configuration Configuration overview and warnings about potential issues.
    Ready to Install The install wizard installs the software.
    Setup finish Post-installation tasks. To see the Pre-flight check results, select View Configuration Recommendations And Warnings

Results

DataStax Enterprise is ready to start or for additional configuration.

What's next

Please send any feedback or suggestions about this installer to dse-installer@datastax.com.