Creating a local cluster

Create a new Cassandra or DataStax Enterprise cluster on a local machine.

Create a new Cassandra or DataStax Enterprise cluster on a local machine. The Add Datacenter queues up for provisioning groups of nodes that would go into a logical datacenter.

Prerequisites

Each node in the cluster must meet the following requirements:

  • Cassandra or DataStax Enterprise is not installed.
  • For local clusters, have a user capable of using sudo, unless OpsCenter has been configured not to use sudo (see the runs_sudo option described in OpsCenter configuration properties).
  • Oracle Java 7+ is installed.
  • If you intend to encrypt sensitive configuration values, enable configuration encryption and copy the opsc_system_key to each node before using OpsCenter to install Cassandra or DataStax Enterprise, and before provisioning any new clusters. OpsCenter automatically encrypts the sensitive fields such as passwords and writes the encrypted values to the configuration files. Do not enter manually encrypted values in the password fields if configuration encryption is active.

Procedure

  1. From the main menu, click New Cluster.
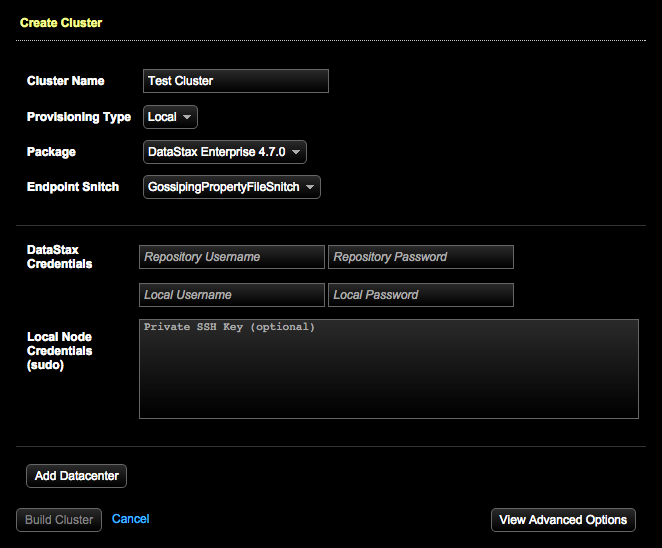
  2. Click Create Brand New Cluster.
    The Create Cluster dialog appears. The Provisioning Type defaults to Cloud. Selections made within the cluster dialogs impact what other fields appear and populate any list options within those fields accordingly.

  3. Select Local as the Provisioning Type.
  4. Consult the following table for assistance with completing the fields:
    Cluster fields
    Field Description
    Cluster Name The name of the cluster. The default name is Test Cluster n. The cluster name must be unique. You can also change the display name of a cluster.
    Provisioning Type Cloud (default) or Local. The Cloud option can be selected only if the OpsCenter instance is running on an AWS EC2 instance.
    Package The version of Cassandra or DataStax Enterprise to install on the nodes. The selected package determines which options populate in the Endpoint Snitch list. The Package default to the most current version of DataStax Enterprise.
    Endpoint Snitch The Endpoint Snitch to use for the cluster. The available options depend upon the selected Provisioning Type and Package:
    • DataStax Enterprise versions 4.6 and later:
      • GossipingPropertyFileSnitch
      • RackInferringSnitch
      • DseSimpleSnitch
      Note: DataStax Enterprise versions earlier than 4.6 include the DseDelegateSnitch. DataStax Enterprise versions 4.5.8, 4.5.7, and 4.5.6 do not support the DseSimpleSnitch and only support the GPFS and RackInferringSnitch.
    • DataStax Community:
      • GossipingPropertyFileSnitch
      • RackInferringSnitch
      • SimpleSnitch
    Note: If a Datacenter has been created, changing the snitch deletes the Datacenter.
    DataStax Credentials Applicable to DataStax Enterprise Packages only. The Repository Userrname and Repository password that were in the email received from DataStax when you registered to download DataStax Enterprise.
    Note: If configuration encryption is active, OpsCenter encrypts the password field on your behalf.
    Local Node Credentials (sudo) The local username and local password to authenticate on the host.
    Note: If configuration encryption is active, OpsCenter encrypts the password field on your behalf.
    The private SSH key to use for authentication. (Optional)
    Add Datacenter Opens the Add Datacenter dialog for adding a datacenter. The number of datacenters you are allowed to add depends upon the selected Endpoint Snitch. DSESimpleSnitch allows up to 4 datacenters, one for each node type. RackInferringSnitch and GossipingPropertyFileSnitches have no limit on the number of datacenters.
    View Advanced Options Access cassandra.yaml for Configuring a cluster. Snitch settings are not available from the advanced options dialog during the initial provision because it is now a top-level field in the provisioning Create Cluster dialog.
  5. To add a datacenter:
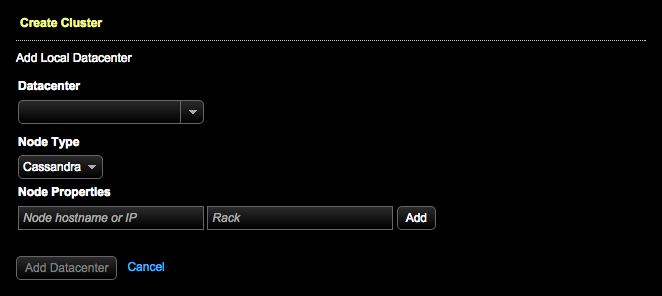
    1. Click Add Datacenter.
      The Create Cluster - Add Local Datacenter dialog appears. The Rack field is only applicable to the default GossipingPropertyFileSnitch.
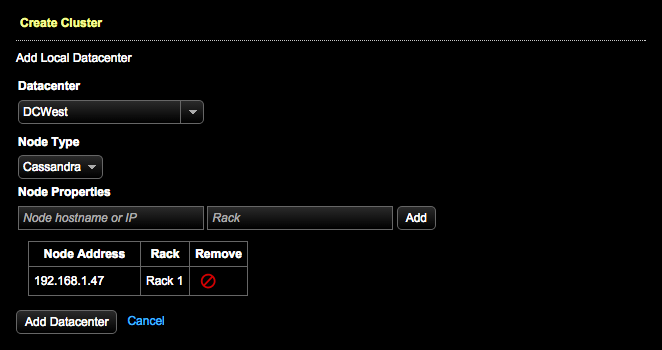
    2. Consult the following table for assistance with completing the fields:
      Datacenter fields
      Field Description
      Datacenter Label A label to uniquely identify the datacenter. The default label is Datacenter n.
      Note: The label is only required for the GossipingPropertyFileSnitch.
      Node Type Each datacenter can only have one type of node. Like Cassandra, node type must be homogenous within each data center. Available node types:
      • Cassandra
      • Hadoop
      • Solr
      • Spark (DataStax Enterprise 4.5 and higher)
      Node Properties The Node hostname or IP and if applicable, the name of the rack.
      Note: The Rack box is only applicable to the GossipingPropertyFileSnitch.
    3. Click Add.
      The node and associated rack is added and appears in the Create Cluster - Add Local Datacenter dialog. You can add or remove nodes queued for addition to a datacenter; editing is not supported.

    4. When you are done adding nodes to the datacenter, click Add Datacenter.
  6. (Optional) To configure advanced configuration options in cassandra.yaml, click View Advanced Options.
  7. Click Build Cluster.
    The Build in Progress displays the provisioning status.

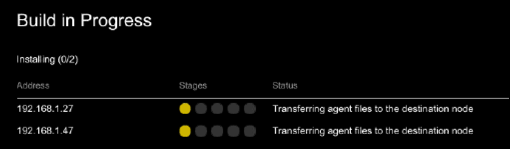
    A message indicates when the cluster build completes. The agent installs successfully and the new cluster is available.