Managing your Astra DB database
As a database administrator, you can manage your database. This includes the following tasks:
Create your database
Complete the following steps to create and launch your DataStax Astra DB database.
Procedure
-
In the Astra Portal, select Databases from the left navigation.
-
Select Create Classic Database.
-
Select a Tier from Production Workloads or High Density Production Workloads.
-
Select a cloud provider and region.
-
Select a Cost Summary review for hourly or monthly.
-
Select Configure Database.
-
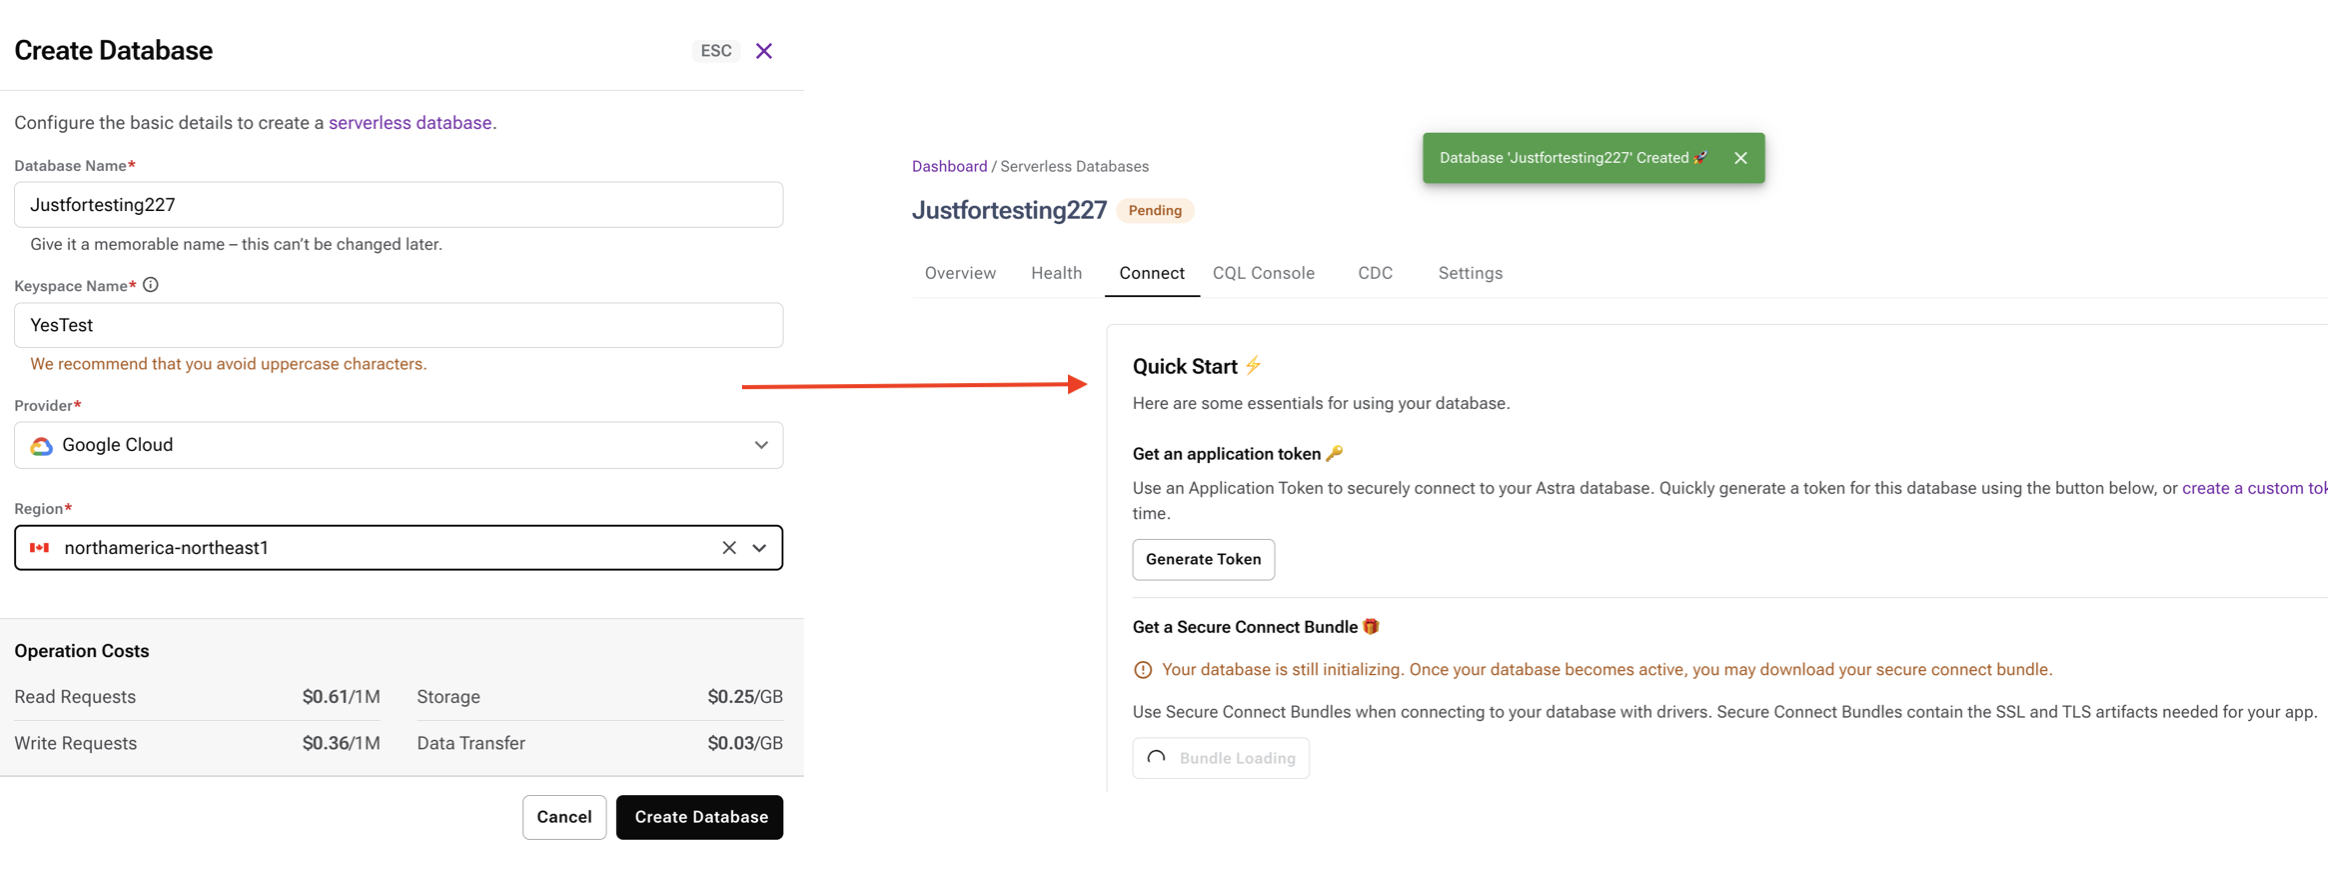
Enter a meaningful Database Name. You cannot alter the database name after the database is created. Use only alphanumeric characters; there is no character limit.
-
Enter a Keyspace Name to reflect your data model. You cannot name your keyspace “dse” or “system”. Use only alphanumeric characters and no more than 48 total characters.
-
Select Create Database. An alert appears at the top of the screen when your database is created.
Results
You are redirected to your Organization Dashboard. The new database and status is shown under Databases. You will receive an email when your database creation is complete. Select the database name to manage or connect with your new database.
View your databases
View all databases in your organization, and select a database to view detailed information about the database.
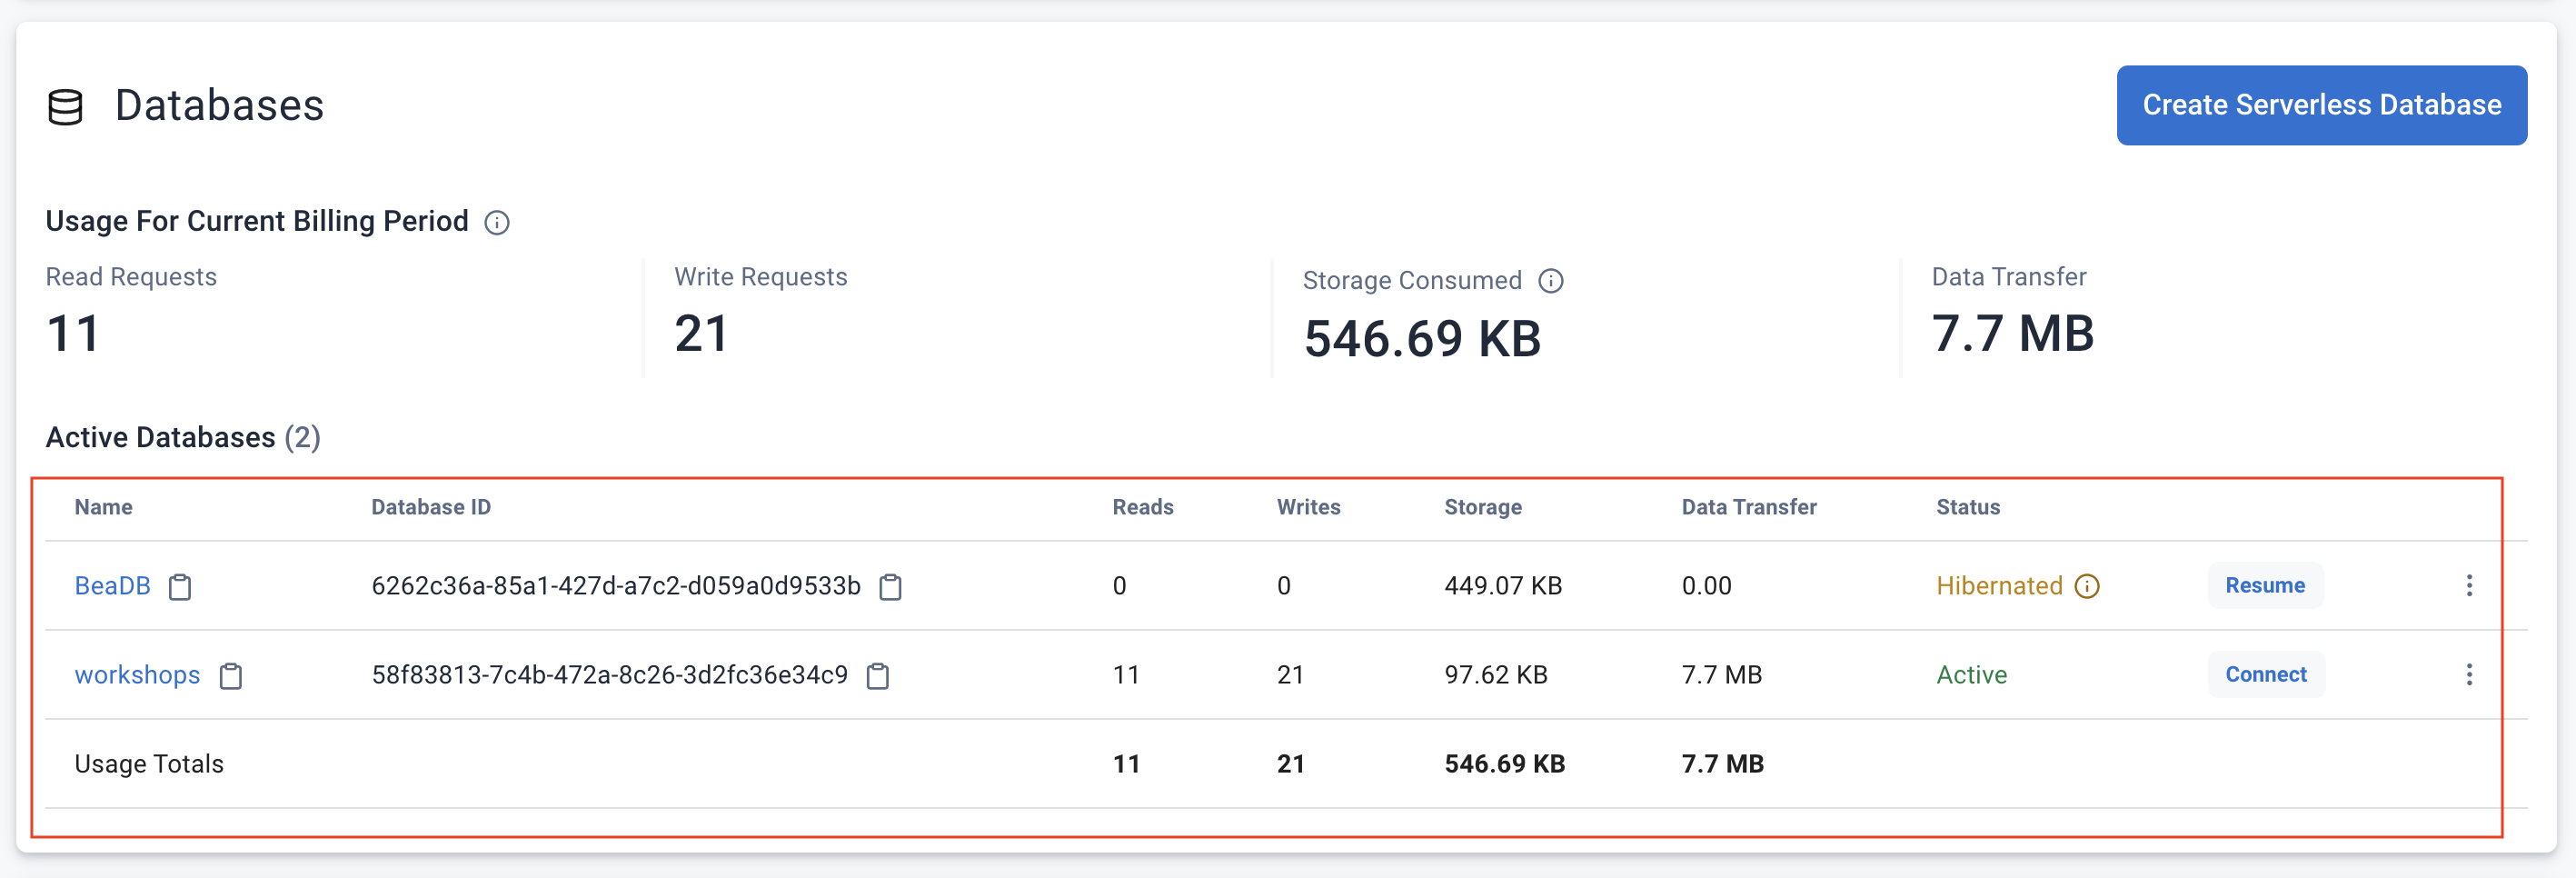
The Dashboard shows all of your databases within your organization, including databases you created and databases created by other team members. From here, you can select an individual database name to manage and connect those databases.
Selecting a database in DataStax Astra DB provides access to detailed information about the database. You can view the keyspaces, size and location of the database, and the estimate cost per hour.
-
Open a browser, navigate to Astra DB, and log in.
-
Select a database from the Databases option in the left navigation or from Recent Resources on the home page.
-
Click the Overview tab.
You can only view connection details and database management operations for databases that you created.
-
You can see several database details from this tab:
-
Database Name
-
Status
-
Usage for current billing period
-
Read Requests
-
Write Requests
-
Storage Consumed
-
Data Transfer
-
-
Compute Size [Only for Classic tier databases]
-
Replication Factor [Only for Classic tier databases]
-
Current Capacity [Only for Classic tier databases]
-
Regions
-
Provider
-
Area
-
Region
-
Datacenter ID
-
Region Availability
-
-
Keyspaces
-
Database statuses
Your database can exist in a range of statuses. These statuses vary based on the actions you take within your database.
To see the system status of Astra, see https://status.astra.datastax.com/.
To see the status of a specific database, view your database Dashboard.
All databases
Active
Your database is available and ready to use.
Initializing
You’ve made your database selections. It should be ready for you to use soon.
Terminating/Terminated
You have terminated your database, which means your database and all data on your database will be removed. Your database is no longer available.
Error
Something is wrong with your database. Contact DataStax Support.
Maintenance
When a database is moving into hibernated or restarting from hibernated, your database will display that it is in the Maintenance status.
Hibernated
When an Astra DB database on the Free plan has been unused for more than 48 hours, it will automatically enter the Hibernated status.
|
It may take a few minutes for your hibernated Astra DB database to resume (return to Active status). |
|
Database hibernation only occurs on the Free plan. Hibernated does not occur on the Astra DB paid plans. To avoid Hibernated, and to take full advantage of additional Astra DB functionality, upgrade from the Free plan to a Pay As You Go plan, or to an Enterprise plan. For details, see Pricing and billing. |
To view the status of any database within your organization,
-
Open your Astra DB dashboard.
-
If you have more than one database in a hibernated status, a banner appears at the top of the screen prompting you to click Resume Databases.

-
-
To activate a specific database, navigate to the Databases table on your dashboard. Select the database(s) to activate.
-
Click Resume to activate a hibernated database.
-
Hover Hibernated for a quick definition of this term.
-
Click the database name to open it, but remain in the hibernated status.
-
Classic databases
Parking
You parked your database. It is in the process of being parked and cannot be used again until you unpark your database.
Parked
You parked your database. It is unavailable and cannot be used again until you unpark your database.
Unparking
You unparked your database. It is unavailable until it is fully unparked and Active again.
Resizing
Scale up your database to change your capacity. Your database has limited functionality while it is resized.
Monitor your databases
View connection details, performance metrics, and health details for databases in your organization.
The Databases page provides an overview of all databases in your organization, including the databases you created and databases created by other team members. However, only a database creator can make changes to a database and view its connection details, which can be shared manually with other team members.
View your databases
View all databases in your organization, and select a database to view detailed information about the database.
The Dashboard shows all of your databases within your organization, including databases you created and databases created by other team members. From here, you can select an individual database name to manage and connect those databases.
Selecting a database in DataStax Astra DB provides access to detailed information about the database. You can view the keyspaces, size and location of the database, and the estimate cost per hour.
-
Open a browser, navigate to Astra DB, and log in.
-
Select a database from the Databases option in the left navigation or from Recent Resources on the home page.
-
Click the Overview tab.
You can only view connection details and database management operations for databases that you created.
-
You can see several database details from this tab:
-
Database Name
-
Status
-
Usage for current billing period
-
Read Requests
-
Write Requests
-
Storage Consumed
-
Data Transfer
-
-
Compute Size [Only for Classic tier databases]
-
Replication Factor [Only for Classic tier databases]
-
Current Capacity [Only for Classic tier databases]
-
Regions
-
Provider
-
Area
-
Region
-
Datacenter ID
-
Region Availability
-
-
Keyspaces
-
View health and metrics
Select a database to view health metrics and performance information. When selecting a database, you can view health metrics that include information regarding latency and throughput to the database. These metrics provide insights into the performance of the database and how workloads are distributed.
|
When viewing information about a database on the Health page, select the region from the dropdown available at the right to view the health metrics of the database particular to that region. This is only applicable for multi-region databases. |
View health dashboard
-
Open a browser, navigate to DataStax Astra DB, and log in.
-
On the Databases page, select the database name to view details for. Details for the database display on the Overview tab.
-
To view health metrics for the database, select the Health tab.
-
Select the time period to display in the health metrics for.
View health dashboard in full window
-
Select Cycle View Mode in the upper right corner. This selection displays the cycle view.
-
Press Esc.
-
Select the share icon in the upper left corner.
-
Copy the URL.
-
Paste the URL in a new browser tab or window to see the dashboard.
Results
Metrics for the database display in the Grafana dashboard embedded in Astra Portal. To view more granular metrics, hover over a specific time in the graph. Read and write latencies display in nanoseconds.
Request Overview

- Requests Combined
-
Displays request rates (req/s) for different types of requests. The rates are summed over all database coordinators.
- Request Errors
-
Displays the request error rates (req/s) for different types of requests. The rates are summed over all database coordinators.
-
Timeouts indicate that the queries are taking too long to complete.
-
Unavailables indicate that the coordinator did not have enough alive data nodes to work with.
-
Failures can be caused by queries violating certain guardrails or other error conditions. For more, see Astra DB database guardrails and limits.
-
- Average Request Complexity
-
This panel provides a high-level view of the average complexity of database requests. It measures the ratio of the average request units to the average request rate. A higher complexity score indicates that a request is more resource-intensive and expensive in terms of read/write activity. This metric combines write operations, including regular writes, counter writes, and index writes, to provide a comprehensive view of the write request complexity.
|
Gaps in the read/write metrics are normal; they indicate periods when no read/write requests are happening. |
Writes
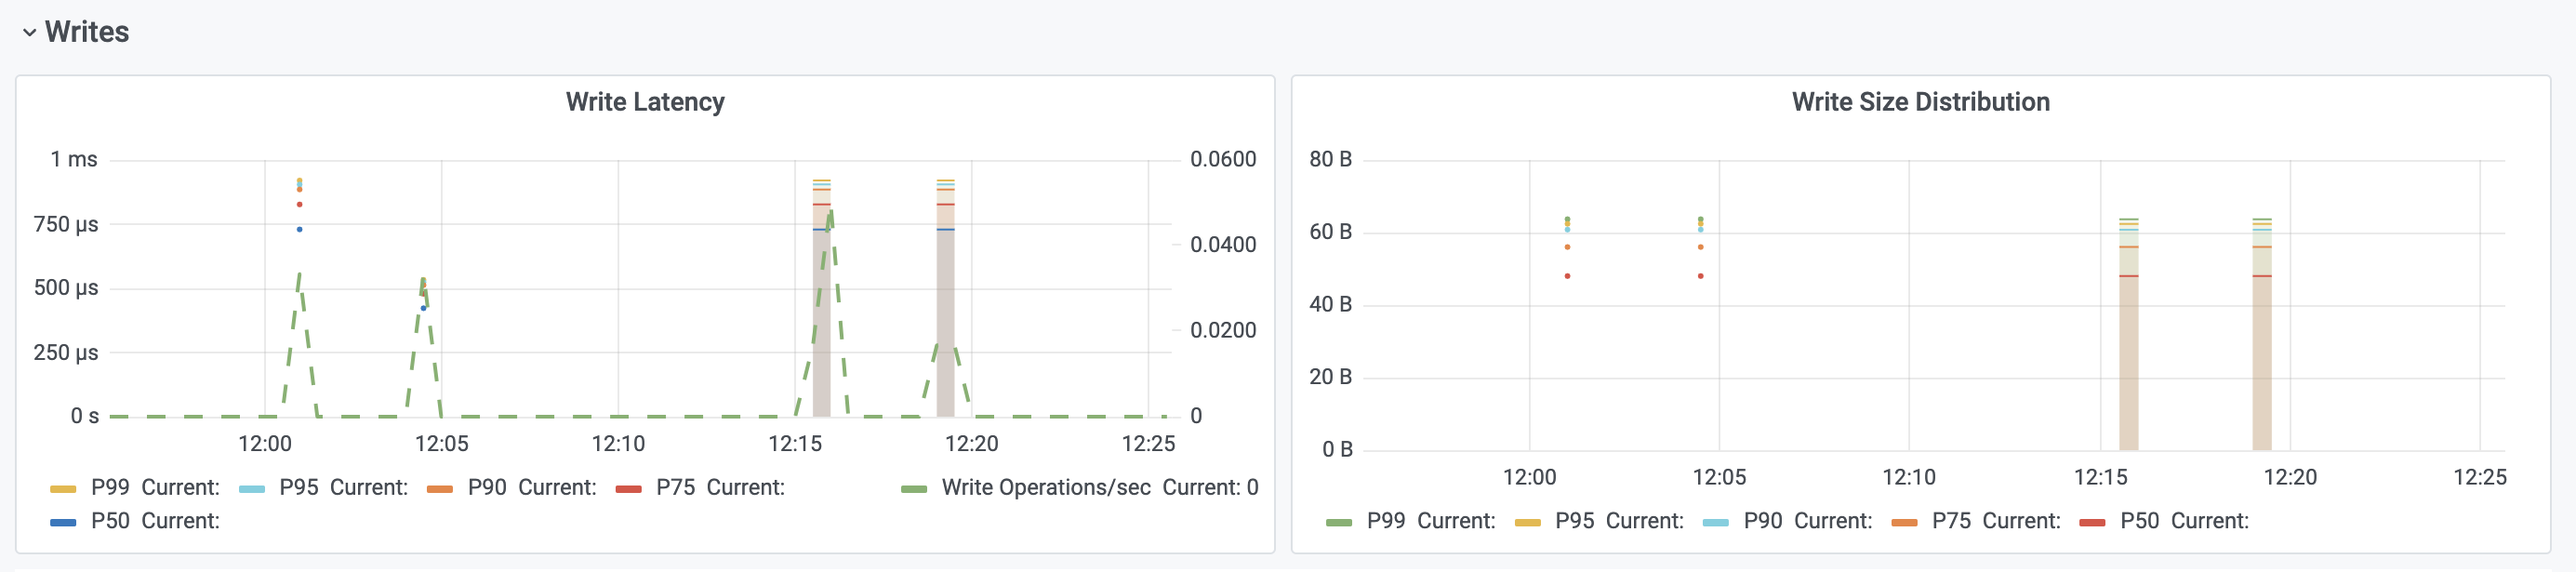
- Write Latency
-
Displays coordinator write request latency quantiles on the left y-axis and the total write request rate (req/s) on the right y-axis.
- Write Size Distribution
-
Displays different write request mutation size quantiles. Large mutations can cause performance problems and might even be rejected.
Reads
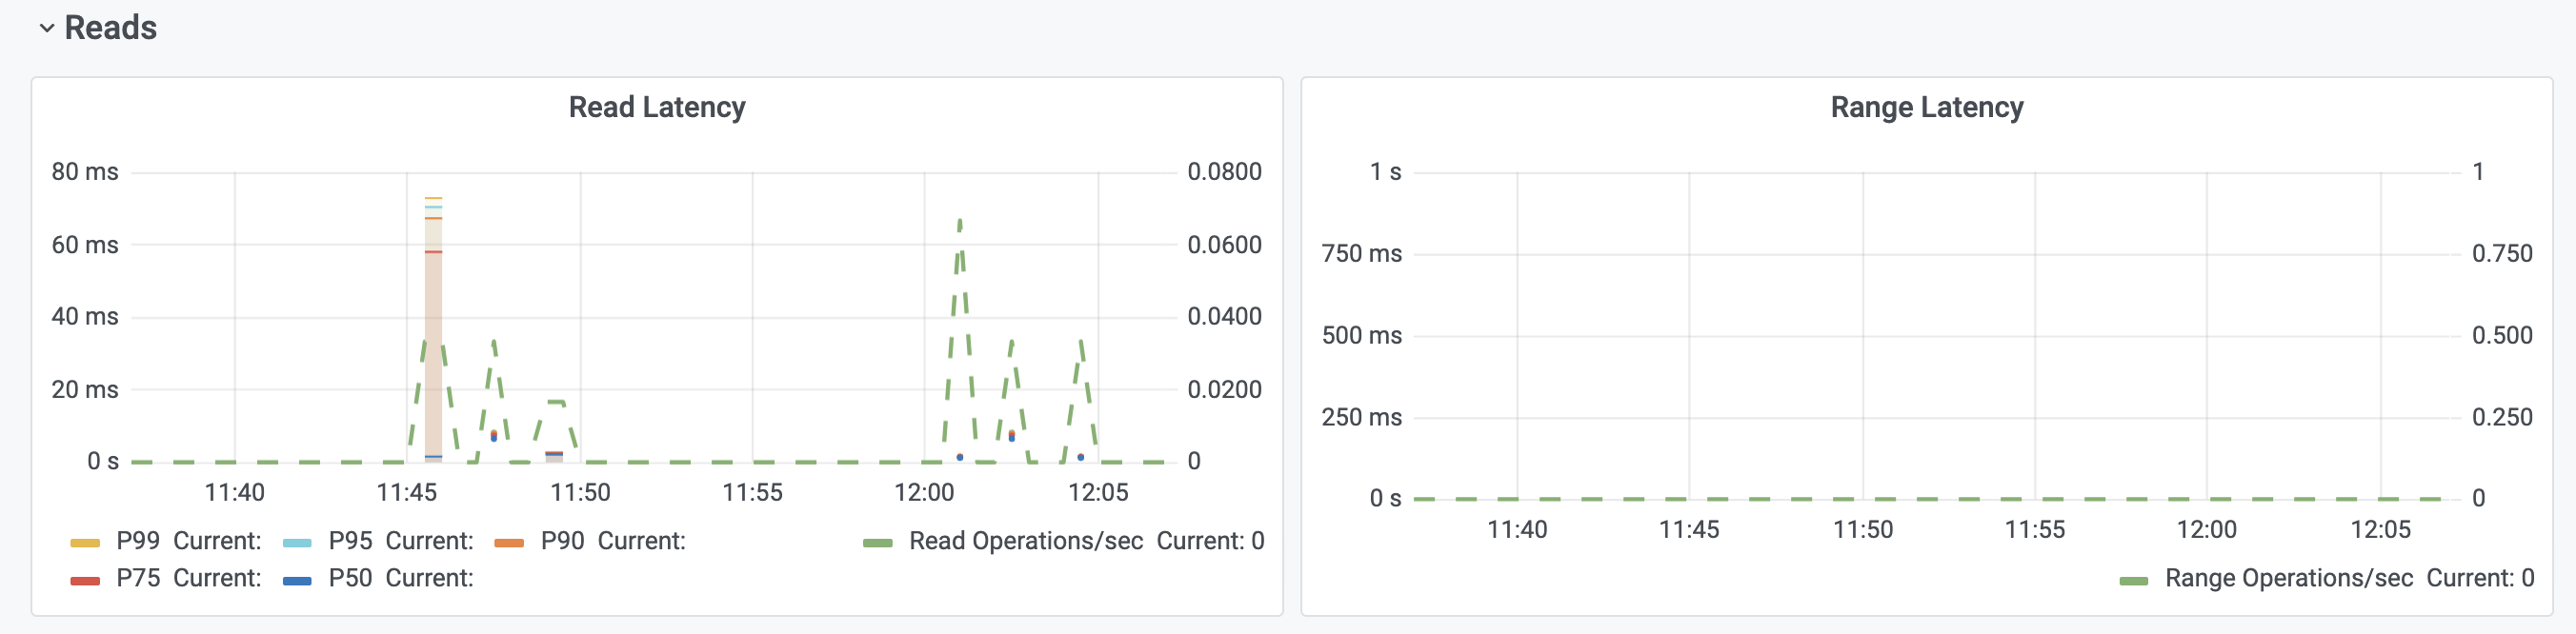
- Read Latency
-
Displays coordinator read request latency quantiles on the left y-axis, and the total read request rate (req/s) on the right y-axis.
- Range Latency
-
Displays coordinator range request latency quantiles on the left y-axis, and the total range request rate (req/s) on the right y-axis.
Lightweight Transactions (LWTs)
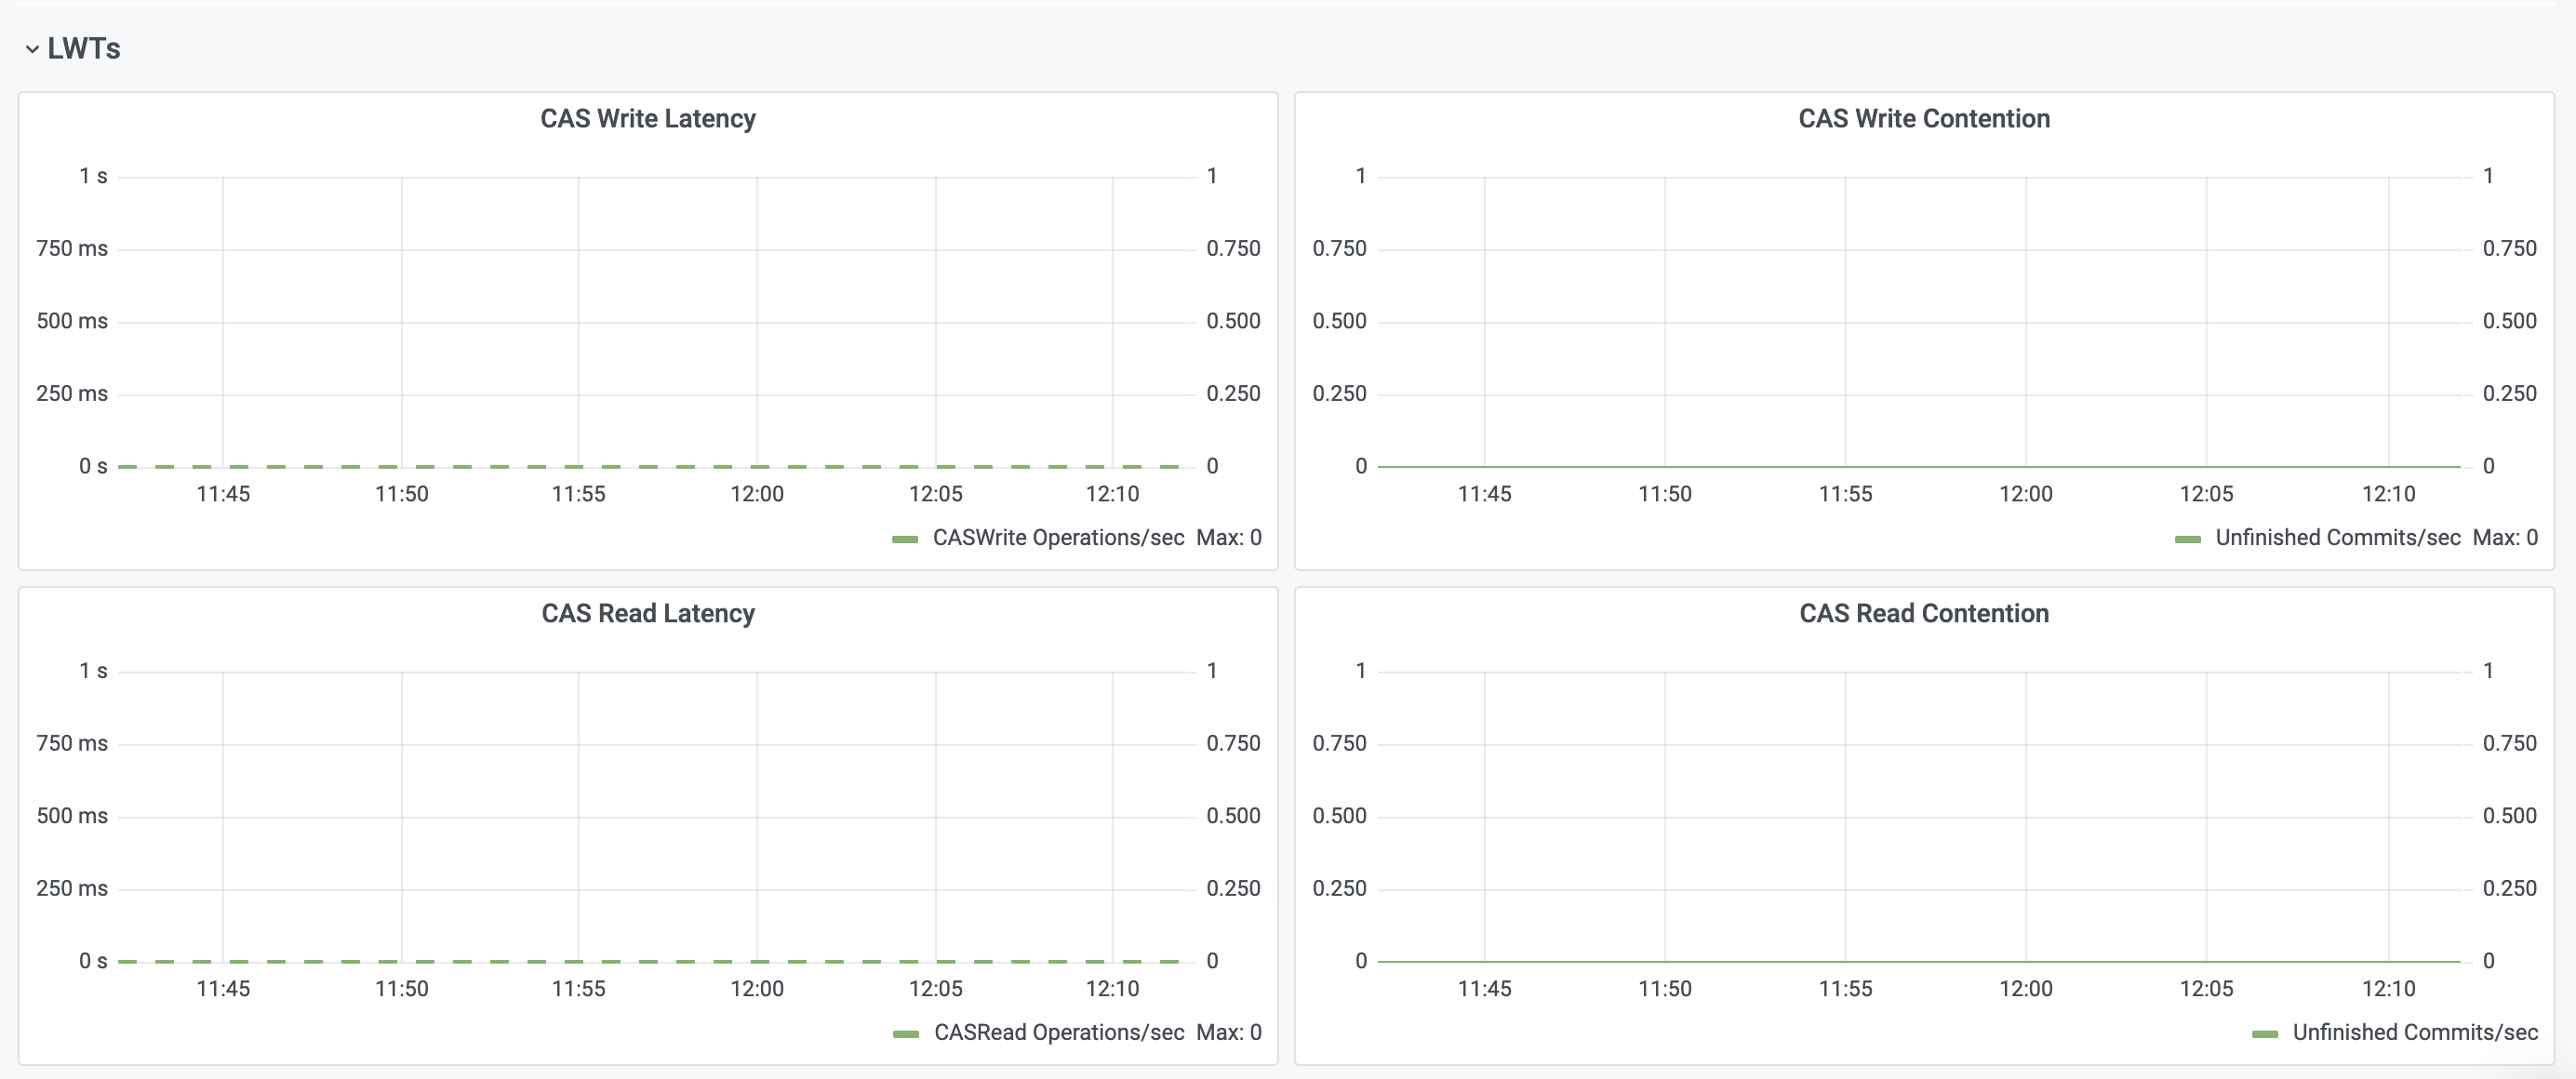
- Compare and Set (CAS) Write Latency
-
Displays coordinator CAS write request latency quantiles on the left y-axis, and the total CAS write request rate (req/s) on the right y-axis.
- CAS Write Contention
-
Displays coordinator CAS write request contention quantiles on the left y-axis and the number of unfinished commits on the right y-axis.
A high number of contended requests negatively affect request latency and cause timeouts. Reduce the number of concurrent requests to the same partition. Unfinished commits cause increased latency. Reducing contention can help reduce the number of unfinished commits.
- CAS Read Latency
-
Displays coordinator CAS read request latency quantiles on the left y-axis, and the total CAS read request rate (req/s) on the right y-axis.
- CAS Read Contention
-
Displays coordinator CAS read request contention quantiles on the left y-axis, and the number of unfinished commits on the right y-axis.
A high number of contended requests negatively affect request latency and cause timeouts. Reduce the number of concurrent requests to the same partition. Unfinished commits cause increased latency. Reducing contention can help reduce the number of unfinished commits.
Tombstones
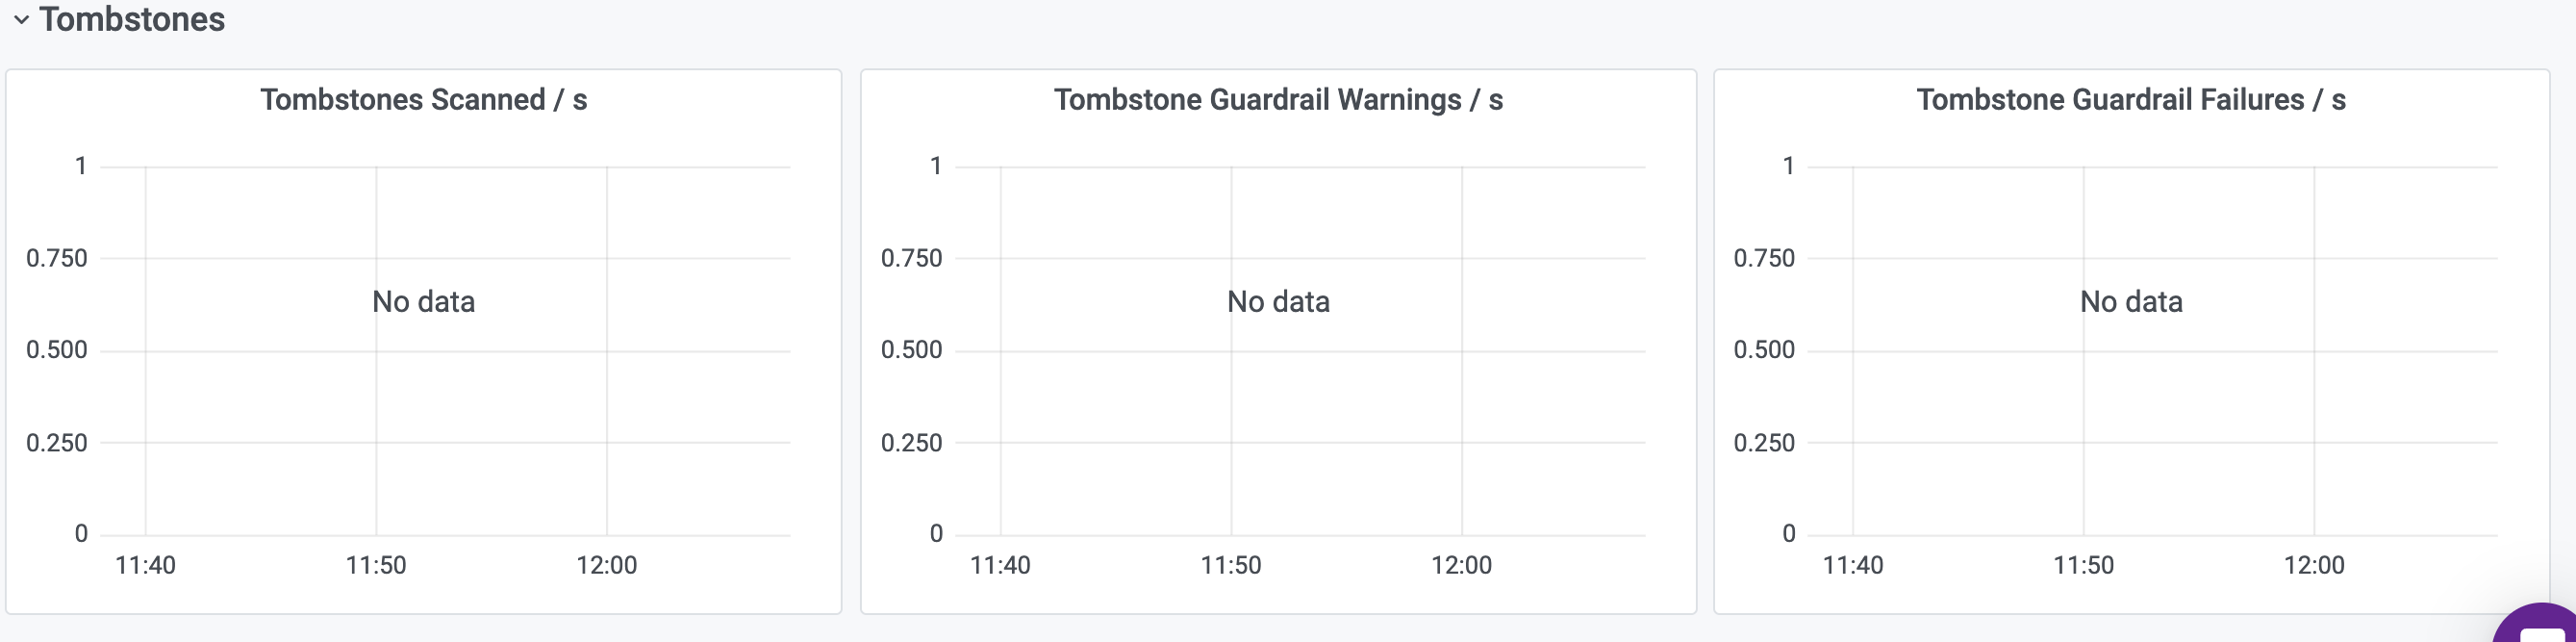
- Tombstones Scanned / s
-
Displays the number of tombstones being scanned per keyspace, table, and second. A large number of tombstones can cause increased latency or query failures.
- Tombstone Guardrail Warnings / s
-
Displays the number of queries exceeding the tombstone guardrail warning threshold per keyspace, table, and second. For more, see Astra DB database guardrails and limits.
- Tombstone Guardrail Failures / s
-
Displays the number of queries exceeding the tombstone guardrail failure threshold per keyspace, table, and second. For more, see Astra DB database guardrails and limits.
Export Astra DB metrics to an external system
Enterprises depend on the ability to view database health metrics in centralized systems along with their other software metrics. The Astra DB Metrics feature lets you forward Astra DB database health metrics to an external third-party metrics system. We refer to the recipient of the exported metrics as the destination system.
Use Astra Portal or DevOps API to export metrics
You can export Astra DB health metrics via Astra Portal or the DevOps API. For details, see:
Supported destinations
Astra DB supports exporting health metrics from its serverless databases to:
You can also use Grafana or Grafana Cloud as a visualization tool.
Feature availability
The Astra DB Metrics feature:
-
Is available only for Astra DB serverless databases.
-
Is available only with Pay As You Go (PAYG) or Enterprise.
-
Is not available on the Astra DB Free plan.
|
Free plan users: in Astra Portal, login and click the Chat icon. It’s on the lower-right corner of the page. Ask the DataStax representative about upgrading your organization to a paid plan, so that you can use Export Metrics and many other Astra DB features. |
Manage access list for public endpoints
Use access lists to limit what public endpoints are able to access your database. You can choose to restrict access in one of two ways:
-
Restrict access to specific IP addresses
-
Restrict access to a range of IP addresses using Classless Inter-Domain Routing (CIDR)
|
When Access List is configured and active, access to these endpoints is restricted:
|
You can also manage your access list using the DevOps API.
|
If you are using the access list and restricting public access, these restrictions exclude the Astra internal site reliability controls. |
|
Only Organization and Database Administrators for the database have permissions to manage the access list. |
Restrict public access
|
By default, public access to your database is not restricted. Access to your database is possible via public internet. |
-
In your database Settings, select the toggle to restrict public access.
-
Confirm your selection to Restrict Public Access.
|
As soon as you enable the 'Restrict Public Access' setting, your database is inaccessible to all internet traffic, which can disrupt any applications depending on it. To prevent downtime, promptly add the approved IP addresses or CIDR blocks to the access list. Until you add to your access list, no external connections to your database are allowed, although Private Endpoint connections remain unaffected. |
Add IP address or CIDR to access list
-
Ensure public access is restricted.
-
Select Add Access.
-
Select Add new endpoint.
-
Select IP Address or CIDR from the Type menu.
A CIDR indicates a range of IP addresses. For example, the CIDR range '192.168.0.0/16' represents the first IP address of '192.168.0.0' through the last IP address of '192.168.255.255'. The '/16' mask indicates that the first 16 bits of the IP address are static. The addresses in the CIDR range are represented by all the permutations of the last 16 bits.
-
Enter the IP address or CIDR into the Address field.
If you want to add you current IP address, copy it from the display and paste it into the Address field.
All IP address must be entered in the IPv4 format, which is four decimal numbers, each ranging from 0 to 255. For example,
179.46.234.11. -
Optional: Add a description for the address you are adding. For example,
officeorhome. -
Select Add to add the address to the access list.
It takes approximately five minutes for each address to sync and have access.
Upload list of endpoints
-
Ensure public access is restricted.
-
Select Add Access.
-
Select Upload from file.
[ { "address": "10.0.0.1", "description": "Reader" }, { "address": "10.0.0.1/32", "description": "Librarians" } ] -
Use the Select File button to find the
JSONfile with your access list to upload.You will see the list of addresses to be added to the access list.
-
Select Import to add the addresses to your access list.
Import endpoints from database
|
You can import an access list from another Astra database. If you do not have another active Astra database, this option will not be available. |
-
Ensure public access is restricted.
-
Select Add Access.
-
Select Import from database.
-
Select the active Astra database from which you want to import the addresses.
You will see the list of addresses to be added to the access list.
-
Select Import to add the addresses to your access list.
Enable or disable an endpoint
-
Select the overflow menu for the address you want to enable or disable.
-
Select Enable or Disable.
The overflow menu will show the Disable option only when the address is enabled and the Enable option only when the address is disabled.
-
Confirm your selection to Enable or Disable the endpoint.
|
Your access list remains active, even if all endpoints are disabled. If you want to allow public access, you must select the toggle to stop restricting public access. |
Delete an endpoint
|
If you remove all of the addresses on your access list, your database will be accessible from the public internet, even if Restrict public access is selected. |
-
Select the overflow menu for the address you want to remove.
-
Select Delete.
-
Confirm your selection to Delete the endpoint.
It takes approximately five minutes for each address to sync and be removed from the access list.
Allow public access
|
If you stop restricting public access, access to your database is possible via public internet. |
-
Select the toggle to stop restricting public access.
-
Confirm your selection to Enable public access.
Manage multiple keyspaces
In Astra, keyspaces hold the datacenter names associated with your Astra regions and defines the replication factor (3 for writes in LOCAL_QUORUM) for each datacenter. A replication factor of 3 ensures against losing your data. You can create keyspaces either with the Astra Dashboard or the DevOps API. Use the instructions below to delete a keyspace with your Astra account, if necessary.
Creating a database with multiple keyspaces allows you to create different data models for each keyspace or store unique data in unique keyspaces. Multiple keyspaces within a single region allows for an application built on a per-keyspace data model.
Adding a new keyspace
-
Open a browser, navigate to Astra DB, and log in.
-
On the Dashboard page, select the database name to access the Overview page for your selected database.
-
Select Add Keyspace.
-
Enter the new keyspace name. When creating your new keyspace name, make sure you meet the following requirements:
-
No empty spaces or null
-
A maximum of 48 characters
-
Only use alphanumeric characters and/or underscores
-
-
Select Save.
Your list of keyspaces displays on the Overview page for your database.
Deleting a keyspace
|
If you delete a keyspace, all data in that keyspace is removed and cannot be recovered. |
-
Open a browser, navigate to DataStax Astra DB, and log in.
-
On the Dashboard page, select the database name to access the Overview page for your selected database.
-
Select the overview menu (…) for the keyspace you want to delete.
-
Select Delete.
-
In the Delete keyspace menu, type in the name of the keyspace to delete.
-
Select Delete Keyspace.
Your list of keyspaces will be updated on the Overview page to show only the remaining keyspaces for your database.
Using multiple regions
You can replicate data to multiple regions for high availability scenarios to ensure active-active applications failover models. Multiple regions also ensure application data availability for locality purposes with the added value of cost savings.
Having multiple regions may increase your billing. For more, see Pricing and billing.
Eventual consistency model and multi-region updates
DataStax Astra DB follows the eventual consistency model. Depending on the selected consistency level, data written to one region might not be immediately accessible to other regions in the same database.
If you are using the EACH_QUORUM consistency level for normal updates or SERIAL consistency level for Lightweight Transactions (LWT), then data is immediately accessible on all regions provided the operation successfully completes.
These consistency levels are for only write requests.
For all other consistency levels, data might not be immediately accessible. The time span is normally within a few minutes to fully replicate the data. However, it could take longer, and possibly span one or more days. There are several contributing factors to the latter scenario, such as the workload volume, the number of regions, the data repair operations, and network resources.
For more, see the FAQs in this topic.
Data sovereignty
Astra DB serverless replicates all data in the database to all of a database’s regions. By contrast, multiple keyspaces in Apache Cassandra® and DataStax Enterprise (DSE) allow a database to replicate some tables to a subset of regions. To achieve the same behavior as Cassandra or DSE, create a separate Astra DB instance that adheres to the necessary region restrictions. The database client will need to add a separate connection for the additional database and send queries to the appropriate connection depending on the table being queried.
Classic databases
|
If you are adding multiple regions to your database, you can use each region only once. You cannot add the same region to the same database more than one time. |
Adding a region to your classic database
-
Open a browser, navigate to DataStax Astra, and log in.
-
On the Dashboard page, select the database name to access the Overview page for your selected database.
-
Select Add Region.
-
Select the region you want to add from the Add Region menu.
-
Select Add.
-
Confirm you want to add the region by selecting Confirm.
You’ll see a screen confirming the new datacenter region is being added. Once you add a region, a maintenance period starts that might take up to 30 minutes. Your database will have limited availability during this window. Some actions, such as viewing database connection details, might be unavailable until maintenance is finished.
Removing a region from your database
-
Open a browser, navigate to DataStax Astra, and log in.
-
On the Dashboard page, select the database name to access the Overview page for your selected database.
-
Select Remove Region from the overflow menu for the region you want to remove.
-
Enter your datacenter id, which is provided in the prompt.
-
Select Remove region.
|
Removing a region is not reversible. Proceed with caution. |
You’ll see a screen confirming the datacenter location will be removed. Once you remove a location, a maintenance period starts that might take up to 30 minutes. Your database will have limited availability during this window. Some actions, such as viewing database connection details, might be unavailable until maintenance is finished.
What’s next?
See additional database management topics.
Terminating your database
When you no longer need a database, terminate it to reduce costs and streamline operations. When you terminate a database, all data is permanently deleted and cannot be recovered.
|
If you have administrator privileges in the DataStax Astra Portal for your team, you can contact DataStax to terminate databases that are owned by other team members. For example, if a team member leaves your organization and you want to delete their databases, contact DataStax with the names of the databases owned by that team member. |
Procedure
|
See instructions on how to terminate a multi-region database here. |
-
Open a browser, navigate to Astra DB, and log in.
-
From the Dashboard page, select the overflow menu for the database you want to terminate and select Terminate.
All data in the database will be permanently deleted. You cannot restart the database. Proceed with caution.
-
To terminate the database, type in the database name you want to terminate and select Terminate.
Results
Your database is removed from the list of available databases. You will receive an email when your database is successfully terminated.
Resizing your classic database
Scale up databases based on your needs. You may need to increase the capacity of your DataStax Astra DB database. If a database is growing quickly or exceeding capacity, add another capacity unit (CU) to expand the storage and capabilities of the database.
|
Scaling down is not supported. |
|
This information applies to only classic databases. |
You can increase your database by a maximum of three CUs. Multiple resize operations are required to add more CUs beyond the maximum number.
Consider the following conditions when resizing databases:
-
You must be the owner of a database to resize it.
-
Databases can only be increased in size to add more CUs.
-
Databases running on the Developer tier cannot be resized.
-
You cannot modify the compute size of existing databases.
Procedure
-
Open a browser, navigate to Astra DB, and log in.
-
From the Dashboard page, select the overflow menu for the database you want to resize and select Expand CUs.
-
In the Expand CUs window, modify the number of CUs for your database.
The total amount of storage and estimated cost changes dynamically based on the number of CUs entered.
You cannot increase your cluster by more than 3 CUs at a time. To increase your cluster by more than 3 CUs, increase them in intervals of 3 CUs at a time until you reach the total CUs you need for your database. The maximum is 20 CUs for your database.
You cannot decrease your cluster. If you need to decrease your cluster, contact DataStax Support.
-
Select Expand to begin resizing the database.
-
Confirm you want to expand your database to your specified size by selecting Yes.
Results
You receive a confirmation that you database is scheduled for expansion. Your database remains active while resizing, but you have limited administrative functions. Your database status changes to Resizing until the resizing is complete.
When your database is successfully resized, you receive an email and a link to the database.
Park databases
Park a database to reduce costs and manage resources efficiently. Parking a database suspends the database but does not destroy it. Parked databases are available to unpark when the database needs to be active again. The cost of parking a database is only the storage cost from the infrastructure as a service (IaaS) provider.
|
This information applies only to existing Classic customers. Effective May 6th, 2022, this feature was deprecated for all new customers. Please contact DataStax support if you have any questions. |
Parking provides an effective means for managing costs and ensuring that databases are running only when needed. When parking a database, the DataStax Cloud console calculates the estimated cost of parking the database versus the cost of keeping the database running.
You can resume your parked databases at any time. If database operations are issued for a parked database, those operations will not be implemented until the database is unparked.
|
When viewing details for a database, click the ellipsis (...) next to the database name to access the Park option. |
Procedure
-
Open a browser, navigate to DataStax Astra DB, and log in.
-
From the Dashboard page, select Park for the database you want to park.
-
To park the database, select Park Database.
Results
The status of the database changes to Parking until the database is parked; the status then changes to Parked.
|
You cannot make changes to your database while the status is Parking. |
The database is parked and remains in that state until you unpark it. The only cost incurred while the database is parked is storage cost from your selected cloud provider.
You will receive an email when your database is successfully parked, along with a link to the database.
Unpark databases
Unpark a database to place it into an active state and use the database again.
|
This information applies only to existing Classic customers. Effective May 6th, 2022, this feature was deprecated for all new customers. Please contact DataStax support if you have any questions. |
Procedure
-
Open a browser, navigate to DataStax Astra DB, and log in.
-
From the Dashboard page, select Unpark for the database you want to unpark.
-
To unpark the database, select Unpark Database.
Results
The status of the database changes to Unparking until the database is parked; the status then changes to Active.
|
You cannot make changes to your database while the status is Unparking. |
You will receive an email when your database is successfully unparked, along with a link to the database.
The database remains Active until you park it again. The only cost incurred while the database is parked is storage cost from your selected cloud provider.