Replacing a dead node or dead seed node
Steps to replace a node that has died for some reason, such as hardware failure.
The procedure for replacing a dead node is the same for vnodes and single-token nodes. Extra steps are required for replacing dead seed nodes.
Procedure
-
Run nodetool status to verify that the node
is dead (
DN).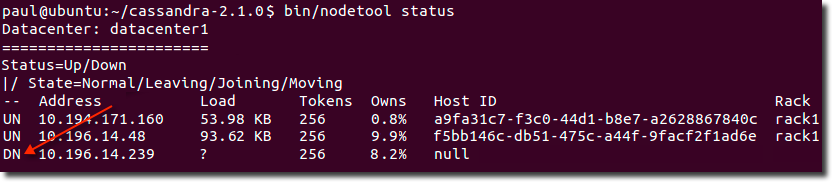
- Record the datacenter, address, and rack settings of the dead node; you will use these later.
- Add the replacement node to the network and record its IP address.
-
If the dead node was a seed node, change the cluster's seed node configuration
on each node:
-
In the cassandra.yaml file for each
node, remove the IP address of the dead node from the
-
                                seeds
list in the seed-provider property. -
If the cluster needs a new seed node to replace the dead node, add the
new node's IP address to the
- seedslist.Attention: In multiple data-center clusters, include at least one node from each datacenter (replication group) in the seed list. Designating more than a single seed node per datacenter is recommended for fault tolerance. Otherwise, gossip has to communicate with another datacenter when bootstrapping a node.Making every node a seed node is not recommended because of increased maintenance and reduced gossip performance. Gossip optimization is not critical, but it is recommended to use a small seed list (approximately three nodes per datacenter).
- Restart the node.
-
In the cassandra.yaml file for each
node, remove the IP address of the dead node from the
-
On an existing node, gather setting information for the new node from the
cassandra.yaml file:
cluster_nameendpoint_snitch- Other non-default settings: Use the diff tool to compare current settings with default settings.
-
Gather rack and datacenter information:
- If the cluster uses the PropertyFileSnitch, record the rack and data assignments listed in the cassandra-topology.properties file, or copy the file to the new node.
- If the cluster uses the GossipPropertyFileSnitch, Ec2Snitch, Ec2MultiRegionSnitch, or GoogleCloudSnitch, record the rack and datacenter assignments in the dead node's cassandra-rackdc.properties file.
-
Make sure that the new node meets all prerequisites and then Install Cassandra on the new node, but
do not start Cassandra.
Note: Be sure to install the same version of Cassandra as is installed on the other nodes in the cluster. If not using the latest version, see Installing earlier releases of Apache Cassandra 3.0.
- If Cassandra automatically started on the node, stop and clear the data that was added automatically on startup.
-
Add values to the following properties in
cassandara.yaml file from the information you
gathered earlier:
- auto_bootstrap: If this setting exists and is set to
false, set it totrue. (This setting is not included in the default cassandra.yaml configuration file.) - cluster_name
- seed list
- auto_bootstrap: If this setting exists and is set to
-
Add the rack and datacenter configuration:
- If the cluster uses the GossipPropertyFileSnitch, Ec2Snitch, Ec2MultiRegionSnitch, or GoogleCloudSnitch:
- Add the dead node's rack and datacenter assignments to the
cassandra-rackdc.properties
file on the replacement node.Note: Do not remove the entry for the dead node's IP address yet.
- Delete the cassandra-topology.properties file.
- Add the dead node's rack and datacenter assignments to the
cassandra-rackdc.properties
file on the replacement node.
- If the cluster uses the PropertyFileSnitch:
- Copy the cassandra-topology.properties file from an existing node, or add the settings to the local copy.
- Edit the file to add an entry with the new node's IP address and the dead node's rack and datacenter assignments.
- If the cluster uses the GossipPropertyFileSnitch, Ec2Snitch, Ec2MultiRegionSnitch, or GoogleCloudSnitch:
-
Start the new node with the replace_address option, passing in the IP address of the dead
node.
Cassandra package installations:
- Add the following option to
cassandra-env.sh
file:
JVM_OPTS="$JVM_OPTS -Dcassandra.replace_address=address_of_dead_node - Start the node.
- After the node bootstraps, remove the
replace-addressparameter from cassandra-env.sh. - Restart the node.
Cassandra tarball installations:
- Start Cassandra with this
option:
sudo bin/cassandra -Dcassandra.replace_address=address_of_dead_node
- Add the following option to
cassandra-env.sh
file:
- Run nodetool status to verify that the new node has bootstrapped successfully.
-
In environments that use the PropertyFileSnitch, wait at least 72 hours and
then remove the old node's IP address from the cassandra-topology.properties
file.
This ensures that old node's information is removed from gossip. If removed from the property file too soon, problems may result. Use nodetool gossipinfo to check the gossip status. The node is still in gossip until LEFT status disappears.
Note: The cassandra-rackdc.properties file does not contain IP information; therefore this step is not required when using other snitches, such as GossipingPropertyFileSnitch.The location of the cassandra-topology.properties file depends on the type of installation:DataStax Enterprise 5.0 Installer-Services and package installations /etc/dse/cassandra/cassandra-topology.properties DataStax Enterprise 5.0 Installer-No Services and tarball installations install_location/resources/cassandra/conf/cassandra-topology.properties Cassandra package installations /etc/cassandra/cassandra-topology.properties Cassandra tarball installations install_location/conf/cassandra-topology.properties The location of the cassandra.yaml file depends on the type of installation:DataStax Enterprise 5.0 Installer-Services and package installations /etc/dse/cassandra/cassandra.yaml DataStax Enterprise 5.0 Installer-No Services and tarball installations install_location/resources/cassandra/conf/cassandra.yaml Cassandra package installations /etc/cassandra/cassandra.yaml Cassandra tarball installations install_location/resources/cassandra/conf/cassandra.yaml