Cloning cluster data from a defined other location
Clone cluster data from one DSE cluster to another using the Restore Backup feature in OpsCenter. This workflow does not require the source and target clusters to both be managed by the same OpsCenter instance. This workflow does not necessarily even require another existing cluster instance. The data can be cloned providing it was backed up to an available Local FS or an Amazon S3 location.
Clone cluster data from one DSE cluster to another using the Restore Backup feature in OpsCenter. This workflow does not require the source and target clusters to both be managed by the same OpsCenter instance. This workflow does not necessarily even require another existing cluster instance. The data can be cloned providing it was backed up to an available Local FS or an Amazon S3 location.
This procedure steps you through the basic required selections in each of the three restore dialogs presented during the workflow.
- Ensure the source and target datacenter names and topology are identical. See Managing datacenter topologies and Cloning cluster data.
- Ensure the encryption keys are identical when cloning encrypted tables to a different cluster.
Prerequisites
- Restoring a snapshot that contains only the system keyspace is not allowed. There must be both system and non-system keyspaces, or only non-system keyspaces in the snapshot you want to restore.
- Restoring a snapshot that does not contain a table definition is not allowed.
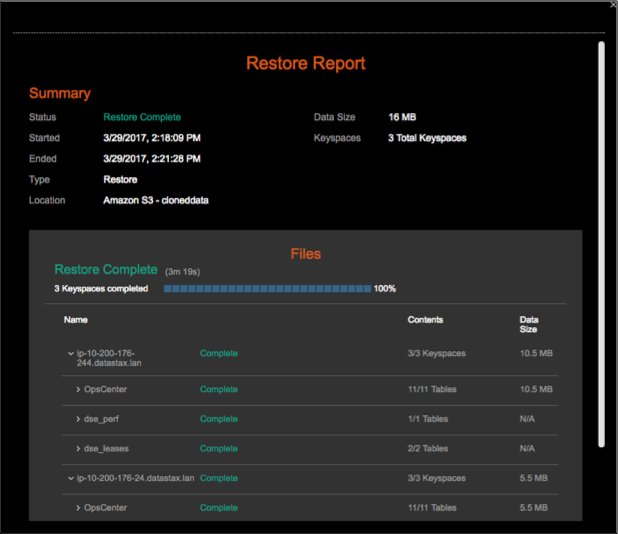
- Restoring a snapshot to a location with insufficient disk space fails. The Restore Report indicates which nodes do not have sufficient space and how much space is necessary for a successful restore. For more information and tips for preventative measures, see Monitoring sufficient disk space for restoring backups.
Procedure
- Click the target .
- Click the Details link for the Backup Service.
- In the Activity tab, click Restore Backup.
-
Click the Other Location tab.
The Step 1 of 3: Select Backup Restore from Backup dialog appears.
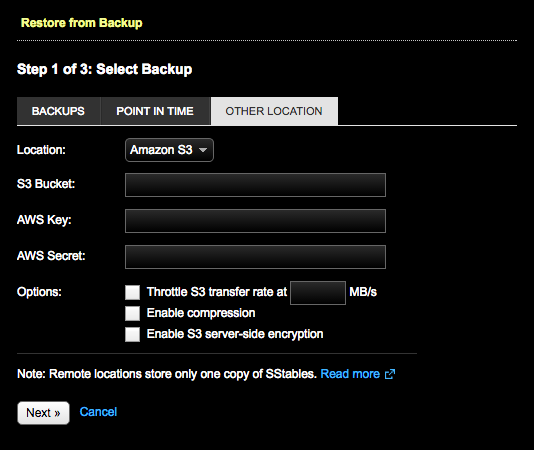
- Select the Location. Available options are:
-
If the location is Amazon S3:
- Enter the S3 Bucket name.
- Enter your AWS credentials in AWS Key and AWS Secret.
- If the location is Local FS, enter the Path to the backups.
-
Click Next.
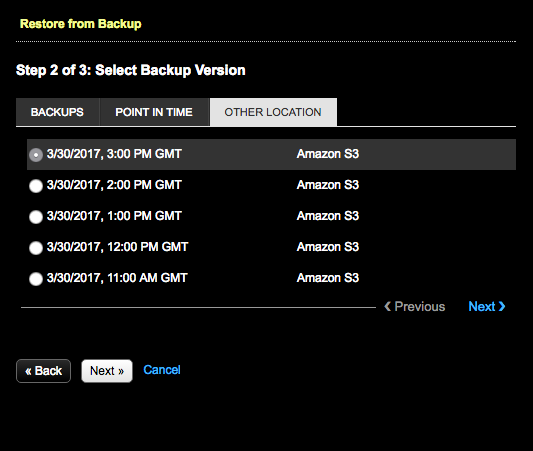
The Step 2 of 3: Select Backup Version dialog appears populated with the available backups at the selected location. For more, see Adding an Amazon S3 backup location.
-
Select the backup to restore and click Next.
The Step 3 of 3: Configure and Restore dialog appears.

-
In Keyspaces and Graphs, select the tables or graphs
included in the backup you want to restore.
- Click the keyspace name to include all the tables in the keyspace. Click All Keyspaces to restore all the keyspaces. To select only specific tables, expand the keyspace name and select the tables.
- Click the graph name to include all the graphs in the keyspace. Click All Graphs to restore all the keyspaces. To select only specific graphs, expand All Graphs and select the graph keyspaces.
- In the Location list, select the cluster to clone the data to.
- When cloning data, it is not necessary to select the Truncate/delete existing data before restore option because it is a no-op for a cloning workflow. The truncate option purges data on a target before a restore runs. When using the restore feature to clone, the truncate option does not do anything because there is no data to purge before the restore runs.
- To prevent overloading the network, set a maximum transfer rate for the restore. Select Throttle DSE stream throughput at ____ MB and set the maximum MB per second.
- Optional:
Change the staging directory if necessary by setting the
backup_staging_directoryconfiguration option in address.yaml. -
Click Restore Backup.
The Confirm Restore dialog appears.
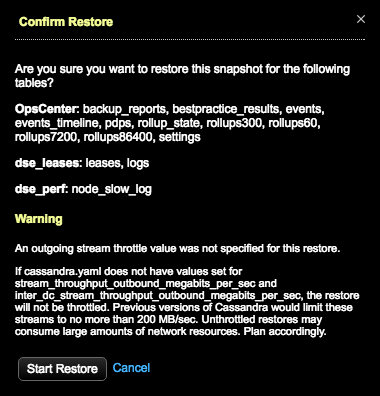 Warning: If a value was not set for throttling stream output, a warning message indicates the consequences of unthrottled restores. Take one of the following actions:
- Click Cancel and set the throttle value in the Restore from Backup dialog.
- Set the
stream_throughput_outbound_megabits_per_secandinter_dc_stream_throughput_outbound_megabits_per_secvalues in cassandra.yaml. - Proceed anyway at the risk of creating network bottlenecks.
Tip: If you are using LCM to manage DSE cluster configuration, update Cluster Communication settings in cassandra.yaml in the config profile for the cluster and run a configuration job. Stream throughput (not inter-dc) is already set to 200 in LCM defaults.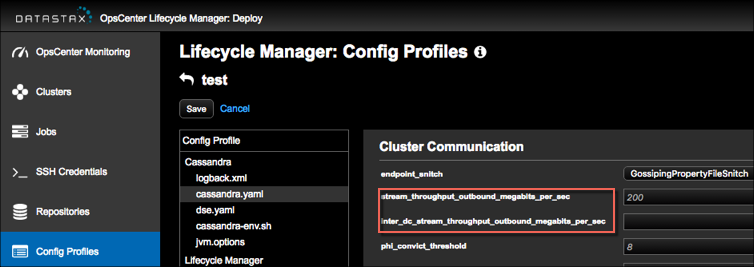
-
Review the information to determine what adjustments if any need to be made to
the current schema:
- To rectify the schema issues and try the restore again afterward, click Cancel.
- To proceed despite the schema mismatch, click Continue
Restore.Warning: Attempting to restore a backup with an incompatible schema might result in corrupt or inaccessible data. Before forcing the restore, back up your current data.
Results