Add an Amazon S3 backup location
Add an Amazon S3 or S3-compatible backup location. For more details, see Back up to Amazon S3 and the Amazon S3 transfer acceleration documentation.
|
Prerequisites
-
Locate the
cluster_name.confconfiguration file. The location of this file depends on the type of installation:-
Package installations:
/etc/opscenter/clusters/cluster_name.conf -
Tarball installations:
INSTALL_DIRECTORY/conf/clusters/cluster_name.conf
-
-
Ensure Java 8 is installed on the same machine where the DataStax Agent is running. Agents require Java 8 to store at an S3 location.
-
Make sure you have the proper AWS IAM privileges for the AWS account that the S3 bucket is linked to.
-
Ensure that the selected Amazon S3 bucket meets the Amazon S3 bucket requirements.
|
The AWS credentials and bucket names are stored in |
Add S3 location
-
Access the Create or Edit Backup dialog.
-
In the Create or Edit Backup dialog, under Location, click +Add Location.
-
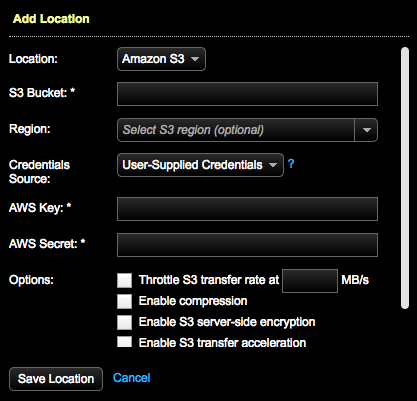
Select Amazon S3 or S3 Compatible as the backup Location.
-
Enter the location of the S3 bucket so that OpsCenter can locate it:
-
Amazon S3: Enter the Region where the S3 bucket is located. If blank, OpsCenter will try to query S3 for the bucket region or use the
remote_backup_regionas a default. Some regions, such as China (Beijing), require a region to be specified and cannot be queried. -
S3 Compatible: Enter a URL that points to an S3 Endpoint. For example,
mys3endpoint:9000.
-
-
Enter the S3 Bucket name.
The bucket name must be at least 4 characters long. Bucket names must only contain lowercase letters, numbers, and hyphens. Additionally, OpsCenter requires that bucket prefixes contain only lowercase letters, numbers, and safe characters. See the S3 guidelines for more details about bucket naming restrictions.
To indicate a bucket subfolder location, delineate the bucket name from the folder name with a forward slash (/) character. For example:
mybucket/myfolder/mysubfolder. Slashes are not allowed within bucket or folder names themselves. -
Select the source type of your AWS credentials.
The AWS credentials and bucket names are stored in
cluster_name.confwith the exception of ad hoc backups. Be sure to use proper security precautions to ensure that this file is not readable by unauthorized users.-
User-Supplied Credentials: Enter your AWS Key and AWS Secret.
-
AWS Credential Provider chain: Use the default credential provider chain to locate AWS credentials. See Working with AWS Credentials on the AWS website.
-
-
Select any throttling, compressing, encryption, or acceleration of the data. For S3 Compatible backups, Throttle S3 transfer rate is the only option available.
-
To avoid saturating your network, set a maximum upload rate. Select Throttle transfer rate and set the maximum MB per second.
When the AWS CLI feature is enabled, the S3 throttle is ignored. A tooltip also mentions this current limitation. See Tune throttling when using AWS CLI.
-
To compress the backup data, select Enable compression. Compression reduces the amount of data going through your network and reduces the disk and data usage but increases the CPU load for the server.
-
To enable server-side S3 encryption, select Enable S3 server-side encryption. Enabling server-side encryption increases the security of your backup files, but increases the time it takes to complete a backup. For more information on S3 server-side encryption, see Using Server Side Encryption on the AWS website.
Choose the type of encryption you want to use:
-
256-bit Advanced Encryption Standard: SSE-S3 encryption encrypts each file in the backup set with a unique key, including the key itself, using a 256-bit AES cypher.
-
KMS Managed Encryption: SSE-KMS encryption uses customer master keys (CMKs) to encrypt Amazon S3 objects.Enter a KMS Key ID that is associated with your AWS account.
-
-
To back up nodes running in multiple regions to a single bucket, select Enable S3 transfer acceleration. Instead of traffic crossing over the internet, acceleration mode uses Amazon CloudFront to cache S3 requests. Because the CloudFront servers are closer to the nodes in each region, the backup latency is reduced.
Enabling S3 transfer acceleration can cause performance degradation, and might slow a standard backup configuration. Use this option only if backing up nodes in multiple regions to a single bucket.
-
-
Optional: For scheduled backups, indicate how long the snapshot data should be retained by selecting a Retention Policy. Retain All (default) saves the snapshot data indefinitely. Or, define a set period of time. After the snapshot data is older than the time set in Retention Policy, the snapshot data is deleted.
DataStax strongly recommends setting a retention policy to periodically remove backups. This practice helps to avoid long-term performance issues caused by an excessive number of backups.
Setting a Retention Policy is not available for an ad hoc (Run Now) backup.
-
Click Save Location.
The S3 location is added to the Location pane of the Create or Edit Backup dialog.

Click the edit icon to the edit a location and its retention policy.
Click the delete icon to delete a location. The
On Serverlocation cannot be deleted. -
Click Save Backup or Create Backup as applicable.
Bulk upload S3 backups using the AWS CLI
Use the AWS CLI instead of the AWS SDK when bulk loading backups to Amazon S3 locations. Using the AWS CLI rather than the AWS SDK can result in a performance increase, with a noticeable decrease in the time it takes to complete a backup.
This feature is available in OpsCenter versions 6.1.3 and later as an OpsCenter Labs feature. As of OpsCenter version 6.5 and later, the AWS CLI feature is officially a production feature.
For more information, see AWS CLI in the Amazon documentation.
When the AWS S3 CLI is enabled, the S3 throttling setting is ignored by OpsCenter during backups. See Tune throttling when using AWS CLI.
-
Install the AWS CLI package on every node. DataStax recommends using the Amazon bundled installer method and upgrading to the latest version of AWS CLI if it is already installed. See Install the AWS CLI using the bundled installer in the Amazon documentation for installation procedures.
As a recommended best practice for OpsCenter, install the AWS CLI bundle using APT as follows:
sudo apt-get install -y unzipcurl 'https://s3.amazonaws.com/aws-cli/awscli-bundle.zip' -o awscli-bundle.zipunzip awscli-bundle.zipsudo ./awscli-bundle/install -i /usr/local/aws -b /usr/local/bin/awsRegardless of the install procedure used, make sure that the AWS CLI package is installed in the PATH of the
cassandrauser, or whichever user the DataStax Agent runs as. -
Add an S3 location for backups if you haven’t done so already.
-
Edit the relevant configuration files, depending on your infrastructure:
-
Set agent options through the cluster configuration file (
cluster_name.conf) to set the corresponding property inaddress.yamlon every node. This file is located at/etc/opscenter/clusters/cluster_name.conforINSTALL_DIRECTORY/conf/clusters/cluster_name.conf. -
To configure the setting for all clusters managed by an OpsCenter instance, edit
opscenterd.conf. This file is located at/etc/opscenter/opscenterd.conforINSTALL_DIRECTORY/conf/opscenterd.conf. -
If your environment requires configuring at the node level, edit
address.yamlfor each node that requires a specific configuration override. This file is located at/var/lib/datastax-agent/conf/address.yamlorINSTALL_DIRECTORY/conf/address.yaml.
-
-
Add the following configuration option:
[backups] use_s3_cli = True -
Save the configuration file or files.
-
If you made changes to
address.yaml, restart the agents.
Tune throttling when using AWS CLI
Use alternative throttle options when using the AWS CLI for bulk uploads because the OpsCenter S3 throttle is ignored when the OpsCenter AWS CLI for S3 feature is enabled.
-
Adjust the
max_concurrent_requestsavailable in the AWS SDK. Refer to the AWS CLI S3 configuration documentation for details. -
If necessary, use a tool such as Trickle to limit bandwidth.
