Adding an Amazon S3 backup location
Add an Amazon S3 backup location. Set a retention policy for the backup location.
Add an Amazon S3 backup location. For more details, see backing up to Amazon S3 and the Amazon S3 transfer acceleration documentation.
cluster_name.conf
The location of the cluster_name.conf file depends on the type of installation:- Package installations: /etc/opscenter/clusters/cluster_name.conf
- Tarball installations: install_location/conf/clusters/cluster_name.conf
Prerequisites
- Ensure Java 8 is installed on the same machine where DataStax Agents are running. Agents require Java 8 to store at an S3 location.
- Make sure you have the proper AWS IAM privileges for the AWS account that the S3 bucket is linked to.
- Ensure that the selected Amazon S3 bucket meets the Amazon S3 bucket requirements.
Procedure
- Access the Create (or Edit) Backup dialog:
-
In the Create or Edit Backup dialog, under
Location, click +Add
Location.
The Add Location dialog appears.
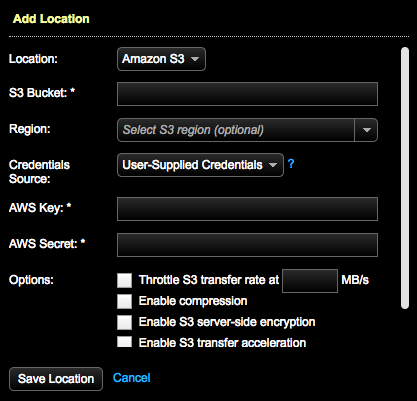
- Select Amazon S3 as the backup Location.
-
Enter the S3 Bucket name.
Note: The bucket name must be at least 4 characters long. Bucket names must only contain lowercase letters, numbers, and hyphens. Additionally, OpsCenter requires that bucket prefixes contain only lowercase letters, numbers, and safe characters. See the S3 guidelines for more details about bucket naming restrictions.Tip: To indicate a bucket subfolder location, delineate the bucket name from the folder name with a forward slash (/) character. Example: mybucket/myfolder/mysubfolder. Remember that slashes are not allowed within bucket or folder names themselves.
-
Enter the Region where the S3 bucket is located so that
OpsCenter can locate it.
If blank, OpsCenter will try to query S3 for the bucket region or use the
remote_backup_regionas a default.Note: Some regions, such as China (Beijing), require a region to be specified and cannot be queried. -
Select the source type of your AWS credentials.
Warning: The AWS credentials and bucket names are stored in cluster_name.conf (with the exception of ad hoc backups). Be sure to use proper security precautions to ensure that this file is not readable by unauthorized users.
Option Description User-Supplied Credentials Enter your AWS Key and AWS Secret. AWS Credential Provider chain Use the default credential provider chain to locate AWS credentials. See Working with AWS Credentials on the AWS website. - Optional:
Select any throttling, compressing, or encryption of the data:
- Optional:
For scheduled backups, indicate how long the snapshot data
should be retained by selecting a Retention
Policy. Retain All (default) saves the
snapshot data indefinitely. Or, define a set period of time. After the snapshot
data is older than the time set in Retention Policy, the snapshot data is
deleted.
DataStax strongly recommends setting a retention policy to periodically remove backups. This practice helps to avoid long-term performance issues caused by an excessive number of backups.
Note: Setting a Retention Policy is not available for an ad hoc (Run Now) backup. -
Click Save Location.
The newly added S3 location displays in the Location pane of the Create or Edit Backup dialog.
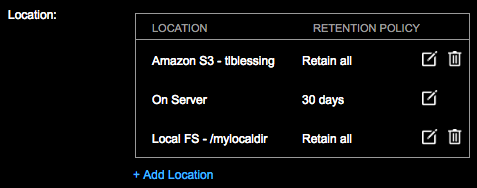
Click the edit icon to the edit a location and its retention policy if applicable. Click the delete icon to delete a location. The On Server location cannot be deleted.
- Click Save Backup, or Create Backup as applicable.