Restoring from a backup
Restore data from a previously completed backup run from OpsCenter.
Restore data from supported backups that have been run by OpsCenter. You cannot use the OpsCenter Backup Service to restore from snapshots run with nodetool. You can pick any subset of tables that exist in the snapshot to restore.
Prerequisites
- To restore encrypted backups, the DataStax agent must be granted password-less
sudo access on the DataStax Enterprise nodes. This access
has already been granted if you used OpsCenter to install the DataStax agents.
If you are running the agent as a different user than
the default and need to restore encrypted tables, you must manually restore the
system_keytable. - When restoring tables that are Solr cores, if the table does not already exist, it will be automatically re-created as a CQL table. If you require this to be a thrift-based table, manually recreate the table prior to restoring. If you are restoring data from a thrift table that no longer exists, you are responsible for creating the table prior to restoring.
- Restoring a snapshot that contains only the system keyspace is not allowed. There must be both system and non-system keyspaces, or only non-system keyspaces in the snapshot you want to restore.
- Restoring a snapshot that does not contain a table definition is not allowed.
- Restoring a snapshot to a location with insufficient disk space fails. The Restore Report indicates which nodes do not have sufficient space and how much space is necessary for a successful restore. For more information and tips for preventative measures, see Monitoring sufficient disk space for restoring backups.
- OpsCenter does not back up indexes. Therefore, DSE must recompute the indexes after a restore.
Procedure
- Click .
- Click the Details link for the Backup Service.
-
In the Activity tab, click Restore
Backup.
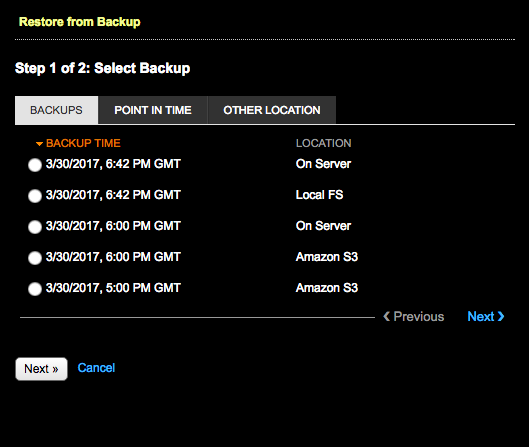
The Restore from Backup dialog appears.
-
Select the tab that correlates to the type of backup to restore.
- Select the keyspace to restore from the Backups tab. The list includes both scheduled and manual backups.
- Select Other Location to restore from a location
not listed in the Backups tab.
Selecting a backup from Other Location is most commonly used when cloning a cluster, but can be used when this OpsCenter instance is not aware of the backup location.
- To restore to a certain point in time, select the Point In Time tab and follow the steps in Restoring a backup to a specific point-in-time.
-
Click Next.
The Restore from Backup, Step 2 of 2: Configure and Restore dialog appears.
-
In Keyspaces and Graphs, select the tables or graphs you
want to restore.
- Click All Keyspaces or All Graphs to restore all keyspaces or all graphs.
- Click the keyspace name or graph name to include all tables or all graphs in the keyspace.
- To select specific tables or graphs, expand the keyspace name or graph name and select the specific tables or graphs to back up.
Note: For DSE 6.0.0-6.0.4, when restoring a DSE Graph backup without selecting Use sstableloader, DSE must be restarted to ensure all data is available. -
Under Location, select the target cluster for the
restored data.
- The Location list is only available when there are multiple clusters and both clusters are managed by the same instance of OpsCenter.
- If you select a different cluster than the one that was backed up, the data is cloned to the selected cluster. See cloning cluster data.
Note: Restoring encrypted tables to a different cluster does not work unless the encryption keys are identical, which is typically not the case. - Optional:
To remove the existing keyspace data before the data is restored, select
Truncate/delete existing data before restore. This
completely removes any updated data in the cluster for the keyspaces you are
restoring.
Note: Choosing to not truncate or delete existing data can be selected only when sstableloader is used for the restore. If not using sstableloader, truncating or deleting existing data is selected by default.
-
To prevent overloading the network, set a maximum
transfer rate for the restore using the Throttle DSE stream
throughput at ____ MB option.
Note: To enter a value for this option, you must select Use sstableloader. Otherwise, the transfer rate value is ignored.
- Optional:
To bulk load external data into a cluster, select Use
sstableloader.
Important: OpsCenter 6.7.5 and earlier cannot execute a restore that bypasses
sstableloaderfor DataStax Enterprise (DSE) 6.7.6 and later, DSE 6.0.11 and later, and DSE 5.1.17 and later. This issue is caused by an OpsCenter check that cannot validate the SSTable format change in DSE 6.7.6. To restore data on a cluster from a DSE backup with the new SSTable format, select Use sstableloader when restoring data or upgrade to OpsCenter 6.7.6 or later. (OPSC-16237)Note: Using sstableloader restores data to a cluster regardless of its original topology, at the expense of speed and performance. Restoring to a cluster that uses tiered storage requires using sstableloader. See sstableloader for details.When restoring from a backup, OpsCenter might report that the restore was successful, even if it failed. This behavior can occur when copying SSTables into the new data directories and running
nodetool refreshafterward. To determine whether the restore failed, search the DataStax Agent logs for a string indicating"Error copying sstables to data dir:". This issue is present only in OpsCenter 6.7.0. - Optional:
If necessary, change the staging directory by setting the
backup_staging_directoryconfiguration option in address.yaml. -
Click Restore Backup.
The Confirm Restore dialog appears.
 Warning: If a value was not set for throttling stream output, a warning message indicates the consequences of unthrottled restores. Take one of the following actions:
- Click Cancel and set the throttle value in the Restore from Backup dialog.
- Set the
stream_throughput_outbound_megabits_per_secandinter_dc_stream_throughput_outbound_megabits_per_secvalues in cassandra.yaml. - Proceed anyway at the risk of creating network bottlenecks.
Tip: If using LCM to manage DSE cluster configuration, update Cluster Communication settings in cassandra.yaml in the configuration profile for the cluster and run a configuration job. Stream throughput (not inter-dc) is set to 200 in LCM defaults.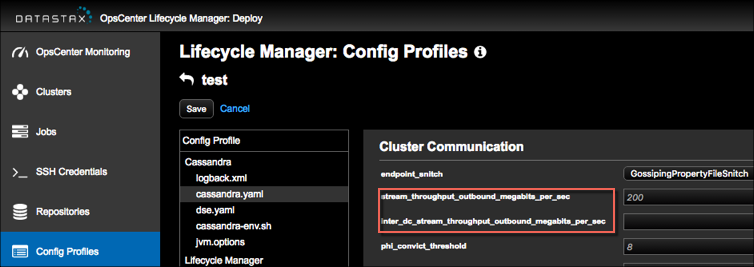
-
Click Start Restore to confirm the restore.
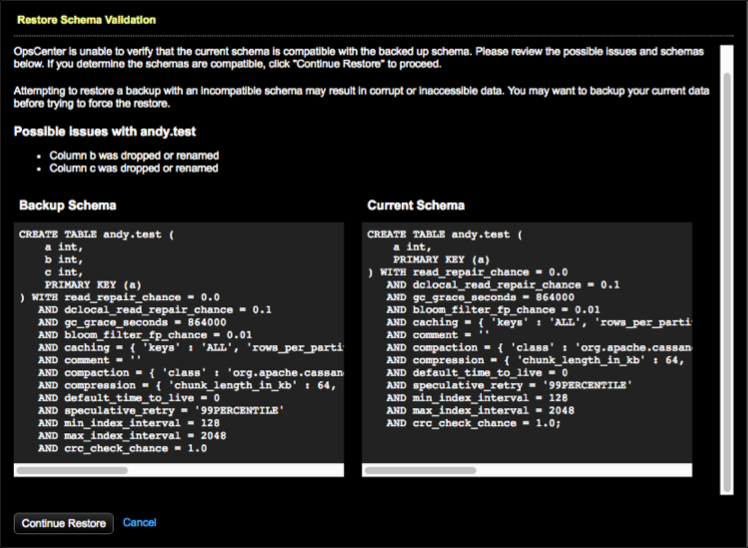
If the pre-restore checks detected schema differences that could not automatically be validated, the Restore Schema Validation dialog appears. Possible issues are listed and a comparison of the backup and current schema are presented side-by-side.
-
Review the information to determine if adjustments or corrections to the
current schema are required :
- To correct schema issues, click Cancel, rectify the issues, and try the restore again.
- To proceed despite the schema mismatch, click Continue
Restore.Warning: Attempting to restore a backup with an incompatible schema might result in corrupt or inaccessible data. Before forcing the restore, back up your current data.
Results
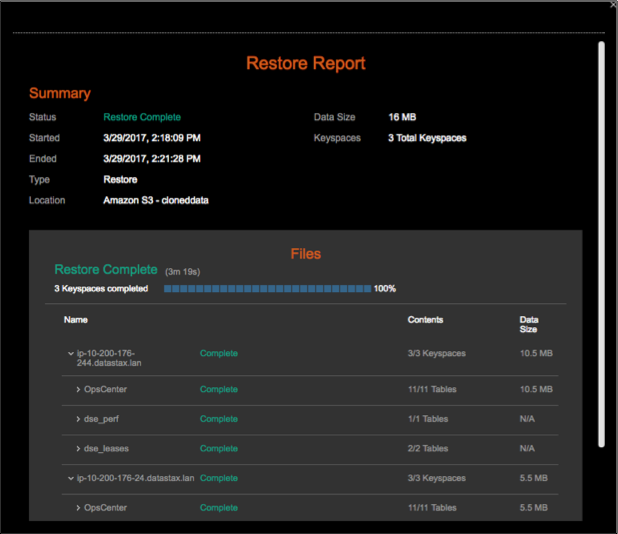
After the restore starts, the Restore Report displays detailed information about the progress and status of the restore. The Restore Report dialog can be closed at any time without impacting the restore process. Reopen the report by clicking on the In Progress restore in the Activity tab. View the Restore Report for any completed restore by clicking on the restore of interest in the Activity tab.
If there is insufficient disk space to restore the backup, the restore fails. See Monitoring sufficient disk space for restoring backups.