Adding an existing cluster

Add an existing DataStax Enterprise cluster to manage using OpsCenter. Install agents on the cluster nodes automatically.

Add an existing DataStax Enterprise cluster to manage within OpsCenter. After you add the cluster to OpsCenter, you can import the cluster into Lifecycle Manager to centrally manage the cluster topology and configuration.
Note: If configuration encryption is active, OpsCenter automatically encrypts the sensitive fields such as passwords and writes the encrypted values to the configuration files. Do not enter manually encrypted values in the password fields.

If commitlog archiving is enabled on a cluster, OpsCenter does not automatically enable commitlog archiving on the new nodes when adding new nodes to a cluster using Lifecycle Manager. If you add nodes to a cluster and commitlog archiving is enabled, you must manually copy commitlog_archiving.properties to the new nodes prior to starting DataStax Enterprise, or re-enable commit log archiving.

Procedure

  1. Click New Cluster from the OpsCenter monitoring main menu.
    The New Cluster prompt appears.

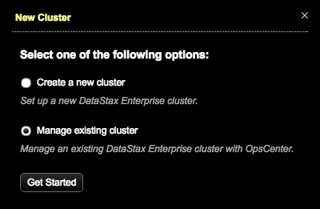
  2. Click Manage Existing Cluster and Get Started.
    The Connect to Existing Cluster dialog appears.


  3. Enter at least one hostname or IP address for a node in the cluster.
    
    ec2-123-45-6-789.us-west-1.compute.amazonaws.com
    ec2-234-56-7-890.us-west-1.compute.amazonaws.com
    
  4. If you are not using the default JMX or Native Transport ports, enter the appropriate port numbers.
  5. If required, click Add Credentials and enter the username and password for JMX or Native Transport ports.
  6. Optional: If applicable to your environment, select DSE security (kerberos) is enabled on my cluster and complete the following fields:
    1. Enter the service name. For example, if the server principal on your nodes is dse/nodeX.example.com@EXAMPLE.COM, this field should be dse.
    2. Enter the client principal for the OpsCenter process/machine to use. Example: opscenterd@YOUR_REALM.
    3. Enter the location of the keytab OpsCenter machine, which contains credentials for the opscenter_client_principal.
    4. Enter the client principal for the DataStax Agent process/machine to use. Example: agent@YOUR_REALM.
    5. Enter the location of the keytab on the DataStax Agent machines, which contains credentials for the agent_client_principal. Example: /path/to/keytab.keytab.

    For more information, see Authenticating with Kerberos and the Kerberos tutorial in the DataStax Enterprise documentation.

  7. Optional:
    Note: For more information, see Enabling client-to-node encrpytion in OpsCenter
    Select Client-to-node encryption is enabled on my cluster. Enter the following for OpsCenter to use to directly connect to Cassandra:
    • If the paths are the same for the OpsCenter Keystore and Truststore (default), select My Keystore and Truststore are the same and enter the path and password.
    • If the paths are not the same, enter the OpsCenter Keystore Path, Truststore Path, and the corresponding Password for each.
  8. Click Next.
    The Set Up Agents dialog appears.

    Install Agents automatically or manually dialog

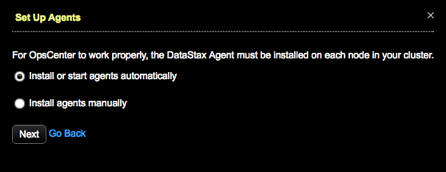
  9. Install or start agents automatically is selected by default. Click Next.
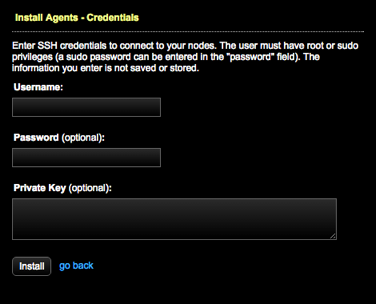
    If your environment requires manual installation of agents, click Install agents manually. Click the link to access the instructions for manually installing agents.
    The Install Agents - Credentials dialog appears.

    Install Agents - Credentials dialog for connecting to nodes

  10. Enter SSH credentials to connect to your nodes:
    1. Required: Enter a Username. The user must have root or sudo privileges.
    2. Optional: A sudo password can be entered in the Password box.
    3. Optional: Enter a Private Key.
    No information entered in the Install Agents - Credentials dialog is saved or stored.
  11. Click Install. The Agents tab opens and displays the progress of the agent installation.