A deployment scenario for a Cassandra cluster with a single datacenter.
This topic contains information for deploying a Cassandra cluster with a single
datacenter. If you're new to Cassandra, and haven't set up
a cluster, see Planning and testing cluster
deployments.
Prerequisites
Each node must be correctly configured before starting the cluster.
You must determine or perform the following before starting the cluster:
This example describes installing a 6 node cluster spanning 2 racks in a single datacenter. Each node is already configured to use the GossipingPropertyFileSnitch and 256 virtual nodes (vnodes).
In Cassandra, "datacenter" is synonymous with "replication
group". Both terms refer to a set of nodes configured as a group for replication
purposes.
Procedure
-
Suppose you install Cassandra on these nodes:
node0 110.82.155.0 (seed1)
node1 110.82.155.1
node2 110.82.155.2
node3 110.82.156.3 (seed2)
node4 110.82.156.4
node5 110.82.156.5
Note: It is a best practice to have more than one seed node per datacenter.
-
If you have a firewall running in your cluster, you must open certain ports for
communication between the nodes. See Configuring firewall port access.
-
If Cassandra is running, you must stop the server and clear the data:
Doing this removes the default cluster_name (Test
Cluster) from the system table. All nodes must use the same cluster
name.
-
Stop Cassandra:
sudo service dse stop #Stops DataStax Enterprise
-
Clear the data:
sudo rm -rf /var/lib/cassandra/data/system/*
-
Stop Cassandra:
ps auwx | grep dse #Stops DataStax Enterprise
$ sudo  kill pid
-
Clear the data:
sudo rm -rf /var/lib/cassandra/data/data/system/*
-
Set the properties in the file
for each node:
Note: After making any changes in the cassandra.yaml file,
you must restart the node for the changes to take effect.
Properties to set:
- cluster_name:
- num_tokens:
recommended value: 256
- -seeds:
internal IP address of each seed node
In new
clusters. Seed nodes don't perform bootstrap (the process
of a new node joining an existing cluster.)
- listen_address:
If the node is a seed node, this address must match an IP address
in the seeds list. Otherwise, gossip communication fails because
it doesn't know that it is a seed.
If not set, Cassandra
asks the system for the local address, the one associated with
its hostname. In some cases Cassandra doesn't produce the
correct address and you must specify the
listen_address.
- rpc_address:listen address for client
connections
- endpoint_snitch:
name of snitch (See endpoint_snitch.) If you are changing snitches, see
Switching snitches.
- auto_bootstrap: false (Add this setting only
when initializing a clean node with no data.)
Note: If the nodes in the cluster are identical in terms of disk layout, shared
libraries, and so on, you can use the same
cassandra.yaml file on all of them.
Example:
cluster_name: 'MyCassandraCluster'
num_tokens: 256
seed_provider:
  - class_name: org.apache.cassandra.locator.SimpleSeedProvider
    parameters:
         - seeds: "110.82.155.0,110.82.155.3"
listen_address:
rpc_address: 0.0.0.0
endpoint_snitch: GossipingPropertyFileSnitch
If rpc_address is set to a wildcard address
(0.0.0.0), then broadcast_rpc_address
must be set, or the service won't even start.
-
In the cassandra-rackdc.properties file, assign the datacenter and rack names you determined in the Prerequisites. For example:
# indicate the rack and dc for this node
dc=DC1
rack=RAC1
-
The
GossipingPropertyFileSnitch always loads
cassandra-topology.properties when that
file is present. Remove the file from each node on any new cluster
or any cluster migrated from the
PropertyFileSnitch.
-
After you have installed and configured Cassandra on all nodes, DataStax
recommends starting the seed nodes one at a time, and then starting the rest of
the nodes.
Note: If the node has restarted because of automatic restart, you must first
stop the node and clear the data directories, as described
above.
Package
installations:
sudo service dse start #Starts DataStax Enterprise
Tarball
installations:
cd install_location
$ bin/dse cassandra #Starts DataStax Enterprise
-
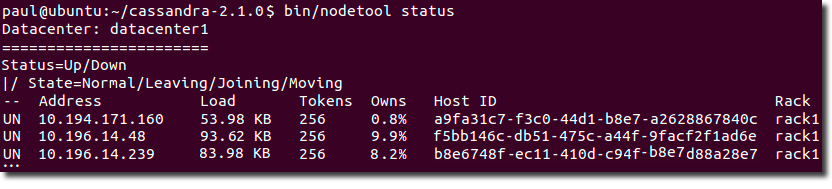
To check that the ring is up and running, run:
Package
installations:
nodetool status
Tarball
installations:
cd install_location
$ bin/nodetool status
The output should list each node, and show its status as
UN (Up Normal).
The location of the
cassandra.yaml file depends on the type of installation:
| DataStax Enterprise 5.0 Installer-Services and package installations |
/etc/dse/cassandra/cassandra.yaml |
| DataStax Enterprise 5.0 Installer-No Services and tarball installations |
install_location/resources/cassandra/conf/cassandra.yaml |
| Cassandra package installations |
/etc/cassandra/cassandra.yaml |
| Cassandra tarball installations |
install_location/resources/cassandra/conf/cassandra.yaml |
 The location of the cassandra.yaml file depends on the type of installation: