Get started with the Starlight for RabbitMQ extension
The Starlight for RabbitMQ extension enables RabbitMQ protocol support for Apache Pulsar™.
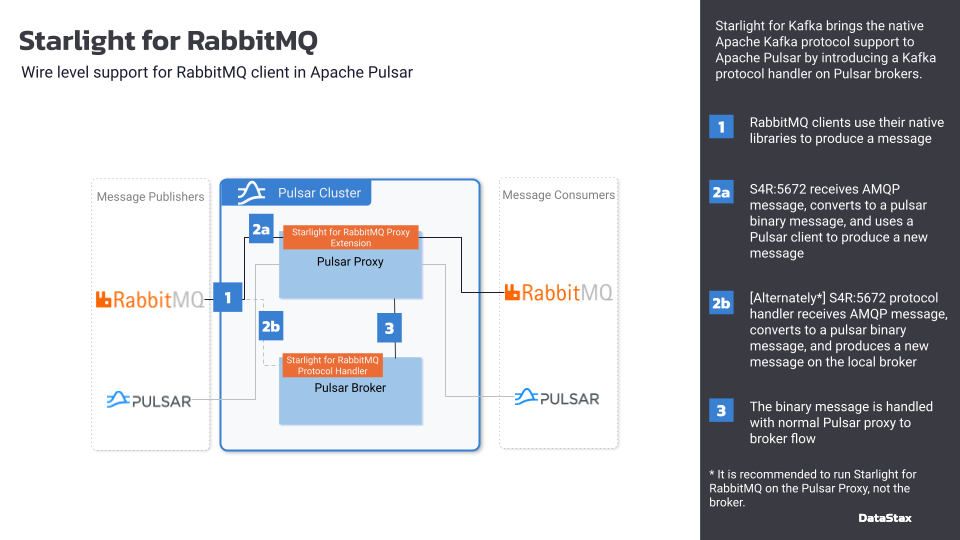
The extension acts as a proxy between your RabbitMQ application and Pulsar cluster. It implements the AMQP 0.9.1 protocol used by RabbitMQ clients and translates AMQP frames and concepts to Pulsar concepts.
Deployment options for Starlight for RabbitMQ
There are several ways to run Starlight for RabbitMQ:
- Pulsar pluggable protocol handler
-
Deploying Starlight for RabbitMQ in the broker as a protocol handler means that you don’t need to deploy another runtime. However, the resources used by Starlight for RabbitMQ to handle traffic can have an impact on the load balancing algorithms used by Pulsar.
By adding the Starlight for RabbitMQ protocol handler to your Pulsar cluster, you can migrate your existing RabbitMQ applications and services to Pulsar without modifying the code.
- Pulsar Proxy extension
-
Deploying Starlight for RabbitMQ in the Pulsar Proxy as a proxy extension means that you don’t need to deploy another runtime if you already use the Pulsar Proxy. Additionally, there is no significant impact on the Pulsar Proxy’s performance. Proxy extensions require Pulsar version 2.9 or later.
- Standalone Java application
-
Running Starlight for RabbitMQ as a standalone Java application has the advantage of not impacting the resources used by the Pulsar cluster but on the other hand you need to deploy and manage the lifecycle of an additional runtime.
The deployment options you can use depend on your Pulsar deployment.
Deploy on Astra Streaming
When you enable Starlight for RabbitMQ in Astra Streaming, it is deployed as a protocol handler in the Pulsar cluster. Because Astra Streaming manages the Pulsar cluster for you, you cannot use the other Starlight for RabbitMQ deployment options.
The following steps explain how to enable the Starlight for RabbitMQ protocol handler in an Astra Streaming Pulsar cluster, and then get the connection details for your RabbitMQ client:
-
In the Astra Portal header, click Applications, and then select Streaming.
-
Create a tenant or click the name of an existing tenant.
-
Go to your tenant’s Connect tab, select RabbitMQ, and then click Enable RabbitMQ.
-
Review the information about the Starlight for RabbitMQ extension, and then click Enable RabbitMQ to confirm that you want to enable this extension on your tenant.
This action creates a configuration file and a
rabbitmqnamespace in your Astra Streaming tenant automatically.The
rabbitmqnamespace is required for the Starlight for RabbitMQ extension to function properly. It is a permanent namespace that cannot be removed except by deleting the entire tenant and all of its data. -
Save the RabbitMQ connection details to a file named
rabbitmq.conf. The actual values depend on your Astra Streaming tenant’s configuration and cloud provider.rabbitmq.confusername: TENANT_NAME password: masked host: rabbitmq-PROVIDER-REGION.streaming.datastax.com port: 5671 virtual_host: TENANT_NAME/rabbitmq amqp_URI: masked@rabbitmq-PROVIDER-REGION.streaming.datastax.com:5671/TENANT_NAME/rabbitmqThe
passwordand first part of theamqp_URIare masked with asterisks (*).In Astra Streaming, if you click Download or Copy, then a Pulsar token is included in the
passwordfield automatically. You can also generate a token on your tenant’s Settings tab. -
To test your Starlight for RabbitMQ deployment and connect a RabbitMQ client, see Produce and consume messages with Starlight for RabbitMQ.
Deploy a protocol handler on IBM Elite Support for Apache Pulsar or a self-managed Pulsar cluster
|
IBM Elite Support for Apache Pulsar was formerly DataStax Luna Streaming. |
You can embed Starlight for RabbitMQ directly into the Pulsar brokers by loading it as a protocol handler using a nar file:
-
Download the Starlight for RabbitMQ
tarfile from the Starlight for RabbitMQ GitHub repository. -
Extract the files from the
tar:tar xvfz starlight-rabbitmq-VERSION-all.tar.gz -
Copy the
starlight-rabbitmq-VERSION.narfile, which is used to run Starlight for RabbitMQ as a protocol handler, to the appropriate directory in your Pulsar broker installation directory, such as the/protocolsdirectory. -
Create or edit a Pulsar broker configuration file, such as
broker.conforstandalone.conf. -
Set the Starlight for RabbitMQ protocol handler configuration. For example, if the
narfile is in the./protocolsdirectory:broker.confmessagingProtocols=rabbitmq protocolHandlerDirectory=./protocols -
Set the AMQP service listeners. For example:
broker.confamqpListeners=amqp://127.0.0.1:5672 advertisedAddress=127.0.0.1The hostname value in
amqpListenersis the same as Pulsar broker’sadvertisedAddress. -
Start the Pulsar broker.
-
To test your Starlight for RabbitMQ deployment and connect a RabbitMQ client, see Produce and consume messages with Starlight for RabbitMQ.
Deploy a proxy extension on IBM Elite Support for Apache Pulsar or a self-managed Pulsar cluster
|
IBM Elite Support for Apache Pulsar was formerly DataStax Luna Streaming. |
You can embed Starlight for RabbitMQ into the Pulsar Proxy by loading it as a proxy extension:
-
Download the Starlight for RabbitMQ
tarfile from the Starlight for RabbitMQ GitHub repository. -
Extract the files from the
tar:tar xvfz starlight-rabbitmq-VERSION-all.tar.gz -
Copy the
starlight-rabbitmq-VERSION.narfile, which is used to run Starlight for RabbitMQ as a proxy extension, to the appropriate directory in your Pulsar Proxy installation directory, such as the/proxyextensionsdirectory. -
Create or edit a Pulsar Proxy configuration file, such as
proxy.conf. -
Set the Starlight for RabbitMQ proxy extension configuration. For example, if the
narfile is in the./proxyextensionsdirectoryproxy.confproxyExtensions=rabbitmq proxyExtensionsDirectory=./proxyextensions -
Set the AMQP service listeners. For example:
proxy.confamqpListeners=amqp://127.0.0.1:5672 advertisedAddress=127.0.0.1The hostname value in listeners is the same as Pulsar proxy’s
advertisedAddress. -
Start the Pulsar proxy.
-
To test your Starlight for RabbitMQ deployment and connect a RabbitMQ client, see Produce and consume messages with Starlight for RabbitMQ.
Deploy a standalone Java application on IBM Elite Support for Apache Pulsar or a self-managed Pulsar cluster
|
IBM Elite Support for Apache Pulsar was formerly DataStax Luna Streaming. |
You can run Starlight for RabbitMQ as a standalone Java application.
The jar file for running Starlight for RabbitMQ as a standalone Java application is available in the Starlight for RabbitMQ tar file.
-
Download the Starlight for RabbitMQ
tarfile from the Starlight for RabbitMQ GitHub repository. -
Extract the files from the
tar:tar xvfz starlight-rabbitmq-VERSION-all.tar.gzThe path to the
jarfile is/starlight-rabbitmq/target/starlight-rabbitmq-VERSION-jar-with-dependencies.jar. -
In a configuration file, set the URLs of the Pulsar brokers and the Apache ZooKeeper™ configuration store. For example:
brokerServiceURL=pulsar://localhost:6650 brokerWebServiceURL=http://localhost:8080 configurationStoreServers=localhost:2181 -
Run the
jarfile as a Java application with the configuration file path in the--config(-c) option:java -jar ./starlight-rabbitmq/target/starlight-rabbitmq-${version}-jar-with-dependencies.jar -c conf/starlight-for-rabbitmq.conf -
To test your Starlight for RabbitMQ deployment and connect a RabbitMQ client, see Produce and consume messages with Starlight for RabbitMQ.
Deploy a protocol handler on IBM Elite Support for Apache Pulsar with a Helm chart (deprecated)
|
IBM Elite Support for Apache Pulsar was formerly DataStax Luna Streaming. |
The Starlight for RabbitMQ extension is included in the luna-streaming-all image used to deploy an IBM Elite Support for Apache Pulsar cluster.
The DataStax Pulsar Helm chart simplifies deployment of Starlight for RabbitMQ as a protocol handler.
The following steps explain how to deploy a DataStax Pulsar Helm chart to create a simple Pulsar cluster with the Starlight for RabbitMQ extension ready for use.
|
The DataStax Pulsar Helm chart used in this example is deprecated. For Kubernetes deployments, DataStax recommends Kubernetes Autoscaling for Apache Pulsar (KAAP). |
-
Make sure you meet the following prerequisites:
-
Install Helm 3 CLI version 3.8.0 or later.
-
Install kubectl CLI version 1.23.4 or later.
-
Have access to a Kubernetes cluster with permission to create a namespace, deployments, and pods.
-
-
Add the DataStax Pulsar Helm chart repo to your Helm store:
helm repo add datastax-pulsar https://datastax.github.io/pulsar-helm-chart -
Install the Helm chart using a minimal values file. The following command creates a Helm release named
my-pulsar-clusterusing the DataStax Pulsar Helm chart within a Kubernetes namespace nameddatastax-pulsar. This minimal configuration creates only the essential components and has no ingress or load balanced services.helm install \ --namespace datastax-pulsar \ --create-namespace \ --values path/to/values.yaml \ --version 3.0.4 \ my-pulsar-cluster \ datastax-pulsar/pulsar -
Wait for the broker pod to reach a running state. It might restart a few times while the components start up.
kubectl -n datastax-pulsar wait --for=condition=Ready pod/pulsar-broker-0 --timeout=120s -
Enable port forwarding for the Pulsar Admin and Starlight for RabbitMQ services that are running on the Kubernetes cluster.
You don’t need to open the Pulsar binary port to accept new messages when using Starlight for RabbitMQ. This is because RabbitMQ clients communicate using the AMQP protocol over the RabbitMQ port (5672).
-
In a new terminal, port forward the Pulsar Admin service:
kubectl port-forward -n datastax-pulsar service/pulsar-broker 8080:8080 -
In a separate terminal window, port forward the Starlight for RabbitMQ service:
kubectl port-forward -n datastax-pulsar service/pulsar-proxy 5672:5672
-
The DataStax Pulsar Helm chart deployed Starlight for RabbitMQ on the Pulsar proxy and opened the correct port. The forwarded ports allow you to access Pulsar and Starlight for RabbitMQ services when running RabbitMQ client scripts and using CLI tools locally. Your applications can now communicate with Pulsar as if it were a real RabbitMQ host, as explained in Produce and consume messages with Starlight for RabbitMQ.
