Getting started with Starlight for JMS
Starlight for JMS is a highly compliant JMS implementation designed to run on a modern streaming platform. This guide will get you up and running with a simple Java JMS client that can talk to an Apache Pulsar™ streaming instance.
Prerequisites
To get started, you need the following:
-
A working Pulsar cluster.
-
Access to the cluster’s admin port 8080 and the binary port 6650.
This guide uses Astra Streaming to get started with Starlight for JMS. For more information, see the Starlight for JMS documentation.
-
Astra Streaming
-
Luna Streaming
-
Self Managed
If you don’t have a tenant in Astra Streaming, follow our "Astra Streaming quickstart" guide.
Follow the "Quick Start for Helm Chart installs (deprecated)" guide to get a cluster going.
Using a standalone cluster? The Starlight for JMS docs provide the "Starlight for JMS standalone quickstart" guide.
Messaging with Starlight for JMS
Retrieve connection properties in Astra Streaming
-
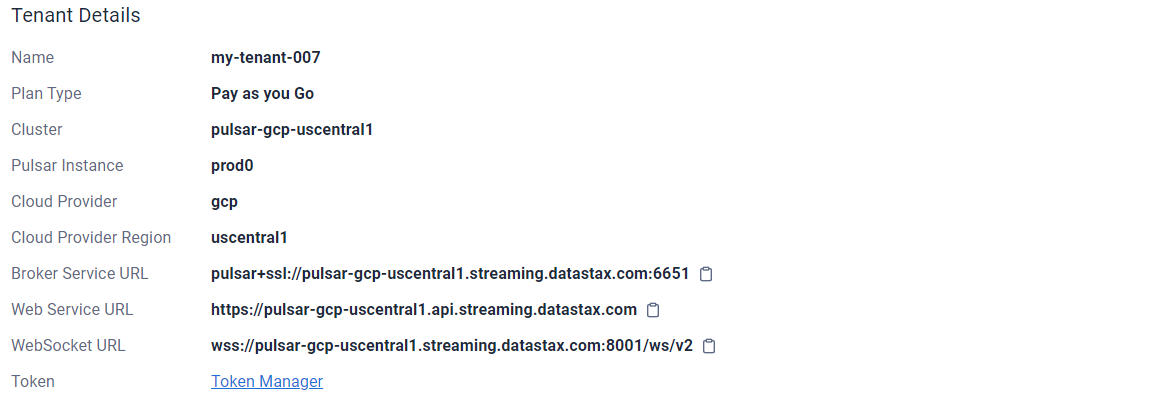
In the Astra Streaming portal "Connect" tab, the "Pulsar" area provides important connection information.
-
Scroll down to the "Tenant Details" area to find your Pulsar connection information.

Produce and consume a message
This example uses Maven for the project structure. If you prefer Gradle or another tool, this code should still be a good fit.
For complete source code examples, see the Astra Streaming examples repository.
-
Create a new Maven project.
mvn archetype:generate \ -DgroupId=org.example \ -DartifactId=StarlightForJMSClient \ -DarchetypeArtifactId=maven-archetype-quickstart \ -DinteractiveMode=false cd StarlightForJMSClient -
Open the new project in your favorite IDE or text editor and add the jms dependency to "pom.xml".
<dependency> <groupId>com.datastax.oss</groupId> <artifactId>pulsar-jms-all</artifactId> <version>1.0.0</version> </dependency> -
Open the file
src/main/java/org/example/App.java, and then enter the following contents. If you cloned the example repository, replace the entire contents of the file with the following code. Your editor will report an error because this isn’t a complete script yet.Replace placeholders with the values you previously retrieved from Astra Streaming.
package org.example; import com.datastax.oss.pulsar.jms.PulsarConnectionFactory; import javax.jms.JMSContext; import javax.jms.Message; import javax.jms.MessageListener; import javax.jms.Queue; import java.util.HashMap; import java.util.Map; public class App { private static String webServiceUrl = "<REPLACE_WITH_WEB_SERVICE_URL>"; private static String brokerServiceUrl = "<REPLACE_WITH_BROKER_SERVICE_URL>"; private static String pulsarToken = "<REPLACE_WITH_PULSAR_TOKEN>"; private static String tenantName = "<REPLACE_WITH_TENANT_NAME>"; private static final String namespace = "<REPLACE_WITH_NAMESPACE>"; private static final String topicName = "<REPLACE_WITH_TOPIC_NAME>"; private static final String topic = String.format("persistent://%s/%s/%s", tenantName,namespace,topicName); public static void main( String[] args ) throws Exception { -
Add the following code to build the configuration that will be used by both the producer and consumer:
Map<String, Object> properties = new HashMap<>(); properties.put("webServiceUrl",webServiceUrl); properties.put("brokerServiceUrl",brokerServiceUrl); properties.put("authPlugin","org.apache.pulsar.client.impl.auth.AuthenticationToken"); properties.put("authParams",pulsarToken); -
Add the following code that defines a simple 'PulsarConnectionFactory' that creates a JMS queue using the full Pulsar topic address, then creates a message listener callback function that watches the queue, and then produces a single message on the queue.
try (PulsarConnectionFactory factory = new PulsarConnectionFactory(properties); ){ JMSContext context = factory.createContext(); Queue queue = context.createQueue(topic); context.createConsumer(queue).setMessageListener(new MessageListener() { @Override public void onMessage(Message message) { try { System.out.println("Received: " + message.getBody(String.class)); } catch (Exception err) { err.printStackTrace(); } } }); String message = "Hello there!"; System.out.println("Sending: "+message); context.createProducer().send(queue, message); Thread.sleep(4000); //wait for the message to be consumed } } } -
Build and run a JAR file for this program:
mvn clean package assembly:single
java -jar target/StarlightForJMSClient-1.0-SNAPSHOT-jar-with-dependencies.jar
Result
Sending: Hello there!
Received: Hello there!
