Getting started with the Starlight for RabbitMQ extension
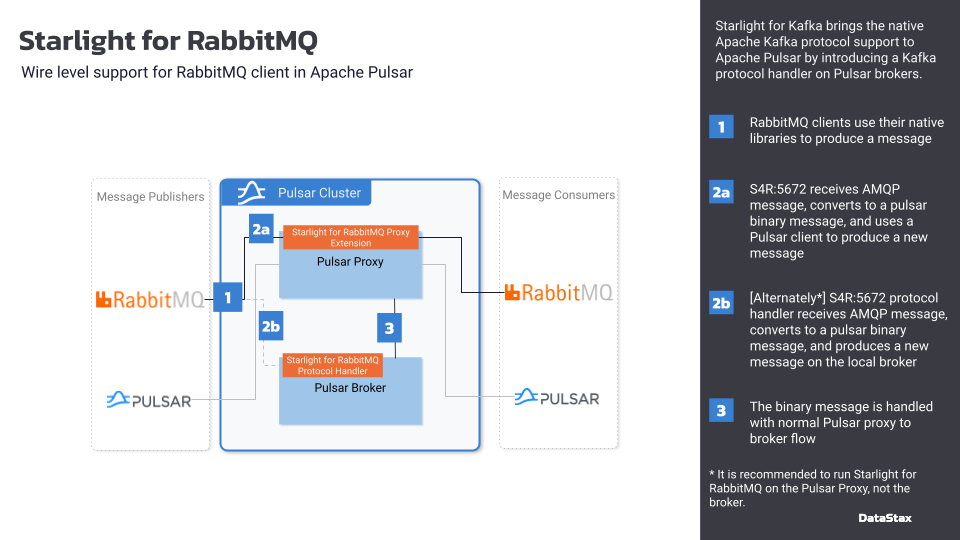
Starlight for RabbitMQ acts as a proxy between your RabbitMQ application and Apache Pulsar™ cluster. It implements the AMQP 0.9.1 protocol used by RabbitMQ clients and translates AMQP frames and concepts to Pulsar concepts.
If source code is your thing, visit the project’s repo on GitHub.
Architecture reference
If you want to dive deep into how Starlight for RabbitMQ works, read the documentation.

Establishing the RabbitMQ protocol handler
Before you can use a RabbitMQ client to interact with your Pulsar cluster, you need the Starlight for RabbitMQ protocol handler installed in the cluster. Installation looks a bit different depending on where your Pulsar cluster is running. Choose the option that best fits your needs.
-
Astra Streaming
-
Luna Streaming
-
Self Managed
If you want a working RabbitMQ extension as quickly as possible, this is your best bet. This is also a good option for those that already have a streaming tenant and are looking to extend it.
-
Sign in to your Astra account and navigate to your streaming tenant.
Don’t have a streaming tenant? Follow our "Astra Streaming quickstart" guide. -
Go to the "Connect" tab and choose the "RabbitMQ" option.
-
Click "Enable RabbitMQ".
-
A message will let you know of the additions (and restrictions) that come with using Starlight for RabbitMQ.
-
Click the "Enable RabbitMQ" button to confirm your understanding.
Your Astra Streaming tenant is ready for prime time! Continue to the next section of the guide to see it in action.
The Starlight for RabbitMQ extension is included in the luna-streaming-all image used to deploy a Luna cluster. The Luna helm chart makes deploying the Kafka extension quite easy. Follow the "Using Starlight for RabbitMQ with Luna Streaming" guide to create a simple Pulsar cluster with the Starlight for RabbitMQ extension ready for use.
Already have your own Pulsar Cluster? Or maybe you’re using a standalone cluster? Starlight for RabbitMQ can easily be a part of that cluster! Follow the "Get started" guide.
Messaging with Starlight for RabbitMQ
Starlight for RabbitMQ supports quite a few different use cases. With a Pulsar cluster between publishers and consumers you can interchange the type of publisher and consumer to fit your needs.
The below examples are using an Astra Streaming tenant as the AMQP listener. If you are using Luna Streaming or a self-managed tenant, switch the listener URL for your own.
Retrieve RabbitMQ connection properties in Astra Streaming
In the Astra Streaming portal "Connect" tab, the "RabbitMQ" area provides important connection information. You will need this connection information to create a working RabbitMQ client or use the CLI.

| Click the clipboard icon to copy the RabbitMQ connection values, as well as a working token to paste in code. |
Produce and consume a message
This example uses Maven for the project structure for a Rabbit MQ Java client. If you prefer Gradle or another tool, this code should still be a good fit.
For complete source code examples, see the Astra Streaming examples repository.
-
Create a new Maven project.
mvn archetype:generate \ -DgroupId=org.example \ -DartifactId=StarlightForRabbitMqClient \ -DarchetypeArtifactId=maven-archetype-quickstart \ -DinteractiveMode=false cd StarlightForRabbitMqClient -
Open the new project in your IDE or text editor, and then add the RabbitMQ client dependency to
pom.xml:<dependency> <groupId>com.rabbitmq</groupId> <artifactId>amqp-client</artifactId> <version>5.16.0</version> </dependency> -
Open the file
src/main/java/org/example/App.java, and then enter the following code. If you cloned the example repo, replace the entire contents with the following code. Your editor will report errors because this isn’t a complete program yet.Replace placeholders with the values you previously retrieved from Astra Streaming.
package org.example; import com.rabbitmq.client.*; import java.io.IOException; import java.net.URISyntaxException; import java.nio.charset.StandardCharsets; import java.security.KeyManagementException; import java.security.NoSuchAlgorithmException; import java.util.concurrent.TimeoutException; public class App { private static final String username = ""; private static final String password = "<REPLACE_WITH_PULSAR_TOKEN>"; private static final String host = "<REPLACE_WITH_SERVICE_URL>"; private static final int port = 5671; private static final String virtual_host = "<REPLACE_WITH_TENANT_NAME>/<REPLACE_WITH_NAMESPACE>"; //The "rabbitmq" namespace should have been created when you enabled S4R private static final String queueName = "<REPLACE_WITH_TOPIC_NAME>"; //This will get created automatically private static final String amqp_URI = String.format("amqps://%s:%s@%s:%d/%s", username, password, host, port, virtual_host.replace("/","%2f")); public static void main(String[] args) throws IOException, TimeoutException, URISyntaxException, NoSuchAlgorithmException, KeyManagementException, InterruptedException { -
Add the code to create a connection, channel, and queue that will be used by both the producer and consumer:
ConnectionFactory factory = new ConnectionFactory(); factory.setUri(amqp_URI); /* You could also set each value individually factory.setHost(host); factory.setPort(port); factory.setUsername(username); factory.setPassword(password); factory.setVirtualHost(virtual_host); factory.useSslProtocol(); */ Connection connection = factory.newConnection(); Channel channel = connection.createChannel(); channel.queueDeclare(queueName, false, false, false, null); -
Add the producer code, which is a simple flow that sends a single message and awaits acknowledgment:
String publishMessage = "Hello World!"; channel.basicPublish("", queueName, null, publishMessage.getBytes()); System.out.println(" Sent '" + publishMessage + "'"); -
Add the consumer code, which creates a basic consumer with callback on message receipt. Because the consumer isn’t a blocking thread, the
sleepallows time for messages to be received and processed.DeliverCallback deliverCallback = (consumerTag, delivery) -> { String consumeMessage = new String(delivery.getBody(), StandardCharsets.UTF_8); System.out.println(" Received '" + consumeMessage + "'"); }; channel.basicConsume(queueName, true, deliverCallback, consumerTag -> { }); Thread.sleep(4000); // wait a bit for messages to be received channel.close(); connection.close(); } } -
Build and run the JAR file for the complete program:
mvn clean package assembly:single
java -jar target/StarlightForRabbitMqClient-1.0-SNAPSHOT-jar-with-dependencies.jar
Result
Sent 'Hello World!'
Received 'Hello World!'
