Build real-time data pipelines with Astra Streaming and Decodable
This tutorial shows you how to build real-time data processing pipelines using Astra Streaming and Decodable. Specifically, this tutorial simulates capturing web click data from an e-commerce website. It describes how to create, integrate, run, and test all components required to capture, process, and store real-time web click events.
This guide uses the Astra Portal and Decodable UI in your web browser. No terminal or scripting is required.
|
This tutorial builds complete real-time data pipelines with third-party integrations. For a simplified tutorial that focuses on the Astra Streaming components only, see the quickstart. |
Architecture
Before building a pipeline, it’s important to understand the required components and their purpose.
This tutorial’s pipelines will ingest raw web click data, break it into queryable values, save the data, and filter for certain values. The parsed raw click data and the filtered data will be written to the database.
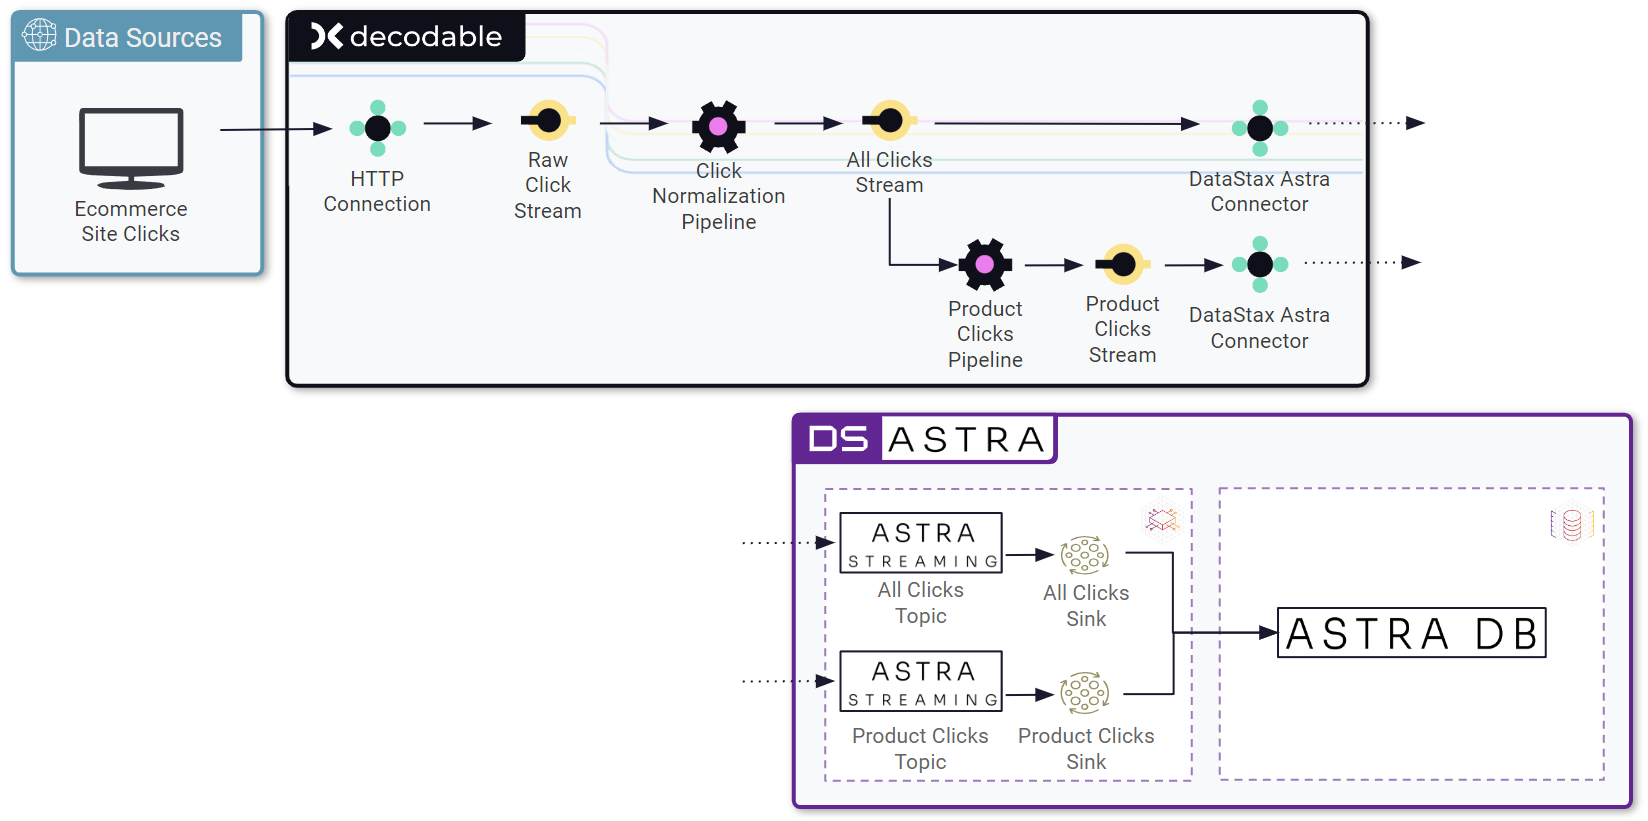
This tutorial uses the following services and components:
- Data sources
-
Simulated e-commerce site clicks are captured and streamed to a Decodable REST endpoint, then processed through two pipelines. The resulting event data is written to Astra DB database tables through Astra Streaming topics and sinks.
- Decodable
-
This tutorial uses Decodable’s real-time stream processing, which is powered by Apache Flink®. Specifically, you will create the following Decodable objects:
-
HTTP connection: A managed REST endpoint for posting click data
-
Raw clicks stream: A flow of click data that other Decodable objects can listen to.
-
Normalization pipeline: A SQL-based pipeline that takes in raw click data (from the raw clicks stream), and processes the data based for writing to the database, including parses, adding context, and transforming certain parts of the data
-
All clicks stream: A flow of normalized click data that other Decodable objects can listen to.
-
Astra Streaming connector: A sink where Decodable objects publish data, which transforms the data into a Pulsar message that is produced to a given streaming topic
-
Product clicks pipeline: A SQL-based pipeline that takes normalized click data and filters for a subset of clicks associated with product entries on the e-commerce site
-
Product clicks stream: A flow of filtered product click data that other Decodable objects can listen to
-
- Astra
-
Within Astra, the tutorial uses Astra DB and Astra Streaming, which are powered by Apache Cassandra® and Apache Pulsar™ respectively. Specifically, you will create the following Astra objects:
-
Astra Streaming tenant: A dedicated streaming environment for your data pipelines
-
Astra Streaming topic for all clicks: A collection of messages with normalized click data from all web click events
-
Astra Streaming topic for product clicks: A collection of messages with normalized and filtered click data for product click events only
-
Astra Streaming sink for all clicks: A function that writes message data from the all clicks topic to the
all_clicksdatabase table -
Astra Streaming sink for product clicks: A function that writes message data from the product clicks topic to the
product_clicksdatabase table -
Astra DB: The backend data store where the event data is written and persisted
-
Prerequisites
-
A place to store credentials securely for the duration of this tutorial
Create Astra objects
First, you need to create a streaming tenant in Astra Streaming with a namespace and topics, create an Astra DB database, and then hook the streaming topics and database together with a sink connector.
Create message topics to capture the stream of click data
-
In the Astra Portal header, click Applications, select Streaming, and then click Create tenant.
-
Name the new streaming tenant
webstore-clicks, select any cloud provider and region, and then click Create tenant. -
From your tenant’s overview page, click the Namespace and Topics tab.
-
Create a new namespace with the name
production.In this example, namespaces represent logical development environments to illustrate how you could create a continuous delivery flow. You could also have namespaces for
developmentandstaging. -
Click Add Topic next to your new
productionnamespace, name the topicall-clicks, make sure Persistent is selected, and then click Add Topic. -
Create another topic in the
productionnamespace, name the topicproduct-clicks, make sure Persistent is selected, and then click Add Topic.
You now have a production namespace with two topics, as well as the default namespace that is automatically created by Pulsar whenever you create a streaming tenant.
Store the stream of click data
-
In the Astra Portal header, click Applications, and then select Astra.
-
Click Create database, and then complete the fields as follows:
-
Type: Select Serverless (non-vector) to follow along with this tutorial.
If you select Serverless (vector), you must modify the tutorial to use the
default_keyspacekeyspace or create the tutorial keyspace after you create your database. -
Database name: Enter
webstore-clicks. -
Keyspace name: Enter
click_data. -
Provider and Region: Select the same cloud provider and region as your streaming tenant.
-
-
Click Create Database, and then wait for the database to initialize. This can take several minutes.
-
From your database’s overview page, click CQL console, and then wait for the built-in CQL shell (
cqlsh) to start. -
Enter the following CQL statement into the CQL console, and then press Enter.
This statement creates a table named
all_clicksin theclick_datakeyspace that will store all unfiltered web click data.CREATE TABLE IF NOT EXISTS click_data.all_clicks ( click_timestamp bigint, url_host text, url_protocol text, url_path text, url_query text, browser_type text, operating_system text, visitor_id uuid, PRIMARY KEY ((operating_system, browser_type, url_host, url_path), click_timestamp) ); -
Run the following command in the CQL console to create another table that will store filtered web click data for product clicks only.
CREATE TABLE click_data.product_clicks ( catalog_area_name text, product_name text, click_timestamp timestamp, PRIMARY KEY ((catalog_area_name), product_name, click_timestamp) ) WITH CLUSTERING ORDER BY (product_name ASC, click_timestamp DESC); -
To verify that the tables were created, run
describe click_data;.The console prints create statements describing the keyspace itself and the two tables.
Resulttoken@cqlsh> describe click_data; CREATE KEYSPACE click_data WITH replication = {'class': 'NetworkTopologyStrategy', 'us-east-1': '3'} AND durable_writes = true; CREATE TABLE click_data.all_clicks ( operating_system text, browser_type text, url_host text, url_path text, click_timestamp bigint, url_protocol text, url_query text, visitor_id uuid, PRIMARY KEY ((operating_system, browser_type, url_host, url_path), click_timestamp) ) WITH CLUSTERING ORDER BY (click_timestamp ASC) AND additional_write_policy = '99PERCENTILE' AND bloom_filter_fp_chance = 0.01 AND caching = {'keys': 'ALL', 'rows_per_partition': 'NONE'} AND comment = '' AND compaction = {'class': 'org.apache.cassandra.db.compaction.UnifiedCompactionStrategy'} AND compression = {'chunk_length_in_kb': '64', 'class': 'org.apache.cassandra.io.compress.LZ4Compressor'} AND crc_check_chance = 1.0 AND default_time_to_live = 0 AND gc_grace_seconds = 864000 AND max_index_interval = 2048 AND memtable_flush_period_in_ms = 0 AND min_index_interval = 128 AND read_repair = 'BLOCKING' AND speculative_retry = '99PERCENTILE'; CREATE TABLE click_data.product_clicks ( catalog_area_name text, product_name text, click_timestamp timestamp, PRIMARY KEY (catalog_area_name, product_name, click_timestamp) ) WITH CLUSTERING ORDER BY (product_name ASC, click_timestamp DESC) AND additional_write_policy = '99PERCENTILE' AND bloom_filter_fp_chance = 0.01 AND caching = {'keys': 'ALL', 'rows_per_partition': 'NONE'} AND comment = '' AND compaction = {'class': 'org.apache.cassandra.db.compaction.UnifiedCompactionStrategy'} AND compression = {'chunk_length_in_kb': '64', 'class': 'org.apache.cassandra.io.compress.LZ4Compressor'} AND crc_check_chance = 1.0 AND default_time_to_live = 0 AND gc_grace_seconds = 864000 AND max_index_interval = 2048 AND memtable_flush_period_in_ms = 0 AND min_index_interval = 128 AND read_repair = 'BLOCKING' AND speculative_retry = '99PERCENTILE';
Connect the topics to the store
-
In the Astra Portal header, click Applications, and then select Streaming.
-
Click your
webstore-clicksstreaming tenant. -
Click the Sinks tab, click Create Sink, and then complete the fields as follows:
-
Namespace: Select your
productionnamespace. -
Sink Type: Select Astra DB.
-
Name: Enter
all-clicks. -
Input topic: Select your
all-clickstopic in yourproductionnamespace. -
Database: Select your
webstore-clicksdatabase. -
Token: Click the link to create an Astra application token with the Organization Administrator role, and then enter the token in the sink’s Token field. Store the token securely, you will use it multiple times during this tutorial.
-
Keyspace: Enter
click_data. -
Table Name: Enter
all_clicks. -
Mapping: Use the default mapping, which maps the topic’s fields to the table’s columns.
-
-
Click Create, and then wait for the sink to initialize.
When the sink is ready, its status changes to Running.
-
Create another sink with the following configuration:
-
Namespace: Select your
productionnamespace. -
Sink Type: Select Astra DB.
-
Name: Enter
prd-click-astradb. -
Input topic: Select your
product-clickstopic in yourproductionnamespace. -
Database: Select your
webstore-clicksdatabase. -
Token: Use the same token that you created for the other sink.
-
Keyspace: Enter
click_data. -
Table Name: Enter
product_clicks. -
Mapping: Use the default mapping, which maps the topic’s fields to the table’s columns.
-
After the second sink initializes, you have two running sinks.
To debug a sink, you can view the sink’s logs in the Astra Portal.
To do this, click the sink name, and then find the terminal output area on the sink’s overview page.
The deployment logs are printed in this terminal output area, including semi-verbose starting, validating, and running logs.
Create Decodable objects
After you create the required Astra objects, you can create pipelines for processing incoming data and connectors that bond a Decodable stream of data with the Astra Streaming topics.
Get the Astra Streaming tenant details
To connect Astra Streaming to Decodable, you need some information from your Astra Streaming tenant.
-
In the Astra Portal header, click Applications, select Streaming, and then click your webstore-clicks streaming tenant.
-
Go to the Connect tab, and then find the Tenant Details section. You will need the information in this section to create the connection in Decodable.
-
Create a Pulsar token for your tenant:
-
Under Tenant Details, click Token Manager.
-
Click Create Token, copy the Token, and then store it securely.
-
Click Close.
-
Create a Decodable connection to Astra Streaming for all web clicks
In Decodable, create a connection to stream data for all web clicks to the correct topics in Astra Streaming:
-
In new browser tab, sign in to your Decodable account.
DataStax recommends opening a new browser tab so you can easily reference Astra Streaming tenant details while creating Decodable connections.
-
Go to the Connections tab, and then click New Connection.
-
On the Choose a Connector dialog, find the DataStax Astra Streaming connector, and then click Connect.
-
Use your Astra Streaming tenant details to complete the Decodable connection fields, and then click Next:
-
Connection Type: Select Sink.
-
Broker Service URL: Enter the Pulsar broker service URL from your Astra Streaming tenant.
-
Web Service URL: Enter the Pulsar web service URL from your Astra Streaming tenant.
-
Topic: Enter
persistent://webstore-clicks/production/all-clicks. -
Authentication Token: Enter the Pulsar token you created for your Astra Streaming tenant.
-
Value Format: Select JSON.
-
-
On the Where should this Connection get its data dialog, select New Stream, name the stream
Webstore-Normalized-Clicks-Stream, and then click Next. -
On the Define this Connection’s schema dialog, set the Schema Source to New Schema, and then add the following fields:
Name Type click_timestampTIMESTAMP(0)
url_hostSTRING
url_protocolSTRING
url_pathSTRING
url_querySTRING
browser_typeSTRING
operating_systemSTRING
visitor_idSTRING
For Type, you must select options from the dropdown menu in order for Decodable to accept the schema.
-
Click Next, name the connection
Astra-Streaming-All-Webclicks-Connection, and then click Create Connection.
Create a Decodable connection to Astra Streaming for product web clicks
Create another connection in Decodable to stream product clicks:
-
In Decodable, on the Connections tab, click New Connection.
-
On the Choose a Connector dialog, find the DataStax Astra Streaming connector, and then click Connect.
-
Use your Astra Streaming tenant details to complete the Decodable connection fields, and then click Next. All values are the same as the other connection except the Topic.
-
Connection Type: Select Sink.
-
Broker Service URL: Enter the Pulsar broker service URL from your Astra Streaming tenant.
-
Web Service URL: Enter the Pulsar web service URL from your Astra Streaming tenant.
-
Topic: Enter
persistent://webstore-clicks/production/product-clicks. -
Authentication Token: Enter the Pulsar token you created for your Astra Streaming tenant.
-
Value Format: Select JSON.
-
-
On the Where should this Connection get its data dialog, select New Stream, name the stream
Webstore-Product-Clicks-Stream, and then click Next. -
On the Define this Connection’s schema dialog, set Schema Source to New Schema, and then add the following fields:
Name Type click_timestampTIMESTAMP(0)
catalog_area_nameSTRING
product_nameSTRING
-
Click Next, name the connection
Astra-Streaming-Product-Webclicks-Connection, and then click Create Connection.
Create an HTTP data ingestion source
Create a third connection to use Decodable’s REST API to ingest (POST) raw data into the pipeline:
-
In Decodable, on the Connections tab, click New Connection.
-
In the Choose a Connector dialog, find the REST source connector, and then click Connect.
-
On the Create your REST connector dialog, use the default values for all fields, and then click Next.
-
On the Where should we send this Connection’s data dialog, select New Stream, name the stream
Webstore-Raw-Clicks-Stream, and then click Next. -
On the Define this Connection’s schema dialog, set Schema Source to New Schema, and then add the following fields:
Name Type click_epochBIGINT
UTC_offsetINT
request_urlSTRING
browser_agentSTRING
visitor_idSTRING
-
Click Next, name the connection
Webstore-Raw-Clicks-Connection, and then click Create Connection.
In your REST connection’s settings, you might have noticed that the Endpoint value had a <connection_ID> placeholder.
This dynamic value is generated when you create the connection.
Go to the connection’s Details tab to get the resolved endpoint path, such as /v1alpha2/connections/7ef9055f/events.
Combine this path with your account domain, such as user.api.decodable.co, to create the full endpoint URL.
For more information about the REST connector, see the Decodable documentation.
Create a data normalization pipeline
After creating the three connections (raw clicks, all webclicks, and product webclicks), create two pipelines to process the data:
-
In Decodable, go to Pipelines, and then click Create Pipeline.
-
For the input stream, select Webstore-Raw-Clicks-Stream, and then click Next.
-
On the Define your data processing with SQL page, delete all pre-populated code in the SQL editor, and then enter the following SQL statement:
insert into `Webstore-Normalized-Clicks-Stream` select CURRENT_TIMESTAMP as click_timestamp , PARSE_URL(request_url, 'HOST') as url_host , PARSE_URL(request_url, 'PROTOCOL') as url_protocol , PARSE_URL(request_url, 'PATH') as url_path , PARSE_URL(request_url, 'QUERY') as url_query , REGEXP_EXTRACT(browser_agent,'(MSIE|Trident|(?!Gecko.+)Firefox|(?!AppleWebKit.+Chrome.+)Safari(?!.+Edge)|(?!AppleWebKit.+)Chrome(?!.+Edge)|(?!AppleWebKit.+Chrome.+Safari.+)Edge|AppleWebKit(?!.+Chrome|.+Safari)|Gecko(?!.+Firefox))(?: |\/)([\d\.apre]+)') as browser_type , CASE WHEN (browser_agent like '%Win64%') THEN 'Windows' WHEN (browser_agent like '%Mac%') THEN 'Macintosh' WHEN (browser_agent like '%Linux%') THEN 'Linux' WHEN (browser_agent like '%iPhone%') THEN 'iPhone' WHEN (browser_agent like '%Android%') THEN 'Android' ELSE 'unknown' END as operating_system , visitor_id as visitor_id from `Webstore-Raw-Clicks-Stream` -
Click Next, review the automatically generated output stream, and then click Next.
The output stream should be correct by default if you followed along with the tutorial so far.
-
Click Next, name the pipeline
Webstore-Raw-Clicks-Normalize-Pipeline, and then click Create Pipeline.It can take a few minutes for the pipeline to be created.
Create a data filtering pipeline
Create a pipeline to separate product click data from all web click data:
-
In Decodable, go to Pipelines, and then click Create Pipeline.
-
For the input stream, select Webstore-Normalized-Clicks-Stream, and then click Next.
-
On the Define your data processing with SQL page, delete all pre-populated code in the SQL editor, and then enter the following SQL statement:
insert into `Webstore-Product-Clicks-Stream` select click_timestamp , TRIM(REPLACE(SPLIT_INDEX(url_path, '/', 2),'-',' ')) as catalog_area_name , TRIM(REPLACE(SPLIT_INDEX(url_path, '/', 3),'-',' ')) as product_name from `Webstore-Normalized-Clicks-Stream` where TRIM(LOWER(SPLIT_INDEX(url_path, '/', 1))) = 'catalog' -
Click Next, review the automatically generated output stream, and then click Next.
The output stream should be correct by default if you followed along with the tutorial so far.
-
Click Next, name the pipeline
Webstore-Product-Clicks-Pipeline, and then click Create Pipeline.It can take a few minutes for the pipeline to be created.
Run the pipelines
Next, start the connectors and run the pipelines.
These steps start the processing pipelines, send a single record of data through them, and then validate that the data was handled as expected. Optionally, you can use a sample website to test how the pipelines handle a heavier data flow.
Start the connections and pipelines
-
In Decodable, go to the Connections tab.
-
For the three connections you created for this tutorial, click More, and then select Start.
-
Wait for the connections to start and reach the Running state.
If a connection doesn’t start correctly, it might have an incorrect setting or expired token. You can click a connection to inspect it and get more information about the issue.
-
Go to the Pipelines tab.
-
For the two pipelines you created for this tutorial, click More, and then select Start.
-
Wait for the pipelines to start and reach the Running state.
At this point you should have three running connections (one REST connector and two DataStax Astra Streaming connectors) and two running pipelines (normalize and product clicks).
Send a simulated REST payload
Use a simulated ingestion to test how the connections and pipelines handle a single event:
-
In Decodable, go to the Connections tab, and then click the REST connection.
-
On the connection’s Upload tab, enter the following web click data:
[ { "click_epoch": 1655303592179, "request_url": "https://somedomain.com/catalog/area1/yetanother-cool-product?a=b&c=d", "visitor_id": "b56afbf3-321f-49c1-919c-b2ea3e550b07", "UTC_offset": -4, "browser_agent": "Mozilla/5.0 (Windows NT 10.0; Win64; x64) AppleWebKit/537.36 (KHTML, like Gecko) Chrome/102.0.0.0 Safari/537.36" } ] -
Click Upload to simulate data being posted to the endpoint. A confirmation message appears if the connector receives the data.
Follow the data
After the REST connector ingests the simulated click event data, the normalize pipeline receives the raw click data, processes it, and writes it to the all_clicks table in Astra DB.
Because the simulated payload was a product click, the product clicks pipeline receives the normalized click data, and then writes it to the product_clicks table in Astra DB.
You can confirm that the data was received and processed by inspecting the metrics for the pipelines, connectors, topics, and sink. You can also query your database tables to verify that the data was written to them as expected.
The following steps inspect the raw clicks data flow and the product clicks data flow:
-
In Decodable, go to the Pipelines tab, and then click the Webstore-Raw-Clicks-Normalize-Pipeline pipeline.
-
Under the Input Metrics and Output Metrics, verify that Total records shows 1 record received. This confirms that the data passed successfully through this pipeline.
-
Go to the Connections tab, and then click Astra-Streaming-All-Webclicks-Connector connection.
-
Under Input Metrics, verify that Total records shows 1 record received.
-
In Astra Streaming, go to your webstore-clicks tenant, and then go to the Namespace and Topics tab.
-
Expand the production namespace, and then click the all-clicks topic.
-
Verify that Data In and Data Out have 1 message each.
This means the topic ingested the data, and then a consumer acknowledged receipt of the message.
-
Go to the Sinks tab, and then click the all-clicks sink.
-
Under Instance Stats, verify that Reads and Writes are both 1.
This means the sink consumed a message from the topic, and then wrote the data to the store.
-
In the Astra Portal header, click Applications, and then select Astra DB.
-
Go to your webstore-clicks database, click CQL console, and then run the following CQL statement to inspect the data that was written to the
all_clickstable:select * from click_data.all_clicks;The result should look similar to the following:
token@cqlsh> EXPAND ON; //this cleans up the output
Now Expanded output is enabled
token@cqlsh> select * from click_data.all_clicks;
@ Row 1
------------------+----------------------------------------
 operating_system | Windows
 browser_type     | Chrome/102.0.0.0
 url_host         | somedomain.com
 url_path         | /catalog/area1/yetanother-cool-product
 click_timestamp  | 1675286722000
 url_protocol     | https
 url_query        | a=b&c=d
 visitor_id       | b56afbf3-321f-49c1-919c-b2ea3e550b07

(1 rows)
This confirms that the data was successfully written to the database. Your normalize pipeline ingested raw web click data, normalized it, and then persisted the parsed data to the database.
Next, inspect the product clicks pipeline.
-
In Decodable, go to the Pipelines tab, and then click your
Webstore-Product-Clicks-Pipelinepipeline. -
Verify that the Input Metrics and the Output Metrics have 1 record each.
-
Go to the Connections tab, and then click your
Astra-Streaming-Product-Webclicks-Connectionconnection. -
Verify that the Input Metrics have 1 record.
-
In Astra Streaming, go to your webstore-clicks tenant, and then go to the Namespace and Topics tab.
-
Expand the production namespace, and then click the product-clicks topic.
-
Verify that Data In and Data Out have 1 message each.
-
In the Astra Portal header, click Applications, and then select Astra DB.
-
Go to your webstore-clicks database, click CQL console, and then run the following CQL statement to inspect the data that was written to the
product_clickstable:select * from click_data.product_clicks;The result should look similar to the following:
@ Row 1
-------------------+---------------------------------
 catalog_area_name | area1
 product_name      | yetanother cool product
 click_timestamp   | 2023-02-01 21:25:22.000000+0000
The simulated web click data was a product click, so the data was filtered to the product clicks pipeline, and then written to the product clicks table.
Test the pipelines with simulated real-time data
To simulate a production workload to test the pipeline, you need a way to continuously post data to your Decodable REST endpoint. For this tutorial, you can use the following sample website:
-
Download the sample
web-click-website.zip.This is a static HTML e-commerce catalog that silently posts click data to an endpoint. The sample site is a copy of the Demoblaze site from BlazeMeter.
-
Extract the zip, open the folder in an IDE or text editor, and then open
script.js. -
Replace the
decodable_tokenandendpoint_urlvalues with actual values from your Decodable account:function post_click(url){ let decodable_token = "access token: DECODABLE_AUTH_ACCESS_TOKEN"; let endpoint_url = "DECODABLE_REST_ENDPOINT_URL"; ... }Replace the following:
-
DECODABLE_AUTH_ACCESS_TOKEN: The value ofaccess_tokenfrom your.decodable/authfile. For more information, see the Decodable authentication documentation. -
DECODABLE_REST_ENDPOINT_URL: Your REST connection’s complete endpoint URL, including the generated endpoint path and your Decodable account’s REST API base URL. For example,https://user.api.decodable.co/v1alpha2/connections/4f003544/events
-
-
Save and close
script.js. -
Open
phones.htmlfile in your browser as a local file, and then click some products to generate streaming events.Each click should send a
POSTrequest to your Decodable REST endpoint. You can monitor connector activity in Decodable.
Troubleshoot the pipeline
These guidelines can help you debug the pipelines if they aren’t working as expected:
First, find where the pipeline broke by following the data flows described in Follow the data.
With Decodable, you can click through the connections, streams, and pipelines and visualize where the connection failed.
For example, if you accidentally named a stream click-stream instead of clicks-stream, you can follow the click event to the outbound clicks-stream and then to the pipeline.
There, you’ll see that the pipeline isn’t receiving the message because its inbound stream is misnamed click-stream.
Then, you can stop the pipeline, fix the inbound stream name, and then restart the pipeline to get data flowing again.
If you’re unable to resolve the issue by inspecting the pipelines and connectors, you can test input data at the point of failure. In this case, you want to determine if the input data is malformed, or if the object itself is failing. There are two tools you can use to debug this at various stages of the pipeline:
-
In Decodable, you can use the Preview feature to see a sample of data processing in each pipeline.
-
In Astra Streaming, each tenant has a Try Me feature where you can simulate producing and consuming messages in specific topics.
Clean up the tutorial resources
To clean up the resources created for this tutorial, you need to remove the Decodable and Astra objects you created.
Remove Decodable objects
-
In Decodable, go to the Connections tab.
-
For each connection that you created for this tutorial, click More, and then select Stop.
-
Once the connections are stopped, click More, and then select Delete to remove each connection object from your Decodable account.
-
Go to the Pipelines tab, and then delete the tutorial’s pipelines.
-
Optional: Go to the Streams tab, and then delete the tutorial’s streams.
Remove Astra objects
-
In the Astra Portal header, click Applications, and then select Streaming.
-
Find the
webstore-clickstenant, click More, and then select Delete.This removes the tenant and all associated sinks, topics, messages, and namespaces.
-
In the Astra Portal header, click Applications, and then select Astra.
-
Find the
webstore-clicksdatabase, click More, and then select Terminate.This removes the database and all associated keyspaces and tables. This can take a few minutes.
Next steps
Now that you’ve created a sample pipeline, try modifying the tutorial to create a pipeline for your own use cases, like fraud detection or removing personally identifiable information (PII).
