Phases of the Zero Downtime Migration process
With the Zero Downtime Migration (ZDM) process, your applications can continue to run while you migrate data from one Cassandra-based database to another, resulting in little or no downtime and minimal service interruptions.
Why migrate?
There are many reasons that you might need to migrate data and applications. For example:
-
You want to move to a different database provider. For example, you might move from self-managed clusters to a cloud-based Database-as-a-Service (DBaaS), such as Astra DB.
-
You need to upgrade a cluster to a newer version or infrastructure.
-
You want to move client applications from shared clusters to dedicated clusters for greater control over individual configurations.
-
You want to consolidate client applications running on separate clusters onto one shared cluster to minimize sprawl and maintenance.
The ZDM process uses ZDM Proxy, ZDM Utility, and ZDM Proxy Automation to orchestrate live reads and writes on your databases while you move and validate data with a data migration tool, such as Astra DB Sideloader, Cassandra Data Migrator, or DSBulk Loader.
ZDM Proxy keeps your databases in sync at all times through its dual-writes feature, which means you can seamlessly stop or abandon the migration at any point before the last phase of the migration (the final cutover to the new database). For more information about these tools, see Compare DataStax migration tools.
When the migration is complete, all data is present in the new database, and you can switch your client applications to connect exclusively to the new database. The old database becomes obsolete and can be shut down.
Requirements for zero downtime
True zero downtime migration with ZDM Proxy is only possible if your database meets the minimum requirements, including cluster compatibility, that are described in Compatibility requirements for ZDM Proxy If your database doesn’t meet these requirements, you can still complete the migration, but you might not be able to use ZDM Proxy and some downtime might be necessary to finish the migration.
Migration phases
A migration project includes preparation for the migration and five migration phases.
The following sections describe the major events in each phase and how your client applications connect to your origin cluster, ZDM Proxy, and the target cluster during each phase.
The origin cluster is is your existing Cassandra-based environment, such as DSE or open-source Apache Cassandra.
The target cluster is your new Cassandra-based environment where you want to migrate your data and client applications.
Plan and prepare for your migration
From a functional standpoint, before you begin a migration, your client applications perform read/write operations directly with your existing CQL-compatible database, such as Apache Cassandra, DSE, HCD, or Astra DB. Over the course of the migration, the contact points change to incorporate ZDM Proxy and eventually switch to the target database.
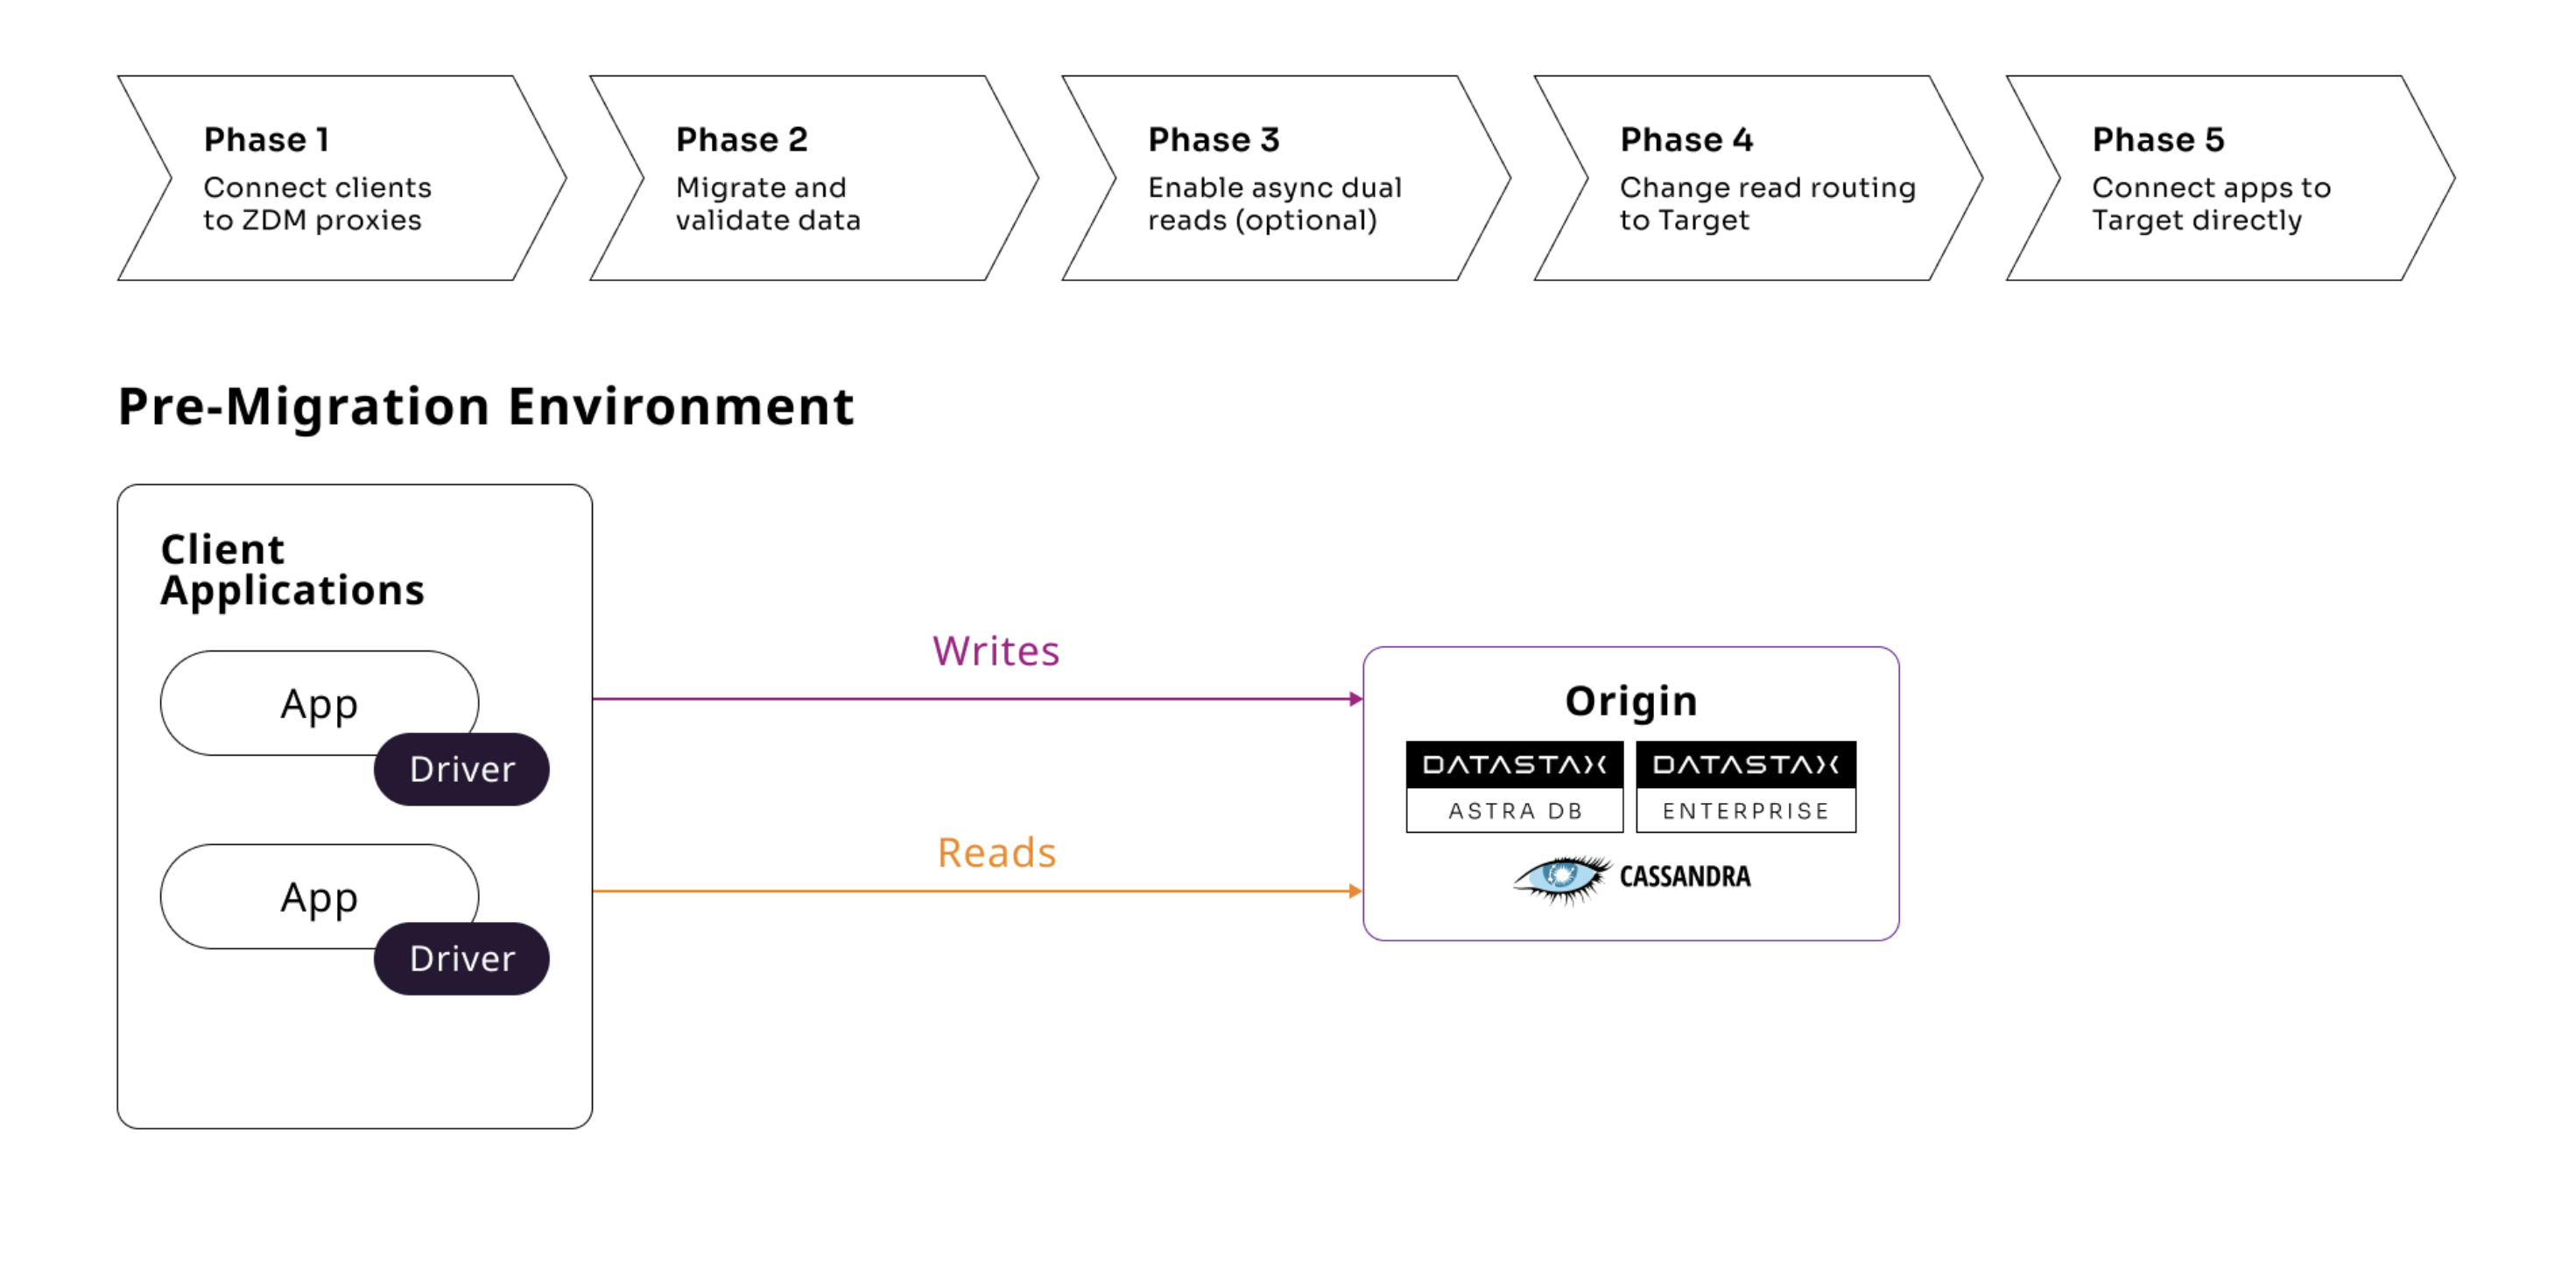
To plan and prepare for the migration, do the following:
-
Review compatibility requirements for ZDM Proxy: Make sure your clusters, data model, and application logic are compatible with ZDM Proxy, and understand how certain operations are handled by ZDM Proxy. If needed, adjust your data model or application logic to ensure compatibility between the two clusters during the migration and ongoing compatibility with the target cluster after the migration.
To successfully migrate with ZDM Proxy, a read or write request produced by your client application must be able to succeed without modification on both your origin (existing) and target (new) clusters. This means that the origin and target clusters must have matching schemas, including keyspace names, table names, column names, and data types.
-
Prepare the ZDM Proxy deployment infrastructure: Set up the infrastructure to host the ZDM tools.
-
Create the target environment: Set up your target cluster, and create schemas that match those on your origin cluster.
-
Understand rollback options: Learn when and how you can stop or rollback an in-progress migration.
Phase 1: Deploy ZDM Proxy and connect client applications
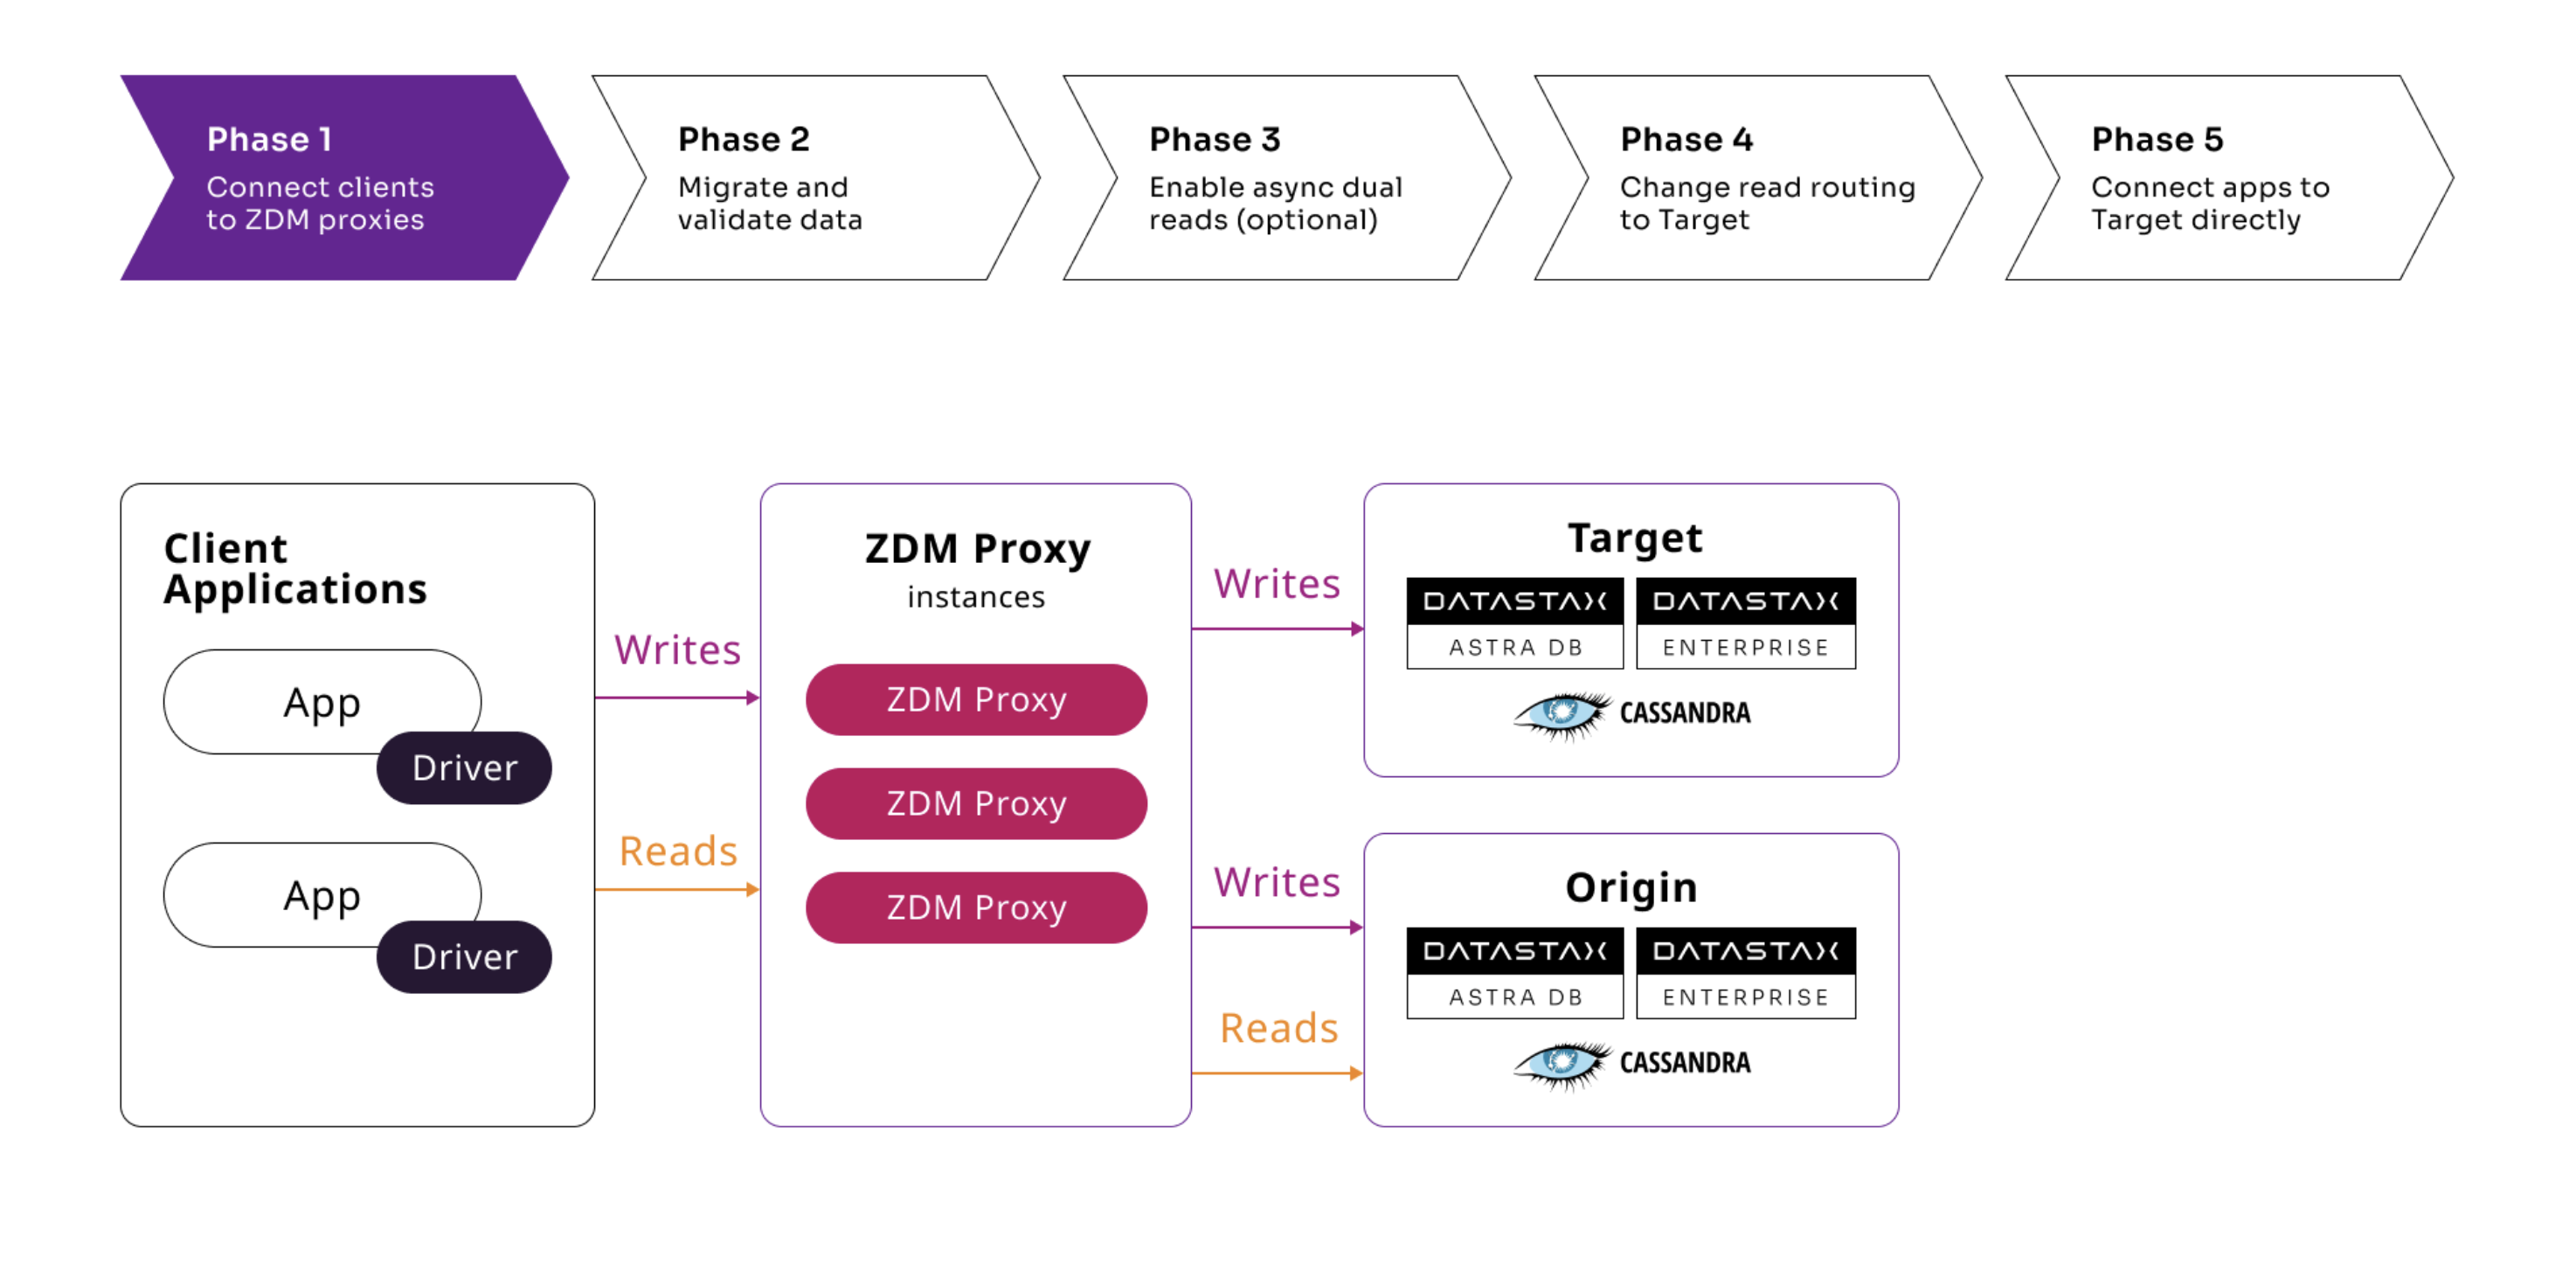
In this first phase, deploy the ZDM Proxy instances and connect client applications to the proxies. This phase activates the dual-write logic. Writes are sent to both the origin and target databases, while reads are executed on the origin only.
For more information and instructions, see Phase 1: Deploy and connect ZDM Proxy.
Phase 2: Migrate data
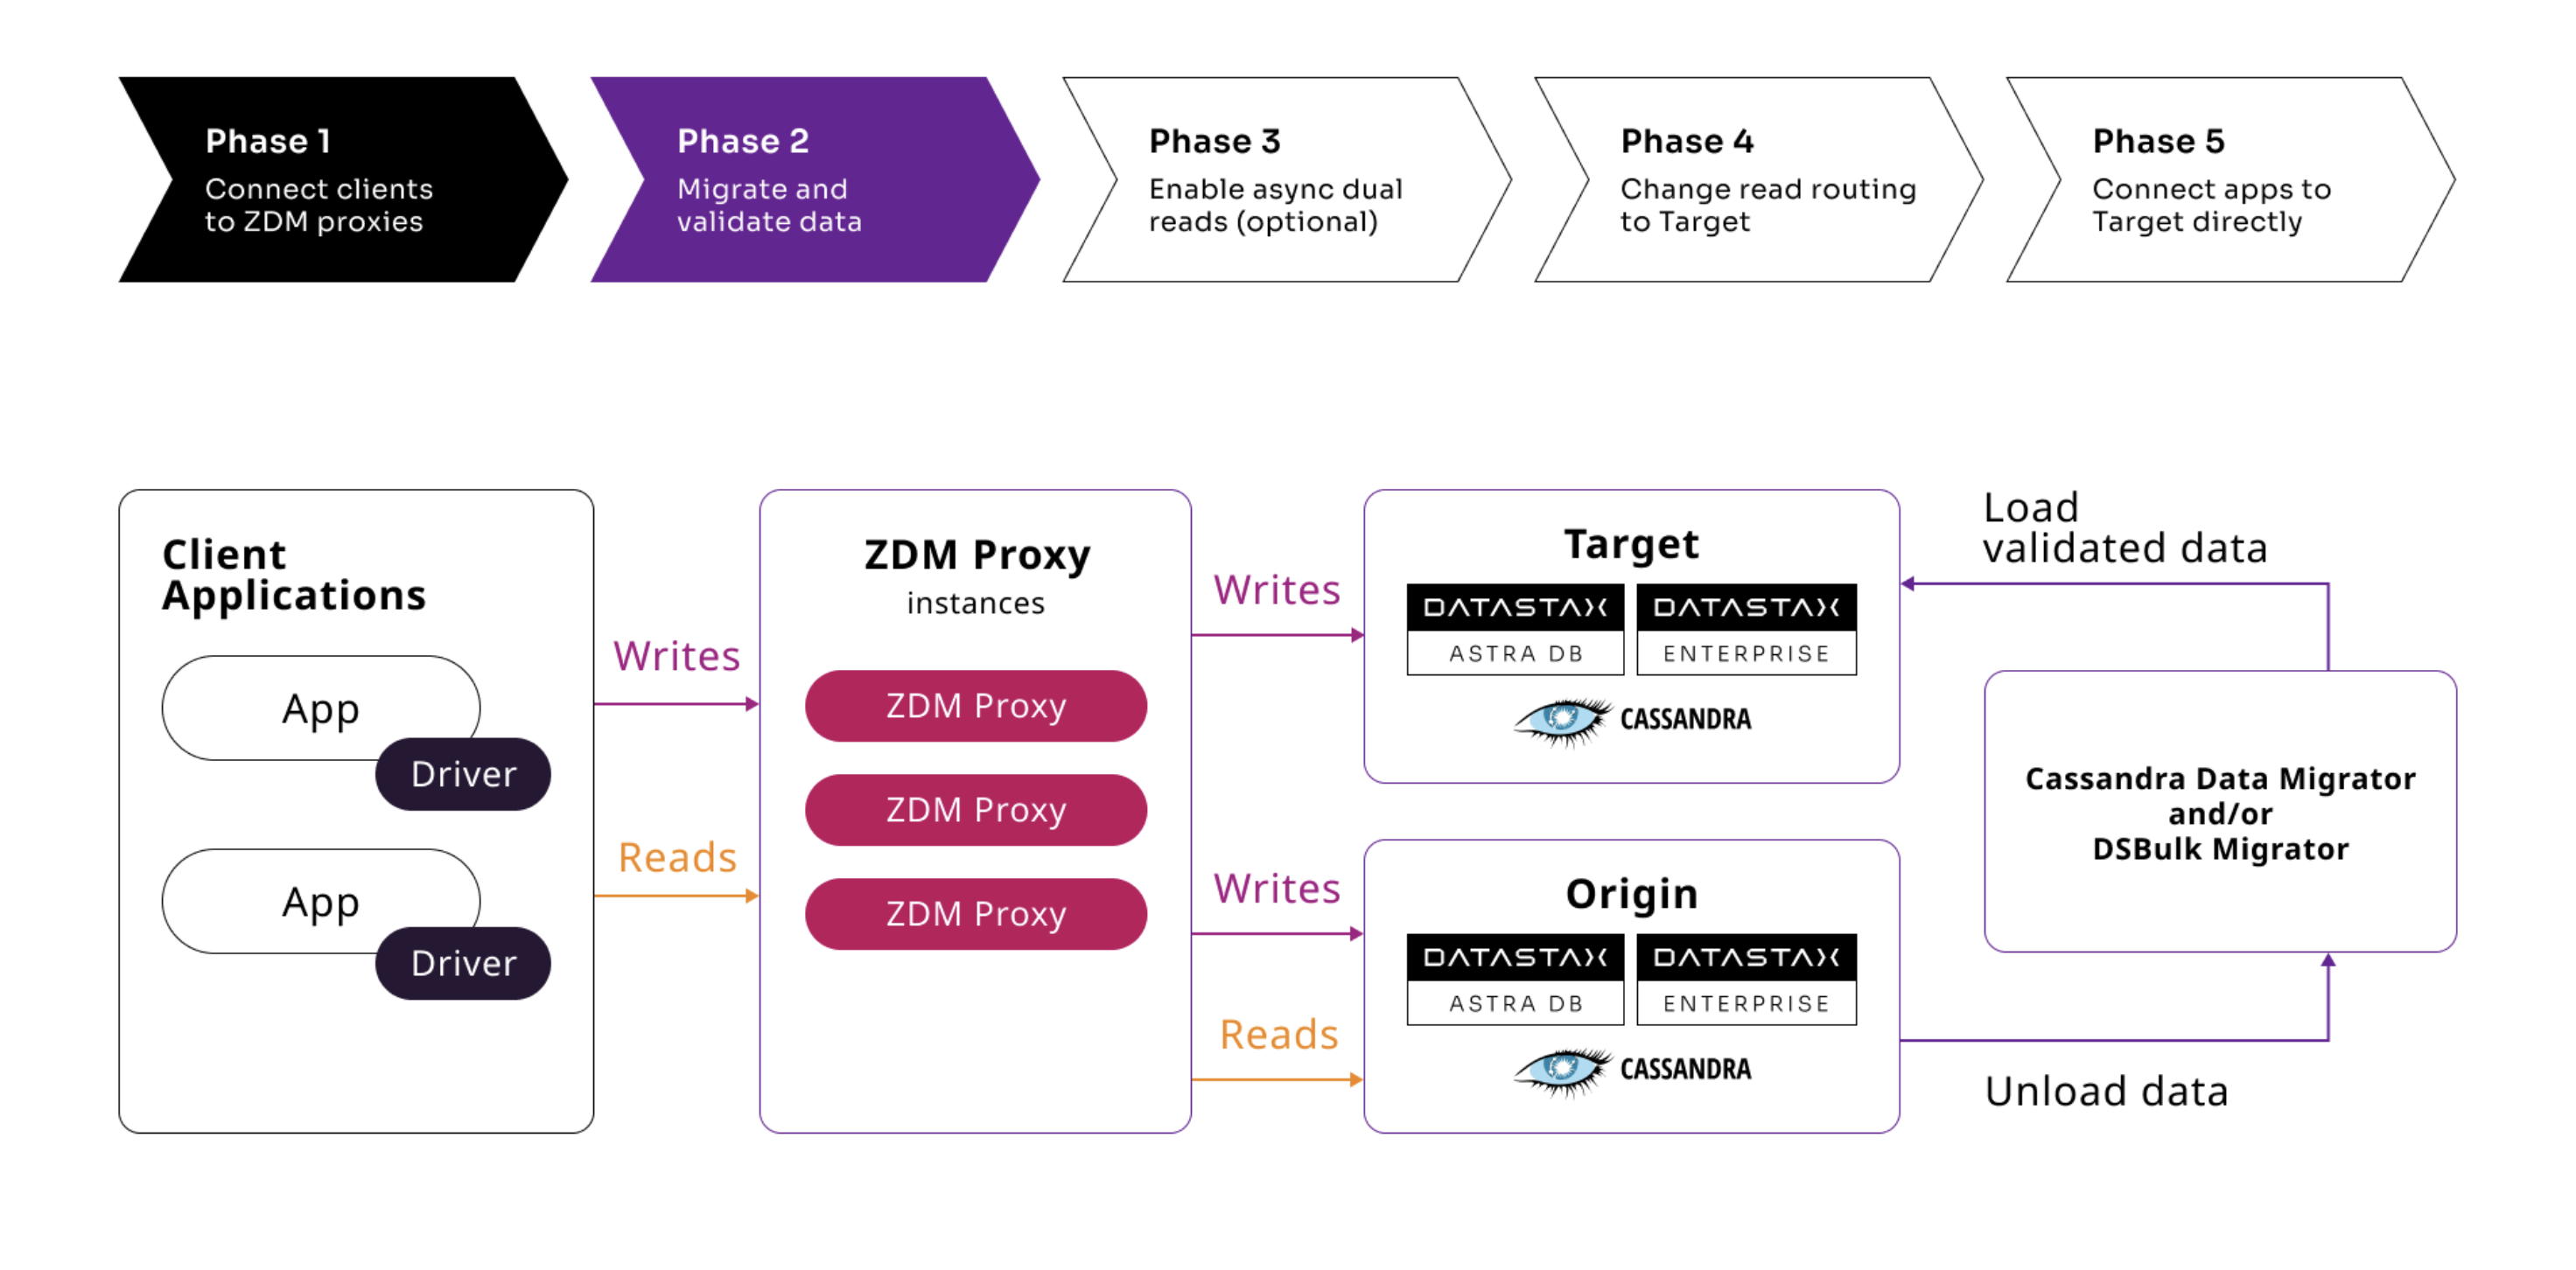
In this phase, you use a data migration tool to copy your existing data to the target database. ZDM Proxy continues to perform dual writes so that you can focus on moving data that was present before you connected ZDM Proxy. Then, you thoroughly validate the migrated data, resolving missing and mismatched records, before moving on to the next phase.
For more information and instructions, see Phase 2: Migrate and validate data.
Phase 3: Enable asynchronous dual reads
This phase is optional but recommended.
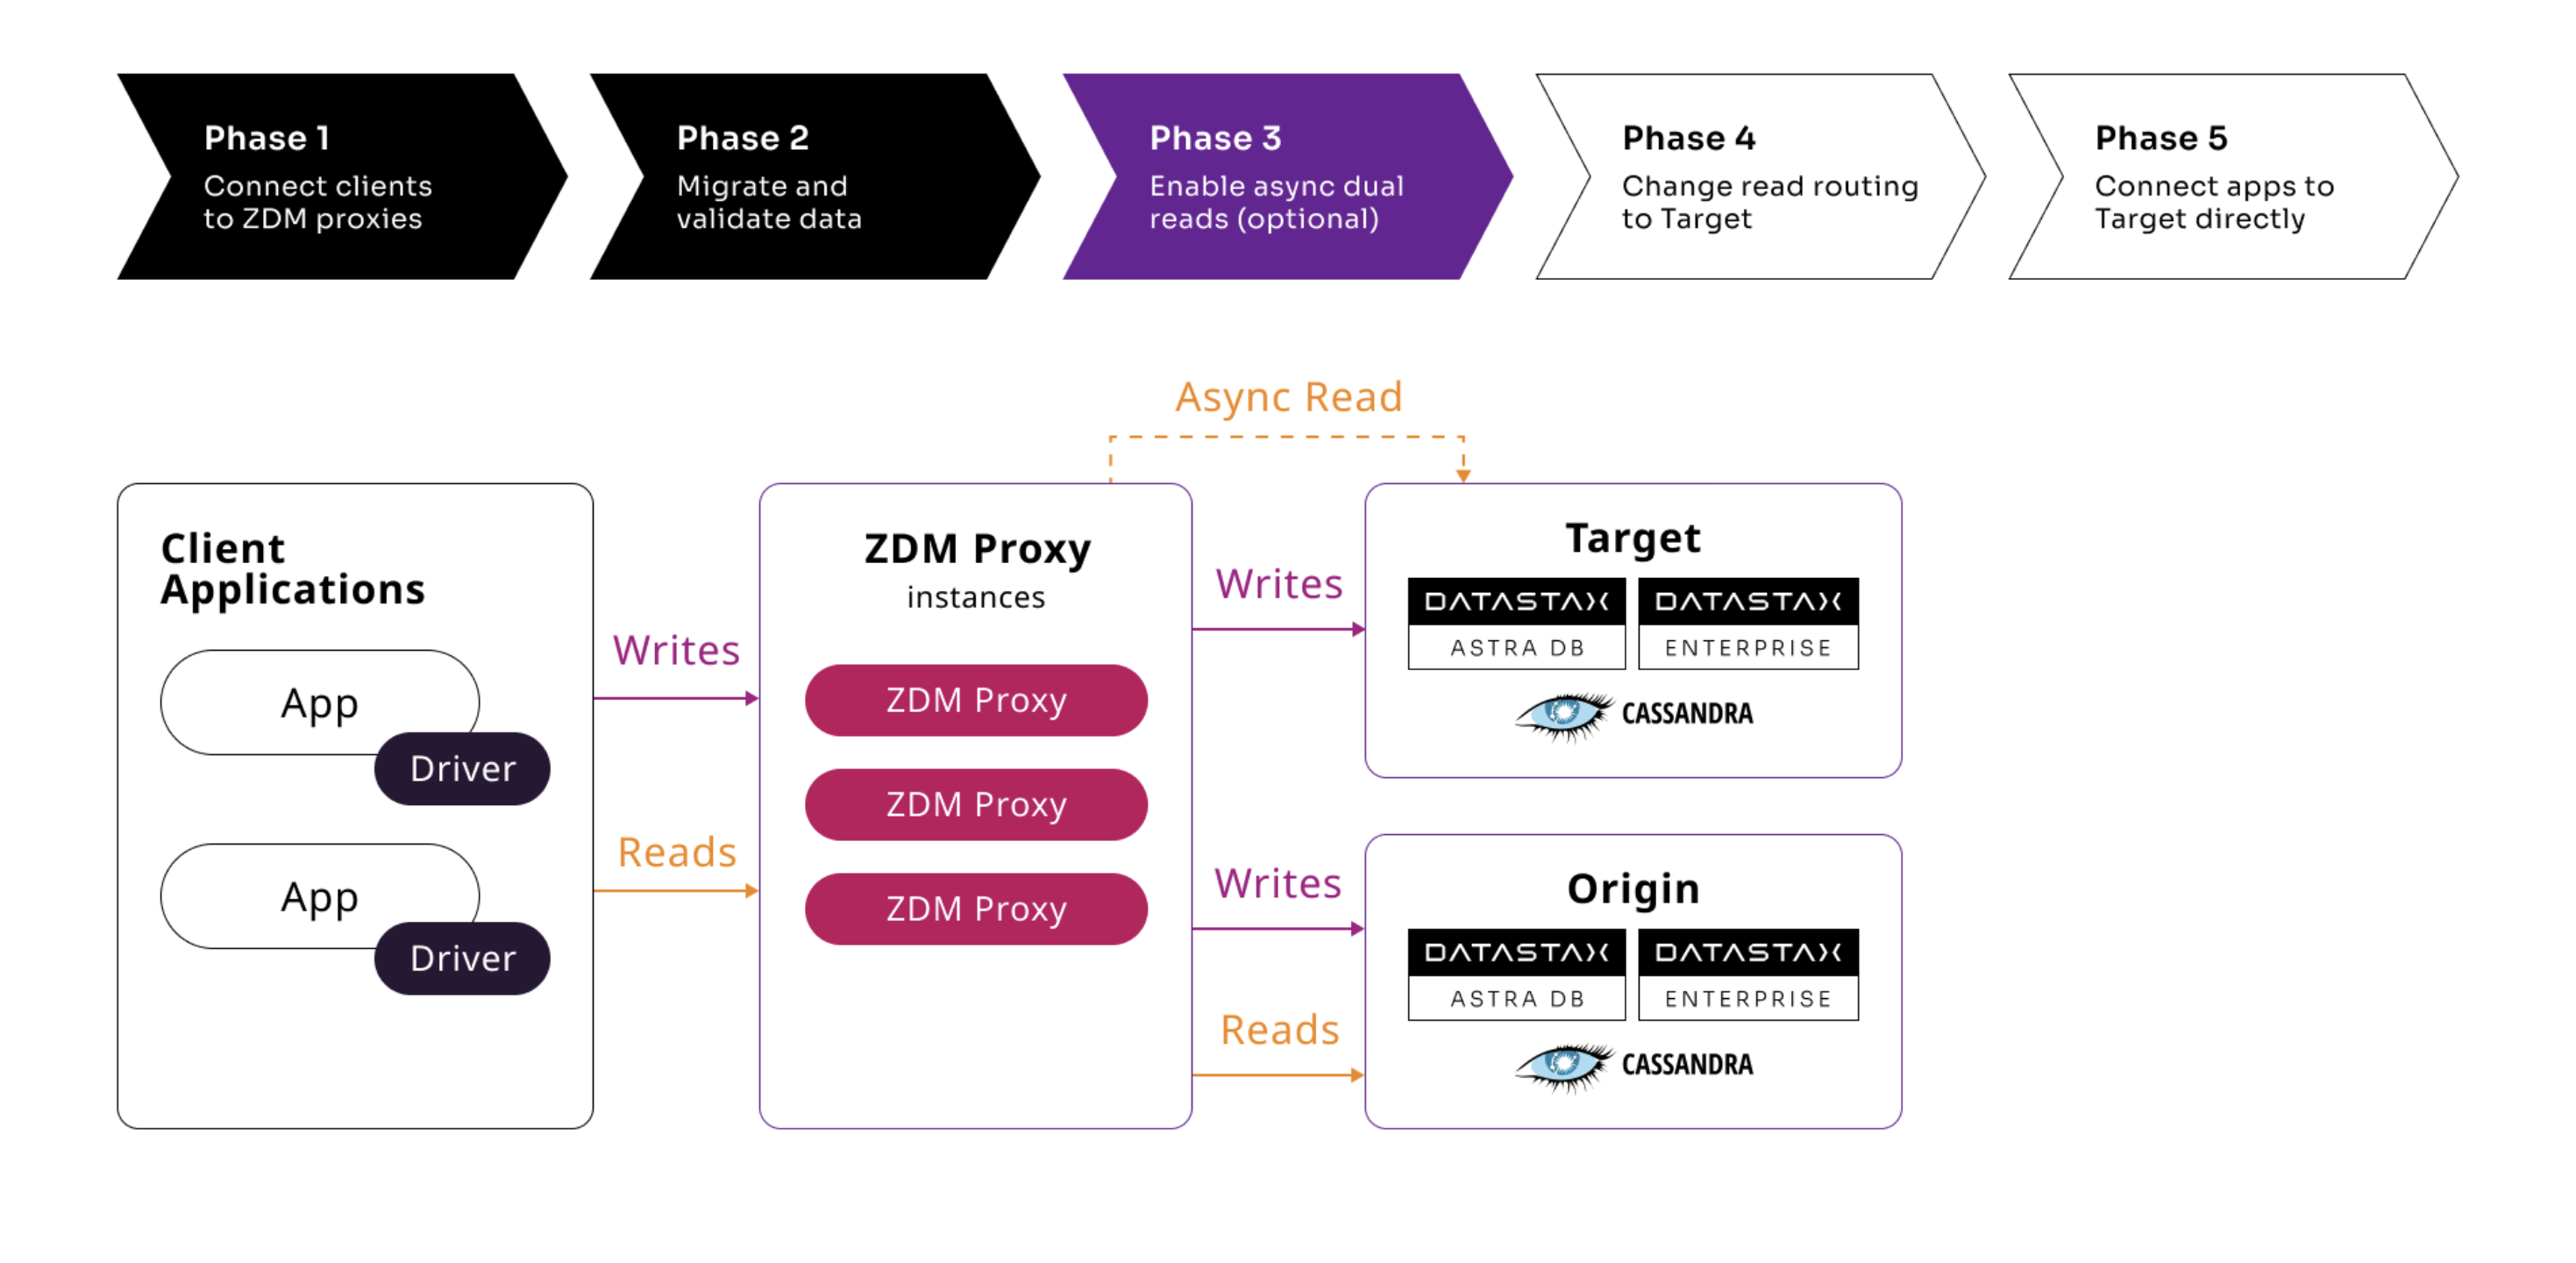
In this phase, you can enable the asynchronous dual reads feature to test the target database’s ability to handle a production workload before you permanently switch your applications to the target database at the end of the migration process.
When enabled, ZDM Proxy sends asynchronous read requests to the secondary database in addition to the synchronous read requests that are sent to the primary database by default.
For more information, see Phase 3: Enable asynchronous dual reads and How ZDM Proxy handles reads and writes.
Phase 4: Route reads to the target database
In this phase, read routing on ZDM Proxy is switched to the target database so that all reads are executed on the target. Writes are still sent to both databases in case you need to rollback the migration.
At this point, the target database becomes the primary database.
For more information and instructions, see Phase 4: Route reads to the target.
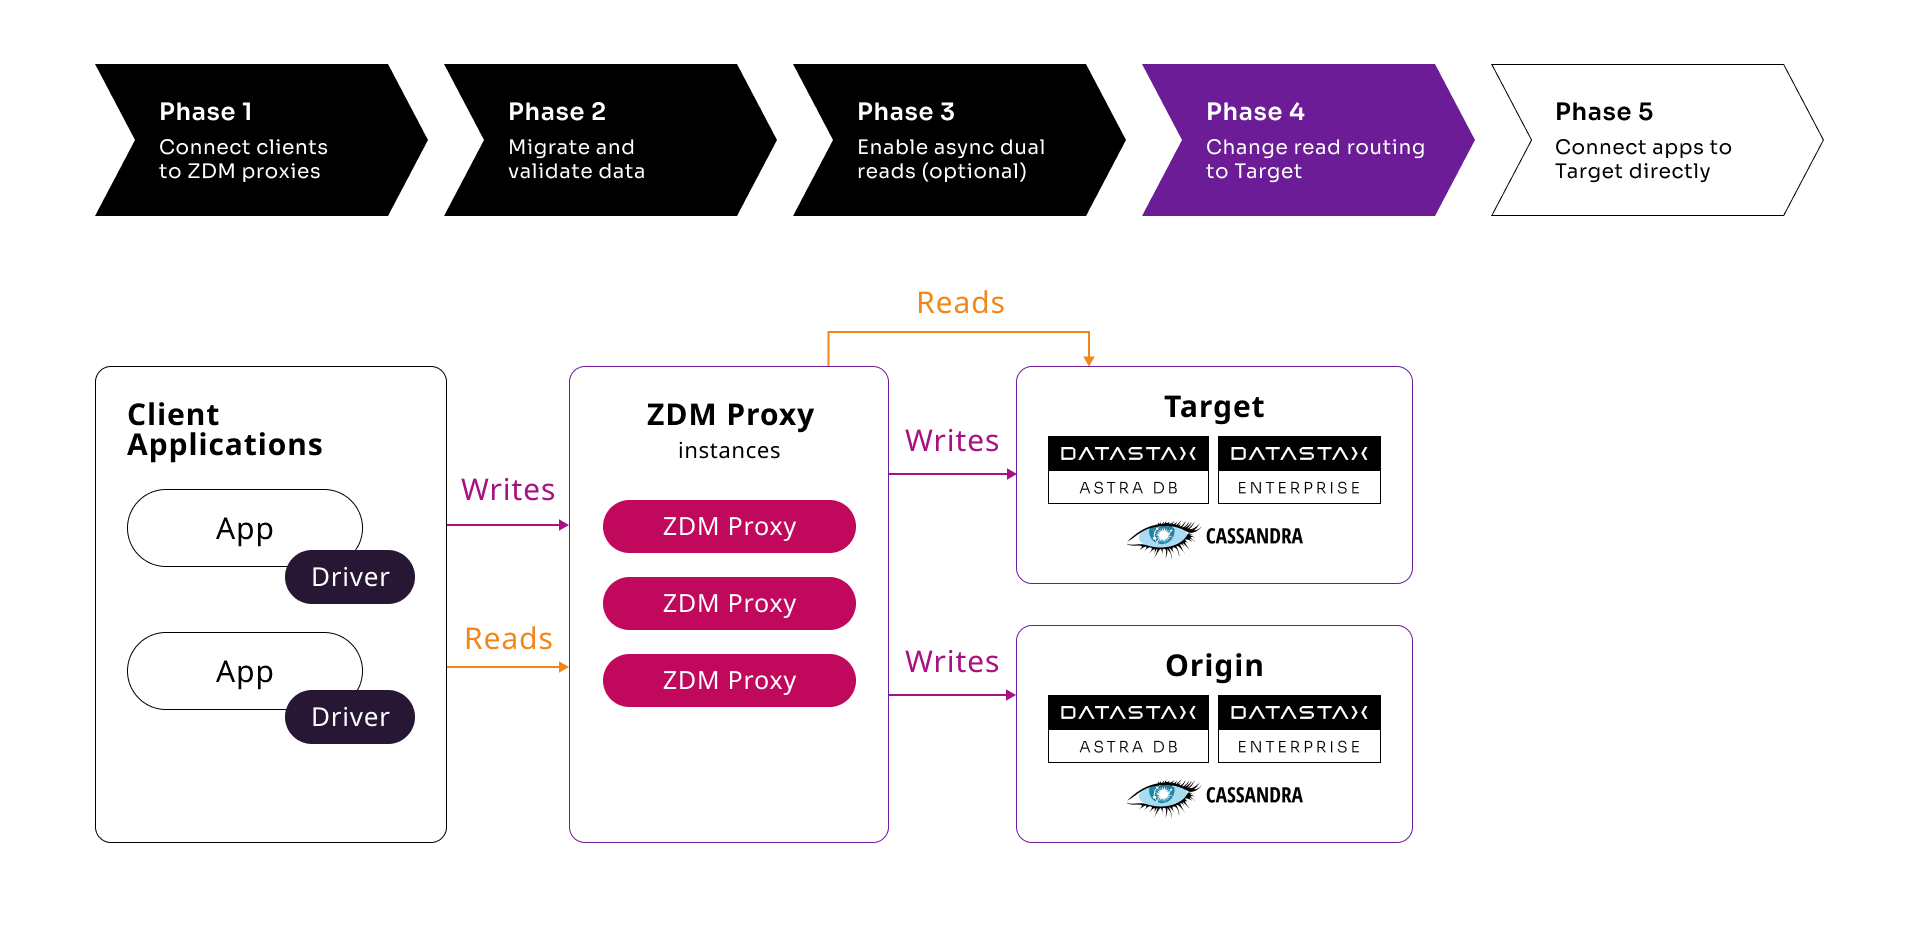
Phase 5: Connect directly to the target database
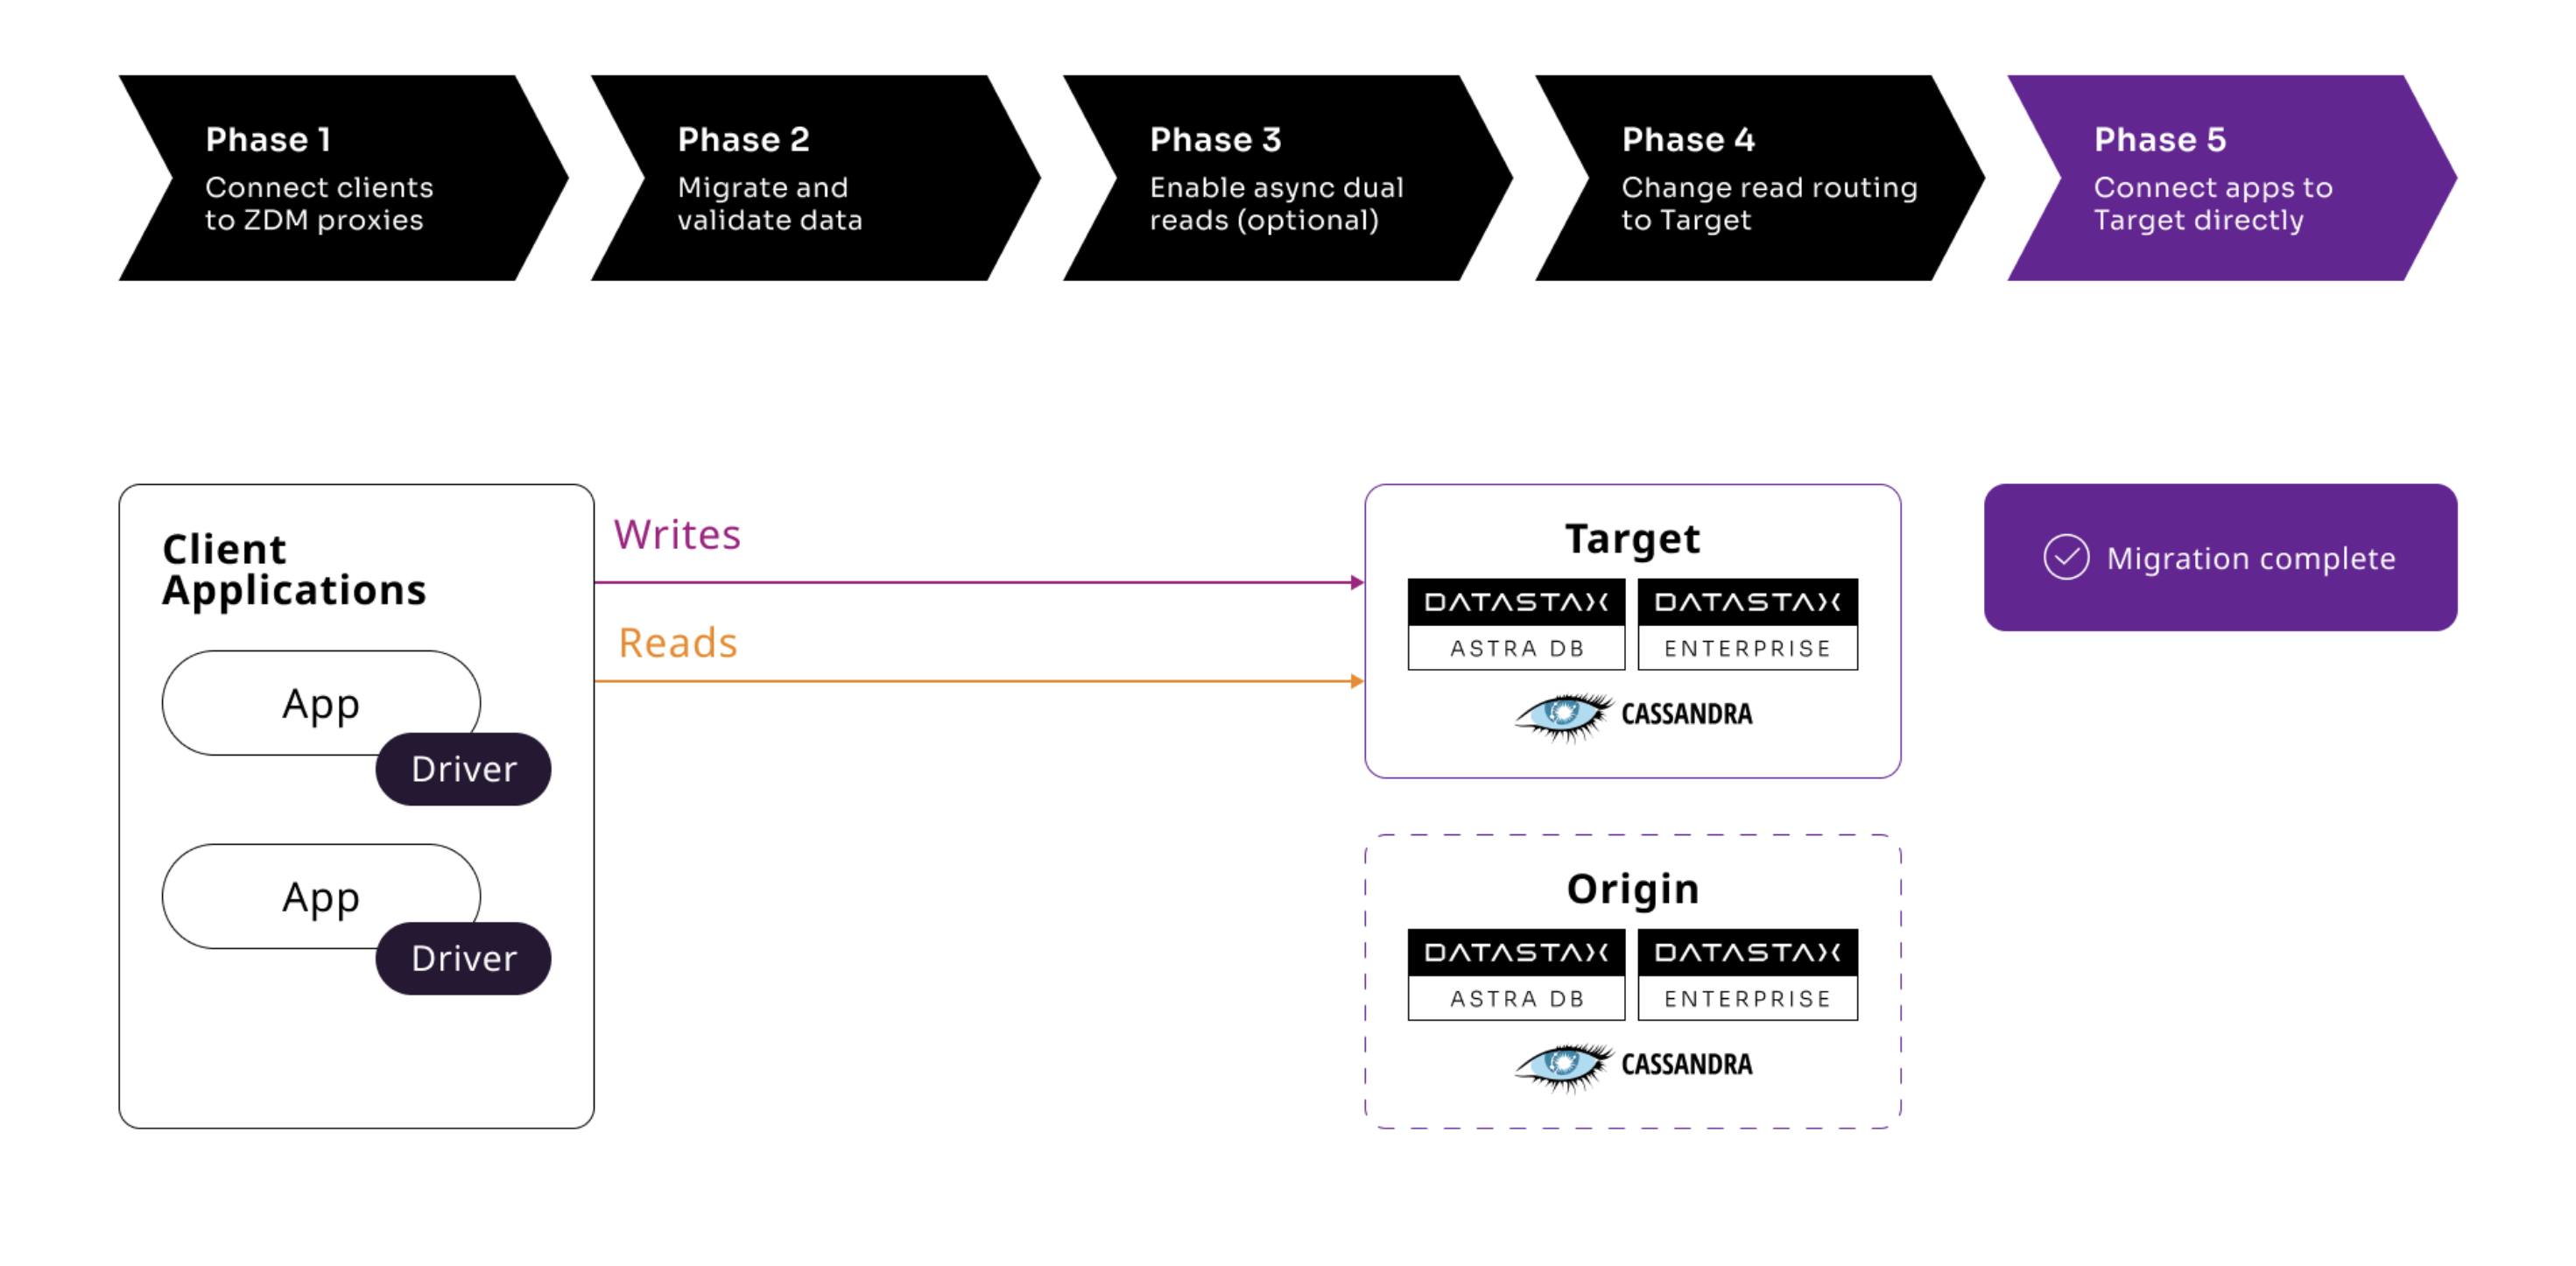
In the final phase of the migration, you move your client applications off ZDM Proxy and connect them directly to the target database.
Once this happens, the migration is complete, and you now exclusively use the target database.
Whether you choose to destroy to retain the origin database depends on your organization’s policies and whether you might need to revert to it in the future. However, be aware that the origin database is no longer synchronized with the target database, and the origin database won’t contain writes that happen after you disconnect ZDM Proxy.
For more information, see Phase 5: Connect client applications to the target cluster.
Zero Downtime Migration interactive lab
As a companion to the ZDM documentation, you can use the Zero Downtime Migration interactive lab to try the entire migration process in a demo environment.
The lab only requires a GitHub account and a supported browser. All browsers are supported except Safari.
You don’t need to install anything because the lab uses a pre-configured GitPod environment.
This lab provides an interactive, detailed walkthrough of the migration process, including pre-migration preparation and each of the five migration phases. The lab describes and demonstrates all steps and automation required to prepare for and complete a migration from any supported origin database to any supported target database.
