Migrate data with Astra DB Sideloader
You can use Astra DB Sideloader to migrate data to Astra DB from Apache Cassandra®, DataStax Enterprise (DSE), or Hyper-Converged Database (HCD).
Prerequisites
Before you use Astra DB Sideloader for a migration, learn about the Astra DB Sideloader process and prepare your environments for Astra DB Sideloader.
Create snapshots
On each node in your origin cluster, use nodetool to create a backup of the data that you want to migrate, including all keyspaces and CQL tables that you want to migrate.
Prepare to create snapshots
-
Due to Astra DB Sideloader limitations related to materialized views, secondary indexes, and encrypted data, you might need to modify the data model on your origin cluster to prepare for the migration. For more information, see Origin cluster requirements.
-
Optional: Before you create snapshots, consider running
nodetool cleanupto remove data that no longer belongs to your nodes. This command is particularly useful after adding more nodes to a cluster because it helps ensure that each node only contains the data that it is responsible for, according to the current cluster configuration and partitioning scheme.If you run
nodetool cleanupbefore you take a snapshot, you can ensure that the snapshot only includes relevant data, potentially reducing the size of the snapshot. Smaller snapshots can lead to lower overall migration times and lower network transfer costs.However, take adequate precautions before you run this command because the cleanup operations can introduce additional load on your origin cluster.
Run nodetool snapshot
Use nodetool snapshot to create snapshots for the tables that you want to migrate.
Don’t create snapshots of system tables or tables that you don’t want to migrate. The migration can fail if you attempt to migrate snapshots that don’t have a matching schema in the target database. Astra DB Sideloader ignores system keyspaces.
The structure of the nodetool snapshot command depends on the keyspaces and tables that you want to migrate.
Snapshot all keyspaces
Create a snapshot of all tables in all keyspaces:
nodetool snapshot -t SNAPSHOT_NAMEReplace the following:
-
SNAPSHOT_NAME: A descriptive name for the snapshot. Use the same snapshot name for each node’s snapshot; this makes it easier to programmatically upload the snapshots to the migration directory.
Snapshot specific keyspaces
Create a snapshot of all tables in one or more specified keyspaces:
nodetool snapshot -t SNAPSHOT_NAME KEYSPACE_NAMEnodetool snapshot -t SNAPSHOT_NAME KEYSPACE_NAME_1 KEYSPACE_NAME_2Replace the following:
-
SNAPSHOT_NAME: A descriptive name for the snapshot. Use the same snapshot name for each node’s snapshot; this makes it easier to programmatically upload the snapshots to the migration directory. -
KEYSPACE_NAME: The name of the keyspace that you want to migrate.To snapshot multiple keyspaces, pass a space-separated list of keyspace names. For example,
customer_data product_data purchase_historyspecifies three keyspaces.
Snapshot specific tables
Create a snapshot of one or more specified tables:
nodetool snapshot -kt KEYSPACE_NAME.TABLE_NAME -t SNAPSHOT_NAMEnodetool snapshot -kt KEYSPACE_NAME_1.TABLE_NAME_A KEYSPACE_NAME_1.TABLE_NAME_B KEYSPACE_NAME_2.TABLE_NAME_X -t SNAPSHOT_NAMEReplace the following:
-
KEYSPACE_NAME.TABLE_NAME: The name of the table that you want to migrate and the keyspace that it belongs to, separated by a period. For example,product_data.appliancesspecifies theappliancestable in theproduct_datakeyspace.To snapshot multiple tables, pass a space-separated list of keyspace-table pairs. For example,
product_data.appliances purchase_history.nevada purchase_history.wisconsinspecifies theappliancestable in theproduct_datakeyspace and thenevadaandwisconsintables in thepurchase_historykeyspace. -
SNAPSHOT_NAME: A descriptive name for the snapshot. Use the same snapshot name for each node’s snapshot; this makes it easier to programmatically upload the snapshots to the migration directory.
Verify snapshot creation with nodetool listsnapshots
Use nodetool listsnapshots to verify that the snapshots were created:
nodetool listsnapshots|
Snapshots have a specific directory structure, such as |
Optional: Use for loops for snapshot creation and validation
If the nodes in your origin cluster are named in a predictable way (for example, dse0, dse1, dse2, etc.), you can use a for loop to simplify snapshot creation.
For example:
- Use a
forloop to snapshot all keyspaces -
To snapshot all keyspaces on each node, append the
nodetoolcommand to yourforloop:for i in 0 1 2; do ssh dse${i} nodetool snapshot -t SNAPSHOT_NAME; done - Use a
forloop to snapshot specific keyspaces -
To snapshot one keyspace on each node, append the
nodetoolcommand to yourforloop:for i in 0 1 2; do ssh dse${i} nodetool snapshot -t SNAPSHOT_NAME KEYSPACE_NAME; doneTo snapshot multiple specific keyspaces on each node, use commas (not spaces) to separate the keyspace names:
for i in 0 1 2; do ssh dse${i} nodetool snapshot -t SNAPSHOT_NAME KEYSPACE_NAME_1,KEYSPACE_NAME_2; done - Use a
forloop to snapshot specific tables -
To snapshot one table on each node, append the
nodetoolcommand to yourforloop:for i in 0 1 2; do ssh dse${i} nodetool snapshot -kt KEYSPACE_NAME.TABLE_NAME -t SNAPSHOT_NAME; doneTo snapshot multiple specific tables on each node, use commas (not spaces) to separate the keyspace-table pairs:
for i in 0 1 2; do ssh dse${i} nodetool snapshot -kt KEYSPACE_NAME_1.TABLE_NAME_A,KEYSPACE_NAME_1.TABLE_NAME_B -t SNAPSHOT_NAME; done
You can use the same for loop structure to verify that each snapshot was successfully created:
for i in 0 1 2; do ssh dse${i} nodetool listsnapshots; doneConfigure the target database
To prepare your target database for the migration, you must record the schema for each table in your origin cluster that you want to migrate, re-create these schemas in your target database, and then set environment variables required to connect to your database.
|
For the migration to succeed, your target database must meet the schema requirements described in this section. Additionally, your snapshots must contain compatible data and directories, as described in Origin cluster requirements and Create snapshots. For example, Astra DB doesn’t support materialized views, and Astra DB Sideloader cannot migrate encrypted data. However, indexes don’t need to match. You can define indexes in your target database independently from the origin cluster because Astra DB Sideloader ignores Storage Attached Indexes (SAI) defined on the origin cluster. During the migration, Astra DB Sideloader automatically populates any SAI defined in your target database, even if those SAI weren’t present in your origin cluster. |
-
Get the following schema properties for each table that you want to migrate:
-
Exact keyspace name.
-
Exact table name.
-
Exact column names, data types, and the order in which they appear in the table creation DDL.
-
Exact primary key definition as defined in your origin cluster, including the partition key, clustering columns, and ascending/descending ordering clauses. You must define partition key columns and clustering columns in the exact order that they are defined on your origin cluster.
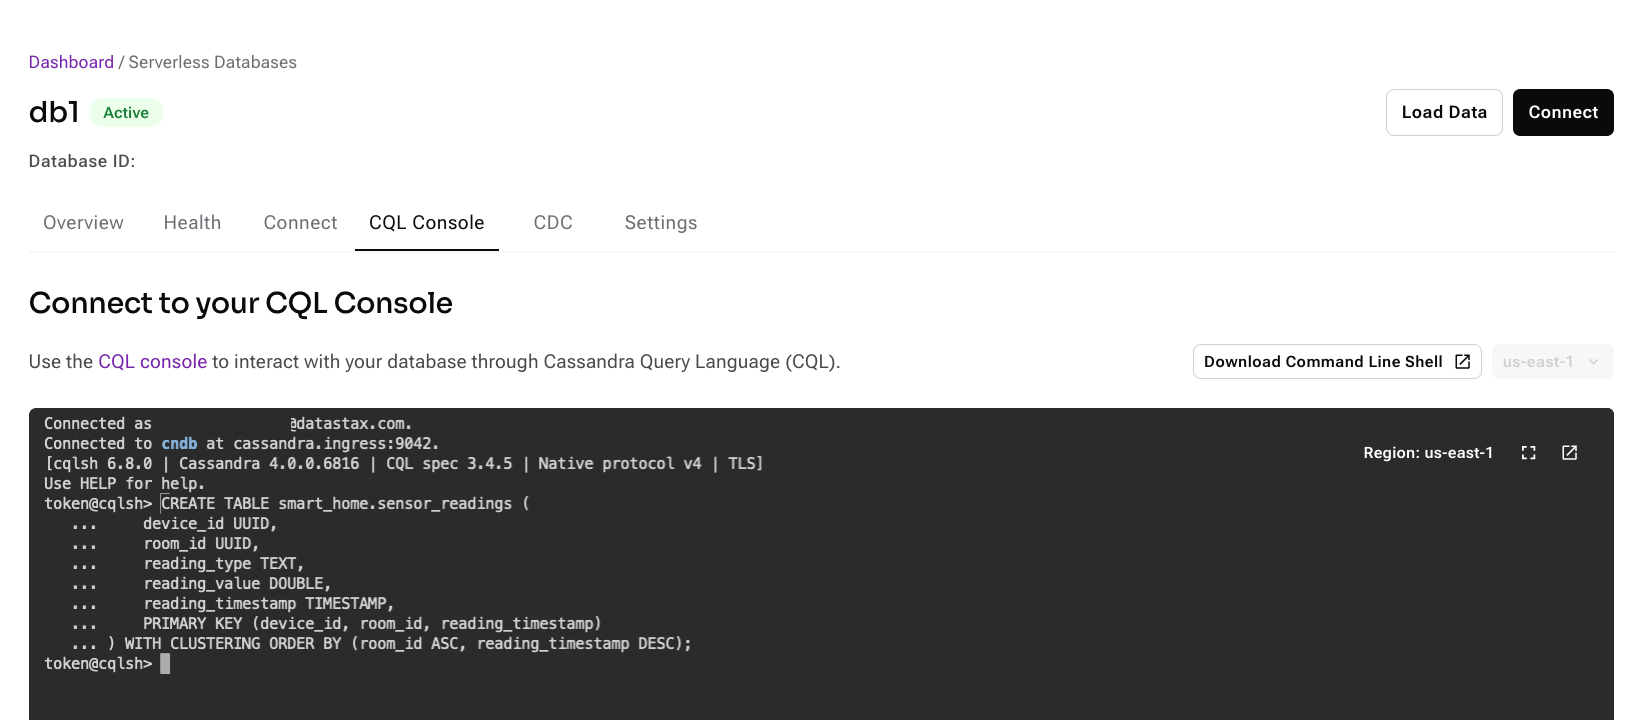
To retrieve schema properties, you can run the
DESCRIBE KEYSPACEcommand on your origin cluster:DESCRIBE KEYSPACE_NAME;Replace
KEYSPACE_NAMEwith the name of the keyspace that contains the tables you want to migrate, such asDESCRIBE smart_home;.Then, get the schema properties from the result:
CREATE TABLE smart_home.sensor_readings (
    device_id UUID,
    room_id UUID,
    reading_type TEXT,
    reading_value DOUBLE,
    reading_timestamp TIMESTAMP,
    PRIMARY KEY (device_id, room_id, reading_timestamp)
) WITH CLUSTERING ORDER BY (room_id ASC, reading_timestamp DESC);
-
-
Re-create the schemas in your target database:
-
In the Astra Portal navigation menu, click Databases, and then click the name of your Astra DB database.
-
Create a keyspace with the exact same name as your origin cluster’s keyspace.
-
In your database’s CQL console, create tables with the exact same names and schemas as your origin cluster.
Astra DB rejects or ignores some table properties, such as compaction strategy. See Astra DB Serverless database limits for more information.
-
-
In your terminal, set environment variables for your target database:
export dbID=DATABASE_ID
export token=APPLICATION_TOKEN
Replace the following:
-
DATABASE_ID: The database ID of your target Astra DB database. -
APPLICATION_TOKEN: An application token with a role that has the required permissions for Astra DB Sideloader, which are Create DB and View DB. You can use a built-in role, such as the Database Administrator role, or a custom role with the required permissions.
Later, you will add another environment variable for the migration ID.
The curl commands in this guide assume that you have set environment variables for token, database ID, and migration ID. Running the commands without these environment variables causes error messages like
<a href="/v2/databases/migrations/">Moved Permanently</a>and404 page not found.Additionally, the curl command use jq to format the JSON responses. If you don’t have jq installed, remove
| jq .from the end of each command. -
Initialize the migration
Use the DevOps API to initialize the migration and get your migration directory path and credentials.
To learn more about the initialization process, see About Astra DB Sideloader: Initialize a migration.
The initialization process can take several minutes to complete, especially if the migration bucket doesn’t already exist.
Get a migration ID
-
In your terminal, use the DevOps API to initialize the data migration:
curl -X POST \ -H "Authorization: Bearer ${token}" \ https://api.astra.datastax.com/v2/databases/${dbID}/migrations/initialize \ | jq . -
Get the
migrationIDfrom the response:{ "migrationID": "272eac1d-df8e-4d1b-a7c6-71d5af232182", "dbID": "b7e7761f-6f7f-4116-81a5-e8eefcf0cc1d", "status": "Initializing", "progressInfo": "", "uploadBucketDir": "", "uploadCredentials": { "name": "", "keys": null, "credentialExpiration": null }, "expectedCleanupTime": "2025-03-04T15:14:38Z" }The
migrationIDis a unique identifier (UUID) for the migration.The response also includes the migration
status. You will refer to this status multiple times throughout the migration process. -
Assign the migration ID to an environment variable:
export migrationID=MIGRATION_IDReplace
MIGRATION_IDwith themigrationIDreturned by theinitializeendpoint.
Check the migration status to verify initialization
-
Check the migration status:
curl -X GET \
    -H "Authorization: Bearer ${token}" \
    https://api.astra.datastax.com/v2/databases/${dbID}/migrations/${migrationID} \
    | jq .
A successful response contains a
MigrationStatusobject. It can take a few minutes for the DevOps API to reflect status changes during a migration. Immediately calling this endpoint after starting a new phase of the migration might not return the actual current status. -
Check the
statusfield in the response:-
"status": "ReceivingFiles": Initialization is complete and your upload credentials are available. Proceed to the next step. -
"status": "Initializing": The migration is still initializing. Wait a few minutes before you check the status again.
-
Get migration directory path and upload credentials
Get your migration directory path and upload credentials from the response. You need these values to upload snapshots to the migration directory.
Get AWS credentials from MigrationStatus
Securely store the uploadBucketDir, accessKeyID, secretAccessKey, and sessionToken from the response:
{
  "migrationID": "272eac1d-df8e-4d1b-a7c6-71d5af232182",
  "dbID": "b7e7761f-6f7f-4116-81a5-e8eefcf0cc1d",
  "status": "ReceivingFiles",
  "progressInfo": "",
  "uploadBucketDir": "s3://ds-mig-b7e7761f-6f7f-4116-81a5-e8eefcf0cc1d/272eac1d-df8e-4d1b-a7c6-71d5af232182/sstables/",
  "uploadCredentials": {
    "name": "sessionToken",
    "keys": {
      "accessKeyID": "ASXXXXXXXXXXXXXXXXXX",
      "secretAccessKey": "2XXXXXXXXXXXXXXXWqcdV519ZubYbyfuNxbZg1Rw",
      "sessionToken": "XXXXXXXXXX"
    },
    "credentialExpiration": "2024-01-18T19:45:09Z",
    "hint": "\nexport AWS_ACCESS_KEY_ID=ASXXXXXXXXXXXXXXXXXX\nexport AWS_SECRET_ACCESS_KEY=2XXXXXXXXXXXXXXXWqcdV519ZubYbyfuNxbZg1Rw\nexport AWS_SESSION_TOKEN=XXXXXXXXXXXXXX\n"
  },
  "expectedCleanupTime": "2024-01-25T15:14:38Z"
}
uploadBucketDir is the migration directory URL.
Note the trailing slash.
uploadCredentials contains the AWS credentials that authorize uploads to the migration directory, namely accessKeyID, secretAccessKey, and sessionToken.
|
The If you use automation to handle Astra DB Sideloader migrations, you might need to script a pause every hour so you can generate new credentials without unexpectedly interrupting the migration. |
Get Google Cloud credentials from MigrationStatus
-
Find the
uploadBucketDirand theuploadCredentialsin the response:{ "migrationID": "272eac1d-df8e-4d1b-a7c6-71d5af232182", "dbID": "b7e7761f-6f7f-4116-81a5-e8eefcf0cc1d", "status": "ReceivingFiles", "progressInfo": "", "uploadBucketDir": "gs://ds-mig-b7e7761f-6f7f-4116-81a5-e8eefcf0cc1d/272eac1d-df8e-4d1b-a7c6-71d5af232182/sstables/", "uploadCredentials": { "name": "TYPE_GOOGLE_CREDENTIALS_FILE", "keys": { "file": "CREDENTIALS_FILE" }, "credentialExpiration": "2024-08-07T18:51:39Z" }, "expectedCleanupTime": "2024-08-14T15:14:38Z" }uploadBucketDiris the migration directory URL. Note the trailing slash.uploadCredentialscontains a base64-encoded file containing Google Cloud credentials that authorize uploads to the migration directory. -
Pipe the Google Cloud credentials
fileto acreds.jsonfile:curl -X GET \ -H "Authorization: Bearer ${token}" \ https://api.astra.datastax.com/v2/databases/${dbID}/migrations/${migrationID} \ | jq -r '.uploadCredentials.keys.file' \ | base64 -d > creds.json -
Securely store the
uploadBucketDirandcreds.json.
Get Azure credentials from MigrationStatus
Securely store the uploadBucketDir and urlSignature from the response:
{
  "migrationID": "456ca4a9-0551-46c4-b8bb-90fcd136a0c3",
  "dbID": "ccefd141-8fda-4e4d-a746-a102a96657bc",
  "status": "ReceivingFiles",
  "progressInfo": "",
  "uploadBucketDir": "https://muztx5cqmp3jhe3j2guebksz.blob.core.windows.net/mig-upload-456ca4a9-0551-46c4-b8bb-90fcd136a0c3/sstables/",
  "uploadCredentials": {
    "name": "URL signature",
    "keys": {
      "url": "https://UPLOAD_BUCKET_DIR/?si=AZURE_SAS_TOKEN",
      "urlSignature": "si=AZURE_SAS_TOKEN"
    },
    "credentialExpiration": "2025-04-02T15:14:31Z"
  },
  "expectedCleanupTime": "2025-03-04T15:14:38Z"
}
uploadBucketDir is the migration directory URL.
Note the trailing slash.
uploadCredentials contains url and urlSignature keys that represent an Azure Shared Access Signature (SAS) token.
You need the urlSignature to upload snapshots to the migration directory.
In the preceding example, these strings are truncated for readability.
Upload snapshots to the migration directory
Use your cloud provider’s CLI and your upload credentials to upload snapshots for each origin node into the migration directory.
|
Be aware of the following requirements for the upload commands:
|
Upload snapshots to AWS
-
Set environment variables for the AWS credentials that were generated when you initialized the migration:
export AWS_ACCESS_KEY_ID=ACCESS_KEY_ID export AWS_SECRET_ACCESS_KEY=SECRET_ACCESS_KEY export AWS_SESSION_TOKEN=SESSION_TOKEN -
Use the AWS CLI to upload one snapshot from one node into the migration directory:
du -sh CASSANDRA_DATA_DIR/KEYSPACE_NAME/*/snapshots/*SNAPSHOT_NAME*; \
aws s3 sync --only-show-errors --exclude '*' --include '*/snapshots/SNAPSHOT_NAME*' CASSANDRA_DATA_DIR/ MIGRATION_DIRNODE_NAME
Replace the following:
-
CASSANDRA_DATA_DIR: The absolute file system path to where Cassandra data is stored on the node. For example,/var/lib/cassandra/data. -
KEYSPACE_NAME: The name of the keyspace that contains the tables you want to migrate. -
SNAPSHOT_NAME: The name of the snapshot backup that you created withnodetool snapshot. -
MIGRATION_DIR: The entireuploadBucketDirvalue that was generated when you initialized the migration, including the trailing slash. -
NODE_NAME: The host name of the node that your snapshots are from. It is important to use the specific node name to ensure that each node has a unique directory in the migration bucket.
Example: Upload a snapshot with AWS CLI# Set environment variables export AWS_ACCESS_KEY_ID=XXXXXXXX export AWS_SECRET_ACCESS_KEY=XXXXXXXXXX export AWS_SESSION_TOKEN=XXXXXXXXXX # Upload "sensor_readings" snapshot from "dse0" node du -sh /var/lib/cassandra/data/smart_home/*/snapshots/*sensor_readings*; \ aws s3 sync --only-show-errors --exclude '*' --include '*/snapshots/sensor_readings*' /var/lib/cassandra/data/ s3://ds-mig-b7e7761f-6f7f-4116-81a5-e8eefcf0cc1d/272eac1d-df8e-4d1b-a7c6-71d5af232182/sstables/dse0 -
-
Monitor upload progress:
-
Use the AWS CLI to get a list of cloud storage keys for the files that have been successfully uploaded to the migration directory:
aws s3 ls --human-readable --summarize --recursive MIGRATION_DIRReplace
MIGRATION_DIRwith theuploadBucketDirthat was generated when you initialized the migration. -
Compare the returned list against the files in your snapshot directory. When the lists match, the upload is complete.
You can potentially increase upload speeds by adjusting the
max_concurrent_requests,multipart_threshold, andmultipart_chunksizeparameters in your AWS CLI S3 configuration. However, upload time primarily depends on the snapshot size, network throughput from your origin cluster to the migration bucket, and whether the origin cluster and migration bucket are in the same region.
-
-
Repeat the upload process for each snapshot (
SNAPSHOT_NAME) and node (NODE_NAME) in your origin cluster.If your credentials expire, see Get new upload credentials.
Use aforloop to simplify snapshot uploadsIf the nodes in your origin cluster have predictable names (for example,
dse0,dse1, anddse2), then you can use aforloop to streamline the execution of the upload commands. For example:# Set environment variables export AWS_ACCESS_KEY_ID=ACCESS_KEY_ID export AWS_SECRET_ACCESS_KEY=SECRET_ACCESS_KEY export AWS_SESSION_TOKEN=SESSION_TOKEN # Loop over the sync command for all nodes for i in 0 1 2; do ssh dse${i} \ "du -sh CASSANDRA_DATA_DIR/KEYSPACE_NAME/*/snapshots/*SNAPSHOT_NAME*; \ aws s3 sync --only-show-errors --exclude '*' --include '*/snapshots/SNAPSHOT_NAME*' CASSANDRA_DATA_DIR/ MIGRATION_DIRdse${i}" & done
Uploaded snapshots are staged in the migration directory, but the data is not yet written to the target database. After uploading snapshots, you must import the data to finish the migration.
|
Idle migration directories are evicted
As an added security measure, migrations that remain continuously idle for one week are subject to automatic cleanup, which deletes all associated snapshots, revokes any unexpired upload credentials, and then closes the migration. DataStax recommends that you manually reschedule the cleanup if you don’t plan to launch the migration within one week or if you need several days to upload snapshots or import data. For large migrations, it can take several days to upload snapshots and import data. Make sure you manually reschedule the cleanup to avoid automatic cleanup. |
Upload snapshots to Google Cloud Storage
-
Authenticate to Google Cloud with the
creds.jsonfile that you created when you initialized the migration:gcloud auth activate-service-account --key-file=creds.jsonIf necessary, modify the
--key-filepath to match the location of yourcreds.jsonfile, such as--key-file=~/.gcloud_credentials/creds.json.You can also use
gcloud auth login --cred-file creds.json. -
Use
gsutilto upload one snapshot from one node into the migration directory:gsutil -m rsync -r -d CASSANDRA_DATA_DIR/KEYSPACE_NAME/**/snapshots/SNAPSHOT_NAME/ MIGRATION_DIRNODE_NAME/Replace the following:
-
CASSANDRA_DATA_DIR: The absolute file system path to where Cassandra data is stored on the node. For example,/var/lib/cassandra/data. -
KEYSPACE_NAME: The name of the keyspace that contains the tables you want to migrate. -
SNAPSHOT_NAME: The name of the snapshot backup that you created withnodetool snapshot. -
MIGRATION_DIR: The entireuploadBucketDirvalue that was generated when you initialized the migration, including the trailing slash. -
NODE_NAME: The host name of the node that your snapshots are from. It is important to use the specific node name to ensure that each node has a unique directory in the migration bucket.
Example: Upload a snapshot with gcloud and gsutil# Authenticate gcloud auth activate-service-account --key-file=creds.json # Upload "sensor_readings" snapshot from "dse0" node gsutil -m rsync -r -d /var/lib/cassandra/data/smart_home/**/snapshots/sensor_readings/ gs://ds-mig-b7e7761f-6f7f-4116-81a5-e8eefcf0cc1d/272eac1d-df8e-4d1b-a7c6-71d5af232182/sstables/dse0 -
-
Monitor upload progress:
-
Use
gsutilto get a list of objects that have been successfully uploaded to the migration directory:gsutil ls -r MIGRATION_DIRReplace
MIGRATION_DIRwith theuploadBucketDirthat was generated when you initialized the migration. -
Compare the returned list against the files in your snapshot directory. When the lists match, the upload is complete.
The
-mflag ingsutil -m rsyncenables parallel synchronization, which can improve upload speed. However, upload time primarily depends on the snapshot size, network throughput from your origin cluster to the migration bucket, and whether the origin cluster and migration bucket are in the same region.
-
-
Repeat the upload process for each snapshot (
SNAPSHOT_NAME) and node (NODE_NAME) in your origin cluster.Use aforloop to simplify snapshot uploadsIf the nodes in your origin cluster have predictable names (for example,
dse0,dse1, anddse2), then you can use aforloop to streamline the execution of thegsutil rsynccommands. For example:for i in 0 1 2; do ssh dse${i} \ du -sh CASSANDRA_DATA_DIR/KEYSPACE_NAME/*/snapshots/*SNAPSHOT_NAME*; \ gsutil -m rsync -r -d CASSANDRA_DATA_DIR/KEYSPACE_NAME/**/snapshots/SNAPSHOT_NAME/ MIGRATION_DIRdse${i} & done
Uploaded snapshots are staged in the migration directory, but the data is not yet written to the target database. After uploading snapshots, you must import the data to finish the migration.
|
Idle migration directories are evicted
As an added security measure, migrations that remain continuously idle for one week are subject to automatic cleanup, which deletes all associated snapshots, revokes any unexpired upload credentials, and then closes the migration. DataStax recommends that you manually reschedule the cleanup if you don’t plan to launch the migration within one week or if you need several days to upload snapshots or import data. For large migrations, it can take several days to upload snapshots and import data. Make sure you manually reschedule the cleanup to avoid automatic cleanup. |
Upload snapshots to Azure
-
Set environment variables for the following values:
-
AZURE_SAS_TOKEN: TheurlSignaturekey that was generated when you initialized the migration. -
CASSANDRA_DATA_DIR: The absolute file system path to where Cassandra data is stored on the node, including the trailing slash. For example,/var/lib/cassandra/data/. -
SNAPSHOT_NAME: The name of the snapshot backup that you created withnodetool snapshot. -
MIGRATION_DIR: The entireuploadBucketDirvalue that was generated when you initialized the migration, including the trailing slash. -
NODE_NAME: The host name of the node that your snapshots are from. It is important to use the specific node name to ensure that each node has a unique directory in the migration bucket.
export AZURE_SAS_TOKEN="AZURE_CREDENTIALS_URL" export CASSANDRA_DATA_DIR="CASSANDRA_DATA_DIR" export SNAPSHOT_NAME="SNAPSHOT_NAME" export MIGRATION_DIR="MIGRATION_DIR" export NODE_NAME="NODE_NAME" -
-
Use the Azure CLI to upload one snapshot from one node into the migration directory:
for dir in $(find "$CASSANDRA_DATA_DIR" -type d -path "*/snapshots/${SNAPSHOT_NAME}*"); do REL_PATH="${dir#"$CASSANDRA_DATA_DIR"}" # Remove the base path DEST_PATH="${MIGRATION_DIR}${NODE_NAME}/${REL_PATH}/?${AZURE_SAS_TOKEN}" azcopy sync "$dir" "$DEST_PATH" --recursive done -
Monitor upload progress:
-
Use the Azure CLI to get the curent contents of the migration directory:
azcopy list ${MIGRATION_DIR}?${AZURE_SAS_TOKEN} -
Compare the returned list against the files in your snapshot directory. When the lists match, the upload is complete.
Upload time primarily depends on the snapshot size, network throughput from your origin cluster to the migration bucket, and whether the origin cluster and migration bucket are in the same region.
-
-
Repeat the upload process for each snapshot and node in your origin cluster. Be sure to change the
SNAPSHOT_NAMEandNODE_NAMEenvironment variables as needed.
Uploaded snapshots are staged in the migration directory, but the data is not yet written to the target database. After uploading snapshots, you must import the data to finish the migration.
|
Idle migration directories are evicted
As an added security measure, migrations that remain continuously idle for one week are subject to automatic cleanup, which deletes all associated snapshots, revokes any unexpired upload credentials, and then closes the migration. DataStax recommends that you manually reschedule the cleanup if you don’t plan to launch the migration within one week or if you need several days to upload snapshots or import data. For large migrations, it can take several days to upload snapshots and import data. Make sure you manually reschedule the cleanup to avoid automatic cleanup. |
Import data
After you completely upload snapshots for each origin node, import the data into your target database.
Data import is a multi-step operation that requires complete success. If one step fails, then the entire import operation stops and the migration fails.
To learn more about the data import process, see About Astra DB Sideloader: Import data.
|
-
Use the DevOps API to launch the data import:
curl -X POST \
    -H "Authorization: Bearer ${token}" \
    https://api.astra.datastax.com/v2/databases/${dbID}/migrations/${migrationID}/launch \
    | jq .
Although this call returns immediately, the import process takes time.
-
Check the migration status periodically:
curl -X GET \
    -H "Authorization: Bearer ${token}" \
    https://api.astra.datastax.com/v2/databases/${dbID}/migrations/${migrationID} \
    | jq .
A successful response contains a
MigrationStatusobject. It can take a few minutes for the DevOps API to reflect status changes during a migration. Immediately calling this endpoint after starting a new phase of the migration might not return the actual current status. -
Check the
statusfield in the response:-
"status": "ImportInProgress": The data is still being imported. Wait a few minutes before you check the status again. -
"status": "MigrationDone": The import is complete, and you can proceed to Validate the migrated data.
-
-
If the migration takes more than a few days, manually reschedule the cleanup to avoid automatic cleanup.
-
If the migration fails, see Troubleshoot Astra DB Sideloader.
Validate the migrated data
After the migration is complete, you can query the migrated data using the CQL shell (cqlsh) or Data API.
You can run CDM in validation mode for more thorough validation. CDM also offers an AutoCorrect mode to reconcile any differences that it detects.
