Install Hyper-Converged Database (HCD)
You can install HCD using the Mission Control UI, manually using the CLI, or with Docker to explore standalone container development in a local, non-prod environment. DataStax recommends using Mission Control to manage your clusters in production environments.
Choose a deployment method
Before starting development, you need to deploy an HCD cluster. DataStax offers a variety of ways to set up a cluster. Select the method below that best suits your environment.
| Method | Description |
|---|---|
Mission Control (preferred method) |
Mission Control is a cloud-based service that provides a unified management console for your database clusters. If you are planning a production deployment, DataStax recommends using Mission Control to manage your clusters. For installation instructions, see Install and configure Mission Control. Mission Control is also able to deploy the Data API for a simple JSON document oriented interface to data. For more details on the Data API and how it compares to the CQL interface, see API reference overview. |
CLI |
You can manually run kubectl commands to install HCD. DataStax recommends that you use this installation method only if you have experience with Kubernetes. You can use the Mission Control UI to install HCD without running Kubernetes manually. |
Docker |
You can use Docker to explore non-prod development with HCD in a containerized environment. An image for HCD is available at https://hub.docker.com/r/datastax/HCD/. |
Prerequisites
-
Mission Control UI
-
CLI
-
Standalone Docker container
You need the following:
-
A Mission Control instance deployed in Control Plane mode. For installation instructions, see Mission Control installation overview.
-
A Mission Control project where you want to add the new database cluster. See Managing projects for details.
You need the following:
-
Working knowledge of Kubernetes.
-
Access to a Kubernetes cluster.
-
kubectl installed and configured.
You need the following:
-
Docker must be installed and configured on your machine.
-
The Docker container must have the Java 11 runtime environment and Python 3 installed in the execution environment.
-
Create and deploy an HCD cluster
Be sure you review the options for deployment methods before proceeding.
-
Mission Control UI
-
CLI
-
Standalone Docker container
To create and deploy an HCD cluster in Mission Control, do the following:
-
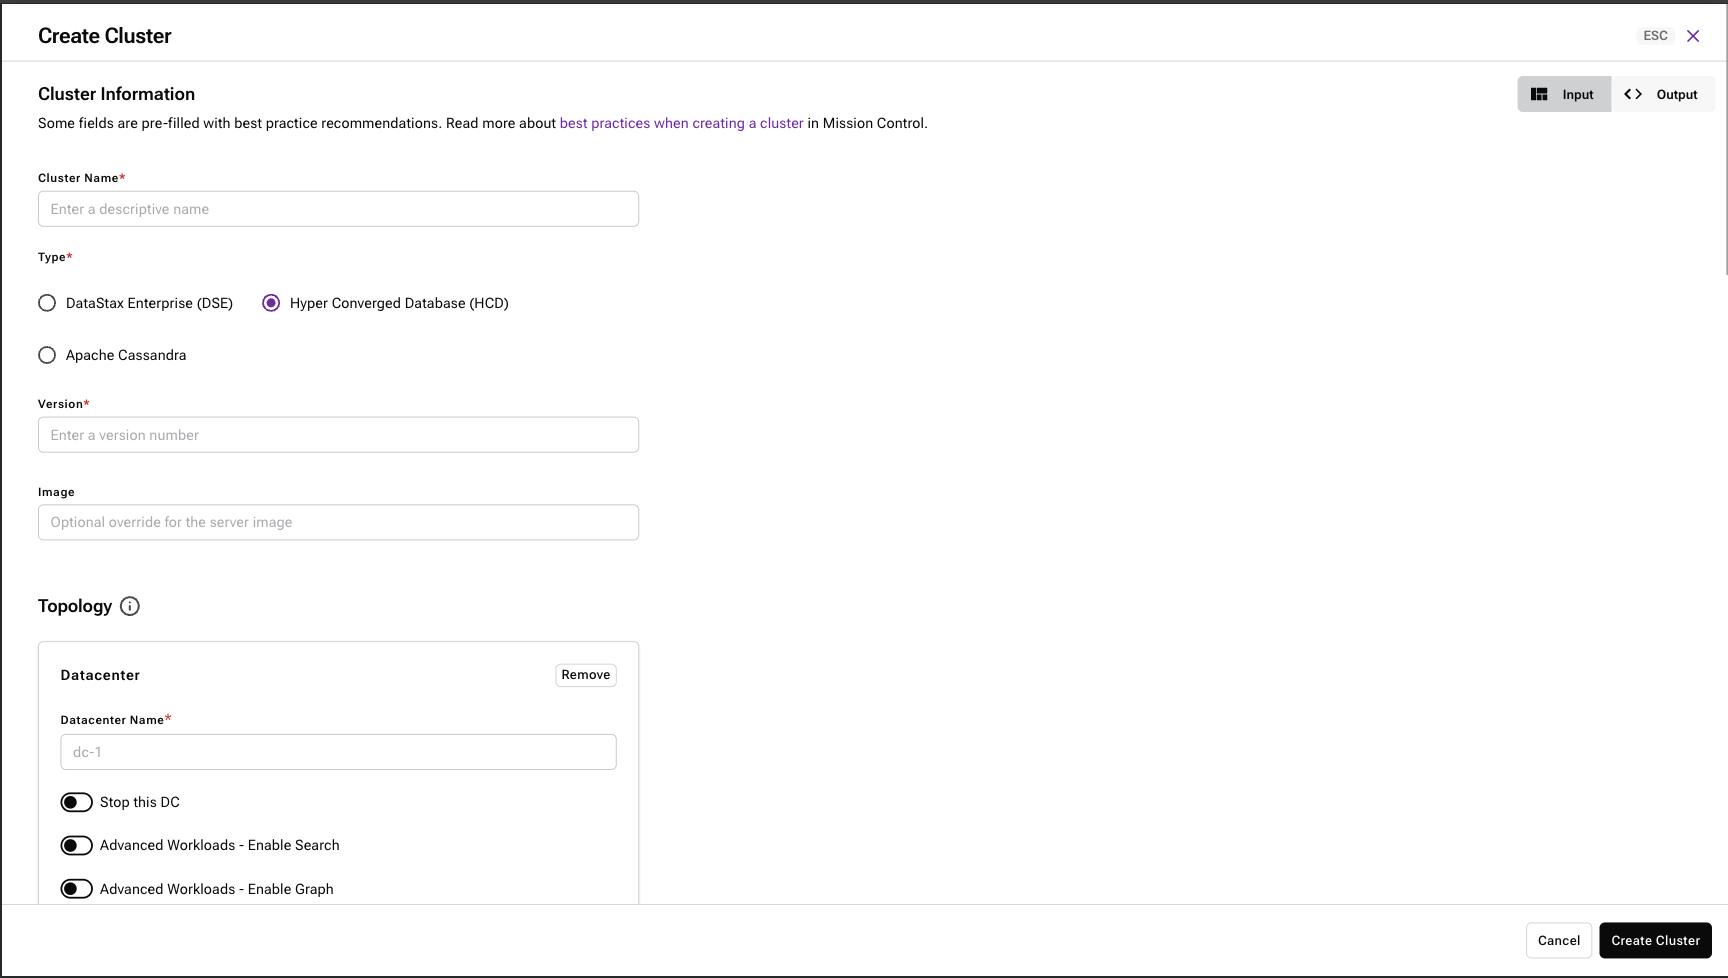
In the Mission Control UI, select a project, and then click Create Cluster.
-
Enter a meaningful, human-readable Cluster Name.
The Cluster Name can be any string of characters, including international, alphanumeric, punctuation—dashes, spaces, underscores, upper or lower case.
After you create a cluster, you can’t change its name. Cluster names are permanent. The name uniquely identifies the cluster across all projects and all environments to prevent a logical cluster from inadvertently joining another.
-
For Type, select Hyper-Converged Database (HCD).
-
Enter a Version number, for example,
1.0.0.For a list of available versions, see the HCD Release Notes.
-
Leave the Image field blank. It is for advanced users.
-
To define the Datacenter configuration, do the following:
-
Enter a meaningful, human-readable Datacenter Name.
After you create a cluster, you can’t change the datacenter names. Datacenter names are permanent. The datacenter name:
-
Must start with an alphanumeric character.
-
Must be a single word.
-
Can be any capitalization: upper, lower, or mixed-case.
-
Can include dashes and underscores.
-
Must not include spaces.
-
-
Optional: Add the configuration property and its corresponding value in the Add cassandra.yaml Setting sub-section if you require a non-standard Apache Cassandra® configuration.
-
Select the Data Plane Context where you want to deploy the HCD cluster.
By default, a database cluster is deployed to the
Control Plane. If aData Planeis deployed on another Kubernetes cluster, you can choose to deploy the database cluster to that context. For more information, see the Planning guide. -
Enter a Rack Name for the first rack, for example
rack1.After you create a cluster, you can’t change its rack names. Rack names are permanent. The rack name:
-
Must start with an alphanumeric character.
-
Must be a single word.
-
Can be any capitalization: upper, lower, or mixed-case.
-
Can have dashes and underscores.
-
Must not include spaces.
Database pods, or HCD nodes, are scheduled using node affinity.
-
-
Add the
mission-control.datastax.com/role=databaselabel to the rack configuration to ensure database pods are scheduled on database worker nodes only, not on platform worker nodes.-
Label:
mission-control.datastax.com/role -
Value:
databaseDataStax recommends a minimum of 3 nodes for production clusters to support replication in a datacenter for high availability. With 3 replicas in a datacenter, this configuration can tolerate a failure of one node when using a strong consistency of
LOCAL_QUORUM.To add another rack, select Add Rack and configure it as you did in the previous steps. Make sure that you add the node affinity label.
-
-
For Nodes Per Rack, allocate at least one database node to the rack.
-
Optional: To create a multi-datacenter cluster, select Add Datacenter and configure it as above.
-
For Resource Requests, enter the minimum available resources required. DataStax recommends that you allocate the following minimum amounts of memory:
-
4 GB of RAM for development environments and 8 GB for nodes with vector search enabled.
-
32 GB of RAM to production nodes and 64 GB for nodes with vector search enabled.
-
500 GB of storage for production nodes.
.Select the Storage Class you configured for your environment.DataStax recommends a class backed by NVMe SSDs.
-
-
For Storage Amount, enter the storage amount to allocate.
-
-
To add Security Settings, do the following:
-
Select the Require authentication to access cluster option.
-
Enter a Superuser Name.
-
Enter a Superuser Password.
-
Select the Enable internode encryption option.
The superuser role is required to provision other roles such as operators and service accounts.
DataStax recommends that you secure your clusters by enabling authentication and internode encryption, especially for production environments.
-
-
To configure Backup/Restore options, do the following:
-
Optional: Enter a Prefix to use as the name of the top-level folder in the Backup bucket. If you don’t enter a value, HCD uses the cluster name.
-
Select your Backup Configuration.
-
-
Under Advanced Settings, for Heap Amount, enter an amount using the following as a guide:
System memory Heap 8 GB
4 GB
32 GB
8-24 GB
64 GB
31 GB
-
Optional: Under Data API, select Deploy the Data API to deploy the Data API.
-
Select Create Cluster.
-
Optional: To monitor the status, track the progress of the database pods provisioned by Hyper-Converged Database (HCD):
kubectl get pods -n mission-controlThe database pods have names prefixed by the cluster name. Each node goes through a standard bootstrap sequence that takes approximately 2-3 minutes to complete. When the pods are operational and ready to accept client requests, each pod should show as
2/2containersREADYwith aSTATUSofRunning. -
Optional: To inspect pods that aren’t ready, run the following command:
kubectl describe pod -n mission-controlPOD_NAMEReplace
POD_NAMEwith the name of your pod.
To deploy an HCD cluster, do the following:
-
On a local machine create a manifest file named
hcd1.0cluster.yamlto describe the cluster topology. -
Copy the following code into the file:
apiVersion: missioncontrol.datastax.com/v1beta2 kind: MissionControlCluster metadata: name: hcd spec: encryption: internodeEncryption: enabled: true k8ssandra: auth: true cassandra: serverVersion: 1.0.0 serverType: hcd storageConfig: cassandraDataVolumeClaimSpec: storageClassName: default accessModes: - ReadWriteOnce resources: requests: storage: 1024Gi config: cassandraYaml: dynamic_snitch: false server_encryption_options: internode_encryption: all jvmOptions: additionalJvmServerOptions: heapSize: 31Gi resources: limits: cpu: "32" memory: 128Gi requests: cpu: "28" memory: 128Gi datacenters: - metadata: name: dc1 datacenterName: dc1 stopped: false size: 3 racks: - name: rack1 nodeAffinityLabels: mission-control.datastax.com/role: database - name: rack2 nodeAffinityLabels: mission-control.datastax.com/role: database - name: rack3 nodeAffinityLabels: mission-control.datastax.com/role: database -
Change the
storageClassNameto a preferred value, matching the ones available in the installation, or leave the default value. To determine which storage classes are available in the environment, run:kubectl get sc
-
Optional: Append the
hostNetworksection at the same level as theconfigsection in thehcd1.0cluster.yamlfile if you use VMs with Mission Control embedded Kubernetes runtime:... networking: hostNetwork: true config: ...This makes the deployed services directly available on the network.
-
Apply the manifest:
kubectl apply -f hcd10cluster.yamlCheck that the pods representing the nodes appear:
$ kubectl get pods -n mission-controlResults
NAME                                                  READY   STATUS    RESTARTS   AGE
cass-operator-controller-manager-6487b8fb6c-xkjjx     1/1     Running   0          41m
k8ssandra-operator-55b44544d6-n8gs8                   1/1     Running   0          41m
mission-control-controller-manager-54c64975cd-nvcm7   1/1     Running   0          41m
test-dc1-default-sts-0                                0/2     Pending   0          7s
test-dc1-default-sts-1                                0/2     Pending   0          7s
test-dc1-default-sts-2                                0/2     Pending   0          7s
Each node must go through the standard bootstrapping process, which takes approximately 2-3 minutes. Upon completion, the nodes should display
2/2under READY andRunningunder STATUS:NAME READY STATUS RESTARTS AGE cass-operator-controller-manager-6487b8fb6c-xkjjx 1/1 Running 0 50m k8ssandra-operator-55b44544d6-n8gs8 1/1 Running 0 50m mission-control-controller-manager-54c64975cd-nvcm7 1/1 Running 0 50m test-dc1-default-sts-0 2/2 Running 0 9m6s test-dc1-default-sts-1 2/2 Running 0 9m6s test-dc1-default-sts-2 2/2 Running 0 9m6sIf any pods list their STATUS as
Pending, there might be resource availability issues. Run the following command to check the pod status:kubectl describe podPOD_NAMEReplace
POD_NAMEwith the name of your pod.The HCD cluster is operational when all of the nodes indicate
2/2under READY andRunningunder STATUS.Now that HCD is up and running, connect to the cluster using the previously downloaded
cqlshbinary with Vector index support. Mission Control is secured by default and generates a unique superuser after disabling the defaultcassandraaccount. -
Discover the username of this generated superuser by accessing the
<cluster-name>-superusersecret in the Kubernetes cluster in themission-controlnamespace. Run the following command:$ kubectl get secret/test-superuser -n mission-control -o jsonpath='{.data.username}' | base64 -d; echoResults
test-superuser -
Read the username’s password:
$ kubectl get secret/test-superuser -n mission-control -o jsonpath='{.data.password}' | base64 -d; echoSample result
PaSsw0rdFORsup3ruser
-
Embedded Kubernetes cluster
-
External Kubernetes cluster
Because host networking is enabled, connect to any of the nodes through its Internet Protocol (IP) address or hostname using cqlsh with the correct Superuser credentials.
Port 9042 must be accessible from cqlsh:
$ cqlsh --username test-superuser --password SUPERUSER_PASSWORD ip-175-32-24-217Replace SUPERUSER_PASSWORD with the password of the superuser.
Results
Connected to test at ip-175-32-24-217:9042
[cqlsh 6.0.0 | Cassandra 4.0.7-c556d537c707 | CQL spec 3.4.5 | Native protocol v5]
Use HELP for help.
test-superuser@cqlsh>-
Port forward the service that exposes the cluster’s CQL port:
kubectl port-forward svc/test-dc1-service 9042:9042 -n mission-control -
Connect using
cqlshpointing atlocalhost:$ cqlsh --username test-superuser --password `**SUPERUSER_PASSWORD**` 127.0.0.1Replace
SUPERUSER_PASSWORDwith the password of the superuser.Results
Connected to test at 127.0.0.1:9042.
[cqlsh 6.0.0 | Cassandra 4.0.7-c556d537c707 | CQL spec 3.4.5 | Native protocol v5]
Use HELP for help.
test-superuser@cqlsh>
Follow the steps below to configure HCD in a Docker container on your local machine. Any user on Linux or MacOS can execute the installation within the container.
You can run HCD using a docker run command or with the Data API using a docker-compose command.
Additionally, you can install the Data API using Docker Compose or utilize cqlsh to execute CQL queries.
Start HCD on a standalone container:
docker run -e DS_LICENSE=accept -p 9042:9042 \
     cr.dtsx.io/datastax/hcd:1.0.0
The -p option of the docker run command ensures that the cqlsh port is exported and available from outside the container.
The database is up and running when the following message is visible in the output:
INFO  [main] 2023-07-20 07:53:28,954 PipelineConfigurator.java:125 -
Starting listening for CQL clients on /0.0.0.0:9042 (unencrypted)...
You can now establish a connection to HCD using the Cassandra Query Language (CQL) shell cqlsh.
You can use a Docker Compose file to run HCD with the Data API. For more information, see the Data API github repository.
Next steps
-
Start using HCD with vector search. Access HCD 1.0 through either a Mission Control deployment or a standalone container, and start using the new vector indexes by following the vector search quickstart.
-
See vector search in action using your HCD database in Vector Quickstart with Data API or with CQL.
