Secure connections to and from DataStax Studio
DataStax Studio includes a web browser client and a DataStax Studio server. Securing DataStax Studio requires protecting the browser client-to-DataStax Studio server connection, and the DataStax Studio server-to-database connection.
Database authentication
To access a database from a notebook, you must create a connection in DataStax Studio. In the connection settings, you provide the necessary authentication credentials for your database.
Only create connections to clusters that you use in your notebooks, and use authentication credentials with minimum required permissions for the operations included in your notebooks.
Authenticate DSE connections
Authentication of DataStax Studio connections to your DSE cluster depends on the cluster’s security configuration.

To require authentication for DataStax Studio connections to DSE, do the following on your DSE cluster:
Then, set the authentication credentials in your DataStax Studio connection settings.
Authenticate Astra DB connections
For Astra DB connections, authentication and authorization are handled through Astra application tokens and the Secure Connect Bundle (SCB).
SSL encryption
Client-to-node encryption protects in-flight data from client machines to a database cluster using SSL. It establishes a secure channel between the client and the coordinator node.
Enable SSL encryption for DSE connections
-
DataStax recommends using certificates signed by a CA. The truststore or CA certificate can be shared between all DSE servers and clients.
For DataStax Studio, the public key certificate from the CA must be stored in a local truststore file. If two-way SSL isn’t configured, then the DataStax Studio connection only requires a truststore file. If two-way SSL is configured, then the DataStax Studio connection requires a truststore file and an appropriate keystore file.
DataStax Studio only works with Java 8
.jkskeystores and truststores.To perform server verification, the client needs to have the public key certificate of each node in the cluster stored in a local truststore file. This truststore file is password protected.
-
In DataStax Studio, create or edit a connection.
DSE connections use the Standard Connection type.
-
Enter the basic connection details:
-
Name: Name of the connection, such as
DSE Notebook Connection -
Host/IP (comma delimited): The host names or IP addresses of the DSE cluster to connect to, such as
127.0.0.1. All hosts must be in a single datacenter. Default:localhost. -
Username and Password: DSE cluster authentication credentials.
-
Port: IP connection port where the Cassandra Query Language (CQL) native transport listens for clients. The default is 9042. This port must be the same as the
native_transport_portin your DSE cluster’scassandra.yamlfile.
-
-
To configure the encrypted connection, select Use SSL, and then configure the Truststore and Keystore settings as appropriate for your environment. Enter the local file path and password for the truststore file and, if required, the keystore file.
-
Click Test to verify the connection.
-
Click Save.
Enable SSL encryption for Astra DB connections
When connecting to Astra DB from DataStax Studio, SSL encryption is handled automatically through the database’s Secure Connect Bundle (SCB).
Ports
DataStax Studio uses the following ports by default when connecting to DSE clusters.
If your cluster uses different ports, you must set the ports accordingly in the DataStax Studio connection settings or configuration.yaml file.
-
CQL native transport: 9042
Set this port when you create a connection to a DSE cluster. It must match the
native_transport_portin your DSE cluster’scassandra.yamlfile.This setting isn’t configurable for Astra DB connections.
-
Thrift/Spark SQL: 10000
For DSE clusters running AlwaysOn SQL (AOSS), set the
defaultSparkSQLPortin the DataStax Studioconfiguration.yamlfile to the same value as thethrift_portin your cluster’sdse.yamlfile.This setting doesn’t apply to Astra DB connections.
-
Graph: 8182
The port on a DSE node running a Gremlin Server. For information about setting this port, see
defaultGremlinPortin the DataStax Studioconfiguration.yamlfile.
DataStax recommends securing DSE ports in compliance with your security requirements.
Security best practices for distributed deployments
DataStax Studio doesn’t provide a multi-user experience, which means that any user that has access to your DataStax Studio instance can use any connection or notebook associated with that instance. When granting any application access to your databases, follow industry standard security best practices to help reduce security risks.
Because DataStax Studio is designed to be a local desktop application, distributed deployment introduces potential security risks.
Namely, changing the httpBindAddress from localhost can expose your DataStax Studio instance to users on external machines.
By extension, these users can access to your DataStax Studio notebooks and access the data in your connected clusters.
Here are some best practices for securing DataStax Studio, particularly if you need to share your DataStax Studio instance with multiple users over remote connections:
- Use VPNs and firewalls to protect remote access gateways
-
When centrally deploying DataStax Studio, deploy all DataStax Studio instances behind a VPN.
Secure a centrally deployed instance of DataStax Studio behind a firewall, accessible only through a bastion node. This architecture assumes that only authorized users can remotely access the DataStax Studio machine. The remote desktop gateway enables privileged users to access the DataStax Studio browser client using
localhostas its bind address.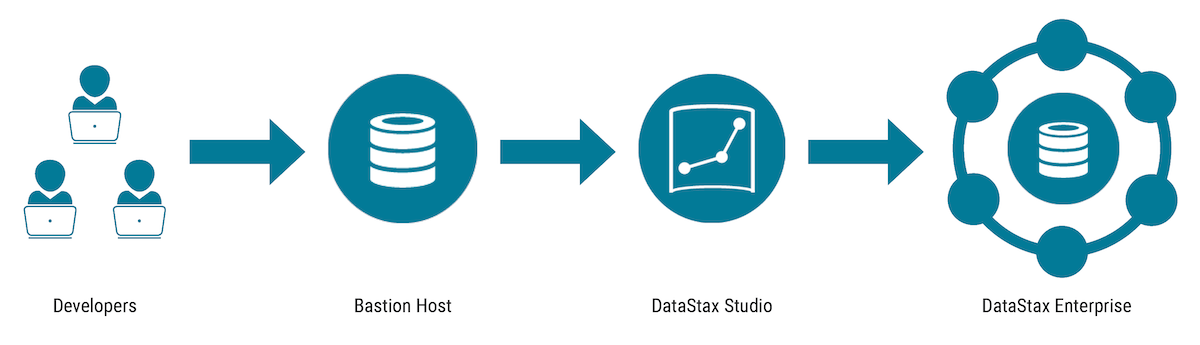
- Use an authentication proxy
-
Enable and protect DataStax Studio server access by using an authentication proxy to access the DataStax Studio browser client, and by using HTTPS for the DataStax Studio browser client.
If you need to set the
httpBindAddressto anything other thanlocalhost, use NGINX as an authentication proxy in front of DataStax Studio to authenticate users to the DataStax Studio browser client. Then, restrict the DataStax Studio browser client port to the local network with firewall rules. Only open the authentication-protected NGINX port to the outside network.Finally, ensure that HTTPS is enabled between the browser client and the DataStax Studio server.
- Restrict User Access
-
For all DataStax Studio installations, only grant access to users who need it:
-
Users who need to see and edit the DataStax Studio notebooks.
-
Users who have permissions to access the databases connected to that DataStax Studio instance.
-
