例:コピー・フィールドおよびdocValue
この例では、コピー・フィールドを使用して、Twitter名、電子メールの別名などのさまざまな別名を多値フィールドにコピーします。用語として別名を使用して多値フィールドをクエリーし、用語と同じ行の他の別名を取得します。
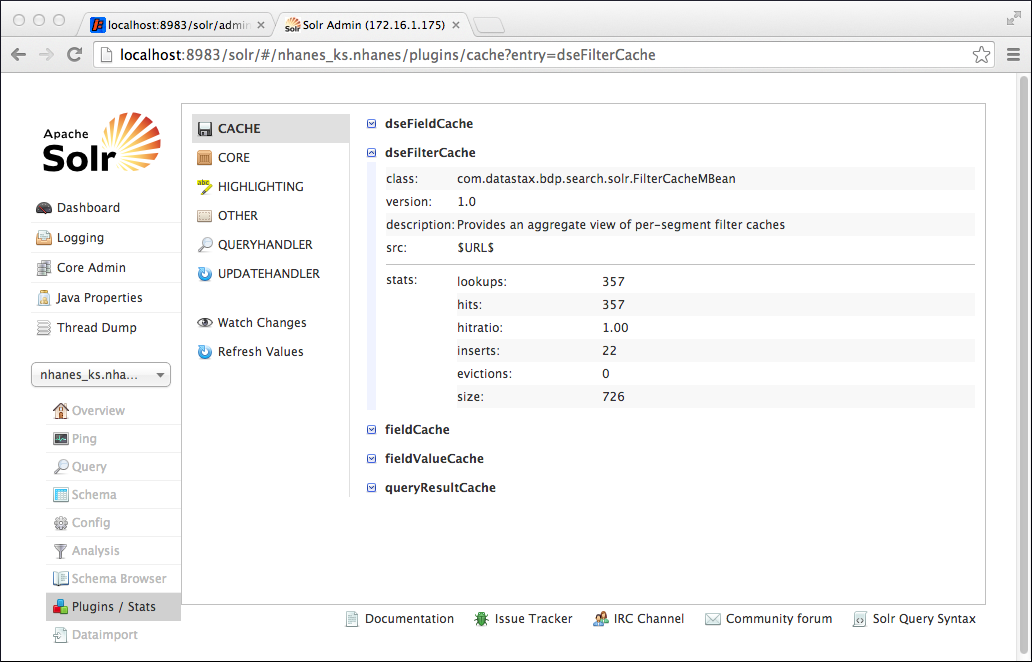
ステップ9では、セグメントごとのフィールド・キャッシュおよびフィルター・キャッシュの情報の表示方法について説明します。DataStax Enterpriseは、ネイティブのメモリーを使用して、DSEのセグメントごとのフィルター・キャッシュをオフヒープに移動するため、オンヒープ・メモリーの消費量およびガーベージ・コレクションのオーバーヘッドが低減します。オフヒープのフィルター・キャッシュはデフォルトで有効にされますが、以下のJVMシステムのプロパティを起動時に渡すことにより無効にできます。-Dsolr.offheap.enable=false.
手順
- schema.xmlおよびsolrconfig.xmlを含んでいるsolr_tutorial46という名前のディレクトリーを作成していない場合は、この時点で作成してください。これらのファイルをsolr_tutorial46にコピーすることによって、demos/wikipediaディレクトリーからschema.xmlおよびsolrconfig.xmlを使用することができます。
-
CQLを使用して、キースペースおよびテーブルを作成し、ユーザー名、電子メールのアドレス、skype名、twitter名、irc名を格納します。allフィールドはSolrインデックスのみに存在するため、テーブルにallカラムは必要ありません。
CREATE KEYSPACE user_info WITH REPLICATION = { 'class' :'SimpleStrategy', 'replication_factor' : 1 }; CREATE TABLE user_info.users ( id text PRIMARY KEY, name text, email text, skype text, irc text, twitter text ) ;
-
前述のように、スキーマに多値フィールドが含まれる場合は、
CQL BATCH
コマンドを実行します。BEGIN BATCH INSERT INTO user_info.users (id, name, email, skype, irc, twitter) VALUES ('user1', 'john smith', 'jsmith@abc.com', 'johnsmith', 'smitty', '@johnsmith') INSERT INTO user_info.users (id, name, email, skype, irc, twitter) VALUES ('user2', 'elizabeth doe', 'lizzy@swbell.net', 'roadwarriorliz', 'elizdoe', '@edoe576') INSERT INTO user_info.users (id, name, email, skype, irc, twitter) VALUES ('user3', 'dan graham', 'etnaboy1@aol.com', 'danielgra', 'dgraham', '@dannyboy') INSERT INTO user_info.users (id, name, email, skype, irc, twitter) VALUES ('user4', 'john smith', 'jonsmit@fyc.com', 'johnsmith', 'jsmith345', '@johnrsmith') INSERT INTO user_info.users (id, name, email, skype, irc, twitter) VALUES ('user5', 'john smith', 'jds@adeck.net', 'jdsmith', 'jdansmith', '@smithjd999') INSERT INTO user_info.users (id, name, email, skype, irc, twitter) VALUES ('user6', 'dan graham', 'hacker@legalb.com', 'dangrah', 'dgraham', '@graham222') APPLY BATCH;
-
all、各別名およびユーザーIDのコピー・フィールド、docValuesオプションなど多値フィールドを含んでいるスキーマを使用します。
<schema name="my_search_demo" version="1.5"> <types> <fieldType name="string" class="solr.StrField"/> <fieldType name="text" class="solr.TextField"> <analyzer> <tokenizer class="solr.StandardTokenizerFactory"/> </analyzer> </fieldType> </types> <fields> <field name="id" type="string" indexed="true" stored="true"/> <field name="name" type="string" indexed="true" stored="true"/> <field name="email" type="string" indexed="true" stored="true"/> <field name="skype" type="string" indexed="true" stored="true"/> <field name="irc" type="string" indexed="true" stored="true"/> <field name="twitter" type="string" indexed="true" stored="true"/> <field name="all" type="string" docValues="true" indexed="true" stored="false" multiValued="true"/> </fields> <defaultSearchField>name</defaultSearchField> <uniqueKey>id</uniqueKey> <copyField source="id" dest="all"/> <copyField source="email" dest="all"/> <copyField source="skype" dest="all"/> <copyField source="irc" dest="all"/> <copyField source="twitter" dest="all"/> </schema>
-
solr_tutorial46ディレクトリーにおいてコマンドラインでschema.xmlおよびsolrconfig.xmlをSolrにアップロードします。キースペースおよびテーブル用のSolrコア、user_info.usersを作成します。
$ curl http://localhost:8983/solr/resource/user_info.users/solrconfig.xml --data-binary @solrconfig.xml -H 'Content-type:text/xml; charset=utf-8' $ curl http://localhost:8983/solr/resource/user_info.users/schema.xml --data-binary @schema.xml -H 'Content-type:text/xml; charset=utf-8' $ curl "http://localhost:8983/solr/admin/cores?action=CREATE&name=user_info.users"
-
ブラウザーで、Solrを検索してユーザー、別名、別名・スミッティを持つユーザーのIDを識別します。
http://localhost:8983/solr/user_info.users/select?q=all%3Asmitty&wt=xml&indent=true
出力は以下のようになります。<result name="response" numFound="1" start="0"> <doc> <str name="id">user1</str> <str name="twitter">@johnsmith</str> <str name="email">jsmith@abc.com</str> <str name="irc">smitty</str> <str name="name">john smith</str> <str name="skype">johnsmith</str> </doc> </result>
-
このクエリーを実行します。
http://localhost:8983/solr/user_info.users/select/?q=*:*&facet=true&facet.field=name&facet.mincount=1&indent=yes
出力の最後にファセットの結果が表示されます。john smithの3つのインスタンス、dan grahamの2つのインスタンス、elizabeth doeの1つのインスタンス:. . . </result> <lst name="facet_counts"> <lst name="facet_queries"/> <lst name="facet_fields"> <lst name="name"> <int name="john smith">3</int> <int name="dan graham">2</int> <int name="elizabeth doe">1</int> </lst> </lst> . . .
- フィールド・キャッシュ・メモリーのステータスを表示し、SolrフィールドごとにdocValuesのRAM使用量を表示します。結果は、例2の例のようになります。
-
Solr Adminで、ドロップダウン・メニューから[Solr core]を選択した後、[Plugins/Stats]をクリックします。[dseFieldCache]および[ dseFilterCache]を展開して、セグメントごとのフィールド・キャッシュおよびフィルター・キャッシュについての情報を表示します。
[Watch Changes]または[Refresh Values]を選択して、更新された情報を取得します。