Configure a multi-region Mission Control environment
You can configure a multi-region Mission Control environment to deploy Mission Control data planes across two or more Kubernetes clusters in multiple regions and datacenters. For example, you might host the Mission Control control plane in one region and deploy data planes in other regions.
|
The control plane must reside in a single region. However, you can deploy multiple data planes across regions, each managed by your single control plane. |
A multi-region environment offers several benefits, including better data locality, increased fault tolerance, improved disaster recovery, and higher availability for distributed applications.
Prerequisites
-
Two or more Kubernetes clusters running in separate regions.
-
An understanding of the planning considerations for deploying Mission Control.
-
An understanding of Kubernetes concepts and how to use
kubectl. -
Planned CIDR ranges for each control plane and data plane cluster for runtime-based installations. Changing CIDR ranges after installation requires stopping the cluster and can cause downtime.
Configure pod-to-pod routing
Ensure that all database pods can route to each other. This is a critical requirement for proper operation and data consistency.
The requirement applies to:
-
All database pods within the same region or availability zone.
-
All database pods across different availability zones within the same region.
-
All database pods across different regions for multi-region deployments.
-
All database pods across different racks in the same datacenter for multi-region deployments.
The way you configure pod-to-pod routing depends on your cluster architecture:
- Single-cluster deployments
-
The cluster’s Container Network Interface (CNI) typically provides pod-to-pod network connectivity for database pods within a single Kubernetes cluster. You usually need no additional configuration beyond standard Kubernetes networking.
- Security considerations for shared clusters
-
If your database cluster shares a Kubernetes cluster with other applications, implement security controls to prevent unauthorized access to database internode ports (7000/7001):
-
NetworkPolicy isolation (required): Use Kubernetes NetworkPolicy to restrict access to internode ports to only authorized database pods. NetworkPolicy prevents other applications in the cluster from accessing these ports even if underlying firewall rules are broad.
-
Internode TLS encryption (required): Enable internode TLS to protect data in transit and prevent unauthorized nodes from joining the cluster.
-
Dedicated node pools (recommended): Consider dedicated node pools or subnets for database workloads to enable more granular firewall controls at the infrastructure level.
-
- Multi-cluster deployments
-
For database pods that span multiple Kubernetes clusters, NetworkPolicy alone doesn’t provide sufficient connectivity. You must establish Layer 3 network connectivity or overlay connectivity between the database pod networks (pod CIDRs or node subnets depending on your deployment). Kubernetes NetworkPolicy operates only within a single cluster boundary and can’t provide cross-cluster connectivity.
-
Choose one of the following approaches to establish pod network connectivity across clusters:
-
Routed pod CIDRs (recommended): Use cloud provider native routing solutions when your platform supports them. This approach provides the best performance and simplest operational model.
-
AWS: VPC Peering, Transit Gateway, or AWS Cloud WAN.
-
Azure: VNet Peering or Virtual WAN.
-
GCP: VPC Peering or Cloud VPN.
-
-
Submariner: Open-source multi-cluster connectivity solution, common in OpenShift multi-cluster deployments. Submariner provides encrypted tunnels between clusters. For more information, see the Submariner documentation.
-
Cilium Cluster Mesh: For clusters that use Cilium CNI. For more information, see the Cilium documentation.
-
Cilium Cluster Mesh provides native multi-cluster networking with Cilium.
-
Cilium Cluster Mesh enables pod-to-pod connectivity across clusters.
-
-
-
After you establish cross-cluster connectivity, implement the following security measures. Traditional firewall rules alone lack application awareness and can’t distinguish between different pods or services within a cluster. Use Kubernetes NetworkPolicy for pod-level access control within clusters, and combine it with network-level firewalls for defense in depth.
-
Enable internode TLS encryption to protect data in transit between clusters.
-
Configure firewall rules at the network level to restrict traffic between cluster pod CIDRs.
-
Use NetworkPolicy within each cluster to further restrict access to database ports.
-
Consider using dedicated subnets or VPCs for database clusters to enable network-level isolation.
-
-
To verify that pod-to-pod routing has been configured properly, do the following:
-
Test connectivity between database pods using
nodetool statusorcqlsh. -
Check that all nodes can see each other in the cluster topology.
-
Monitor for connection errors or timeouts in database logs.
-
Verify that gossip protocol communication functions correctly.
If pod-to-pod routing isn’t implemented correctly, you might experience the following:
-
Connectivity issues between database pods.
-
Cluster instability.
-
Data consistency issues.
-
Failed replication.
-
Incomplete or failed cluster operations.
Network connectivity between multiple Kubernetes clusters
Before you can configure a multi-region Mission Control environment, you must establish network connectivity between the control plane and data plane instances running in different Kubernetes clusters.
This guide uses two clusters running in two different regions, CP_EAST and DP_WEST, which are registered as contexts in your local kubeconfig file.
-
Verify the contexts for your two Kubernetes clusters:
kubectl config get-contextsResultCURRENT NAME CLUSTER AUTHINFO NAMESPACE * **CP_EAST** **CP_EAST** **CP_EAST** default **DP_WEST** **DP_WEST** **DP_WEST** defaultIn this example, the
CP_EASTKubernetes cluster is the Mission Control control plane and also serves as a data plane, hosting database datacenters. TheDP_WESTKubernetes cluster is a Mission Control data plane, which hosts datacenters but is controlled by the control plane of theCP_EASTcluster. -
Ensure the following ports are open between the two Kubernetes clusters to allow communication between the control plane and the data plane:
-
tcp:7000: Internode communications. This port is used for direct node-to-node communication within the Mission Control infrastructure. It facilitates coordination between nodes in different clusters, ensuring data consistency and system reliability. -
tcp:7001: Encrypted internode communications. Similar to port 7000, this port is used for internode communication, but with encryption enabled. This ensures secure data transfer between the control plane and data plane, protecting sensitive information from interception. -
tcp:8080: Management API. This port allows access to the management API for configuring Mission Control. It allows administrators to perform operations such as scaling, monitoring, and managing resources. -
tcp:30600: Vector aggregator. The vector aggregator collects and processes telemetry data from different nodes. This port is essential for log aggregation, monitoring, and analytics, providing visibility into the health and performance of the system. A vector aggregator runs in each data plane datacenter. Each instance aggregates data locally and then forwards logs and metrics to the control plane aggregator. -
Kubernetes API server port: The control plane communicates with the Kubernetes API server in the data plane cluster. The port varies by Kubernetes distribution and configuration. Common ports include
tcp:443(managed services like GKE and IBM Cloud Kubernetes Service use this port) andtcp:6443(self-managed clusters and some managed services like OpenShift on GCP use this port).To determine the correct port for your cluster, check the
serverURL in your kubeconfig file:kubectl config view --minify -o jsonpath='{.clusters[0].cluster.server}'
-
Now that you have verified your contexts and opened the necessary ports for your existing Kubernetes clusters, you can install the Mission Control control plane and data planes.
Install the Mission Control control plane and data planes
-
Use Helm to install Mission Control in your Kubernetes clusters.
-
Change the context to the
CP_EASTcluster:kubectl config use-context CP_EASTReplace
CP_EASTwith the name of the context for your control plane cluster. -
Install Mission Control in control plane mode in the
CP_EASTcluster. -
Change the context to the
DP_WESTcluster:kubectl config use-context DP_WESTReplace
DP_WESTwith the name of the context for the data plane cluster. -
Install Mission Control in data plane mode in the
DP_WESTcluster.A data plane on a separate Kubernetes cluster requires specific Helm values to disable control-plane-only components and configure the local aggregator to forward telemetry to the control plane aggregator.
You must set
aggregator.customConfig.sinks.control_plane_aggregator.addressto the correct control plane address before installing. If the data plane aggregator has no valid sinks, it buffers all collected telemetry indefinitely and eventually crashes with an out-of-memory (OOM) error.The following
values.yamlshows the required data plane deployment configuration:# Set to false: this cluster is a data plane only, not the control plane controlPlane: false disableCertManagerCheck: false # Schedule Mission Control components on nodes with the platform role label nodeSelector: mission-control.datastax.com/role: platform allowOperatorsOnDatabaseNodes: false client: manageCrds: true # Disable control-plane-only UI and authentication components ui: enabled: false dex: enabled: false # Disable control-plane-only observability stack grafana: enabled: false k8ssandra-operator: disableCrdUpgraderJob: true cass-operator: disableCertManagerCheck: true loki: enabled: false mimir: enabled: false minio: enabled: false alertmanager: enabled: false ingester: enabled: false store_gateway: enabled: false compactor: enabled: false distributor: enabled: false # Disable the Vector agent (log collection from nodes) agent: enabled: false # Configure the aggregator to forward telemetry to the control plane aggregator # instead of local Loki/Mimir sinks (which are disabled above) aggregator: service: type: ClusterIP ports: - name: vector protocol: TCP port: 6000 targetPort: 6000 customConfig: sources: mimir-self-monitoring: {} sinks: mimir: {} loki: {} control_plane_aggregator: type: vector inputs: ["vector", "internal_metrics", "kube_state_metrics", "cass_operator_metrics"] address: "CONTROL_PLANE_IP:30600"Replace
CONTROL_PLANE_IPwith the IP address or hostname of a node in the control plane cluster. The control plane exposes the Vector aggregator on all nodes on port30600. Use a hostname that load balances across all nodes in the control plane cluster for high availability.The
customConfigblock merges with the default aggregator configuration. Setting a source or sink key to an empty map ({}) overrides the default configuration for that entry, effectively disabling it.You must use the same release name (for Helm) or application name (for KOTS) for the data plane installation as you used for the control plane installation. This ensures proper communication and resource management between the planes.
-
Use the Mission Control CLI,
mcctl, to register the data plane to the control plane:mcctl register --source-context DP_WEST --dest-context CP_EASTReplace the following:
-
CP_EAST: The context of the control plane cluster -
DP_WEST: The context of the data plane clusterThe Mission Control control plane recognizes the registered data plane. This allows you to manage resources across the two planes.
-
-
Change the context back to the
CP_EASTcluster:kubectl config use-context CP_EASTReplace
CP_EASTwith the name of the context for your control plane cluster. -
Configure and verify pod-to-pod routing.
-
Optional: Validate the connection between the control plane and data plane by checking the
clientconfigandsecretresources in themission-controlnamespace.-
Check the
clientconfigresource for the registered data plane:kubectl get -n mission-control clientconfigResultReturns a list of registered data planes.
NAME AGE DP_WEST-dataplane1 392d -
Check the
secretresource for the registered data plane:kubectl get -n mission-control secretResultReturns a list of registered data planes.
NAME                               TYPE       DATA   AGE
DP_WEST-dataplane1-config      Opaque     1      392d
-
|
You can also verify the data plane context registration in the Mission Control UI. To do this, check the Data Plane Context field in the cluster creation and modification forms. |
Next, create a multi-datacenter Mission Control cluster environment spanning both Kubernetes clusters in your two regions.
Create a multi-datacenter cluster across Kubernetes clusters
The MissionControlCluster object defines the configuration for the Mission Control control plane and data planes.
To configure your environment, do the following:
-
Create a
MissionControlClusterobject that spans both Kubernetes clusters:This example creates the Mission Control cluster using the CLI. The Mission Control UI uses the Data Plane Context field to specify the Kubernetes context where the datacenter should be created. If you don’t set a value for the Data Plane Context, the datacenter is created in the control plane context.
apiVersion: missioncontrol.datastax.com/v1beta1
kind: MissionControlCluster
metadata:
  name: PROJECT_NAME
  namespace: PROJECT_NAMESPACE
spec:
  createIssuer: true
  encryption:
    internodeEncryption:
      certs:
        createCerts: true
      enabled: true
  k8ssandra:
    auth: true
    cassandra:
      config:
        jvmOptions:
          gc: G1GC
          heapSize: 1Gi
      datacenters:
        - config:
            jvmOptions:
              gc: G1GC
          metadata:
            name: dc1
          racks:
            - name: r1
          size: 2
          stopped: false
        - config:
            jvmOptions:
              gc: G1GC
          k8sContext: CP_EAST
          metadata:
            name: dc2
          racks:
            - name: r1
          size: 2
          stopped: false
      resources:
        requests:
          cpu: 100m
          memory: 2Gi
      serverType: cassandra
      serverVersion: 4.0.11
      storageConfig:
        cassandraDataVolumeClaimSpec:
          accessModes:
            - ReadWriteOnce
          resources:
            requests:
              storage: 2Gi
          storageClassName: standard
Replace the following:
-
PROJECT_NAME: The name of theMissionControlClusterobject -
PROJECT_NAMESPACE: The namespace where theMissionControlClusterobject is created -
CP_EAST: The name of the context where the data plane is running
This sample
MissionControlClusterobject defines two datacenters, the first created in the control plane directly, and the other using the Kubernetes context of the data plane registered in the control plane. This configuration ensures a distributed architecture while maintaining centralized control. -
-
Apply the
MissionControlClusterobject to create the multi-datacenter Mission Control cluster:kubectl apply -f PROJECT_NAME.yamlReplace
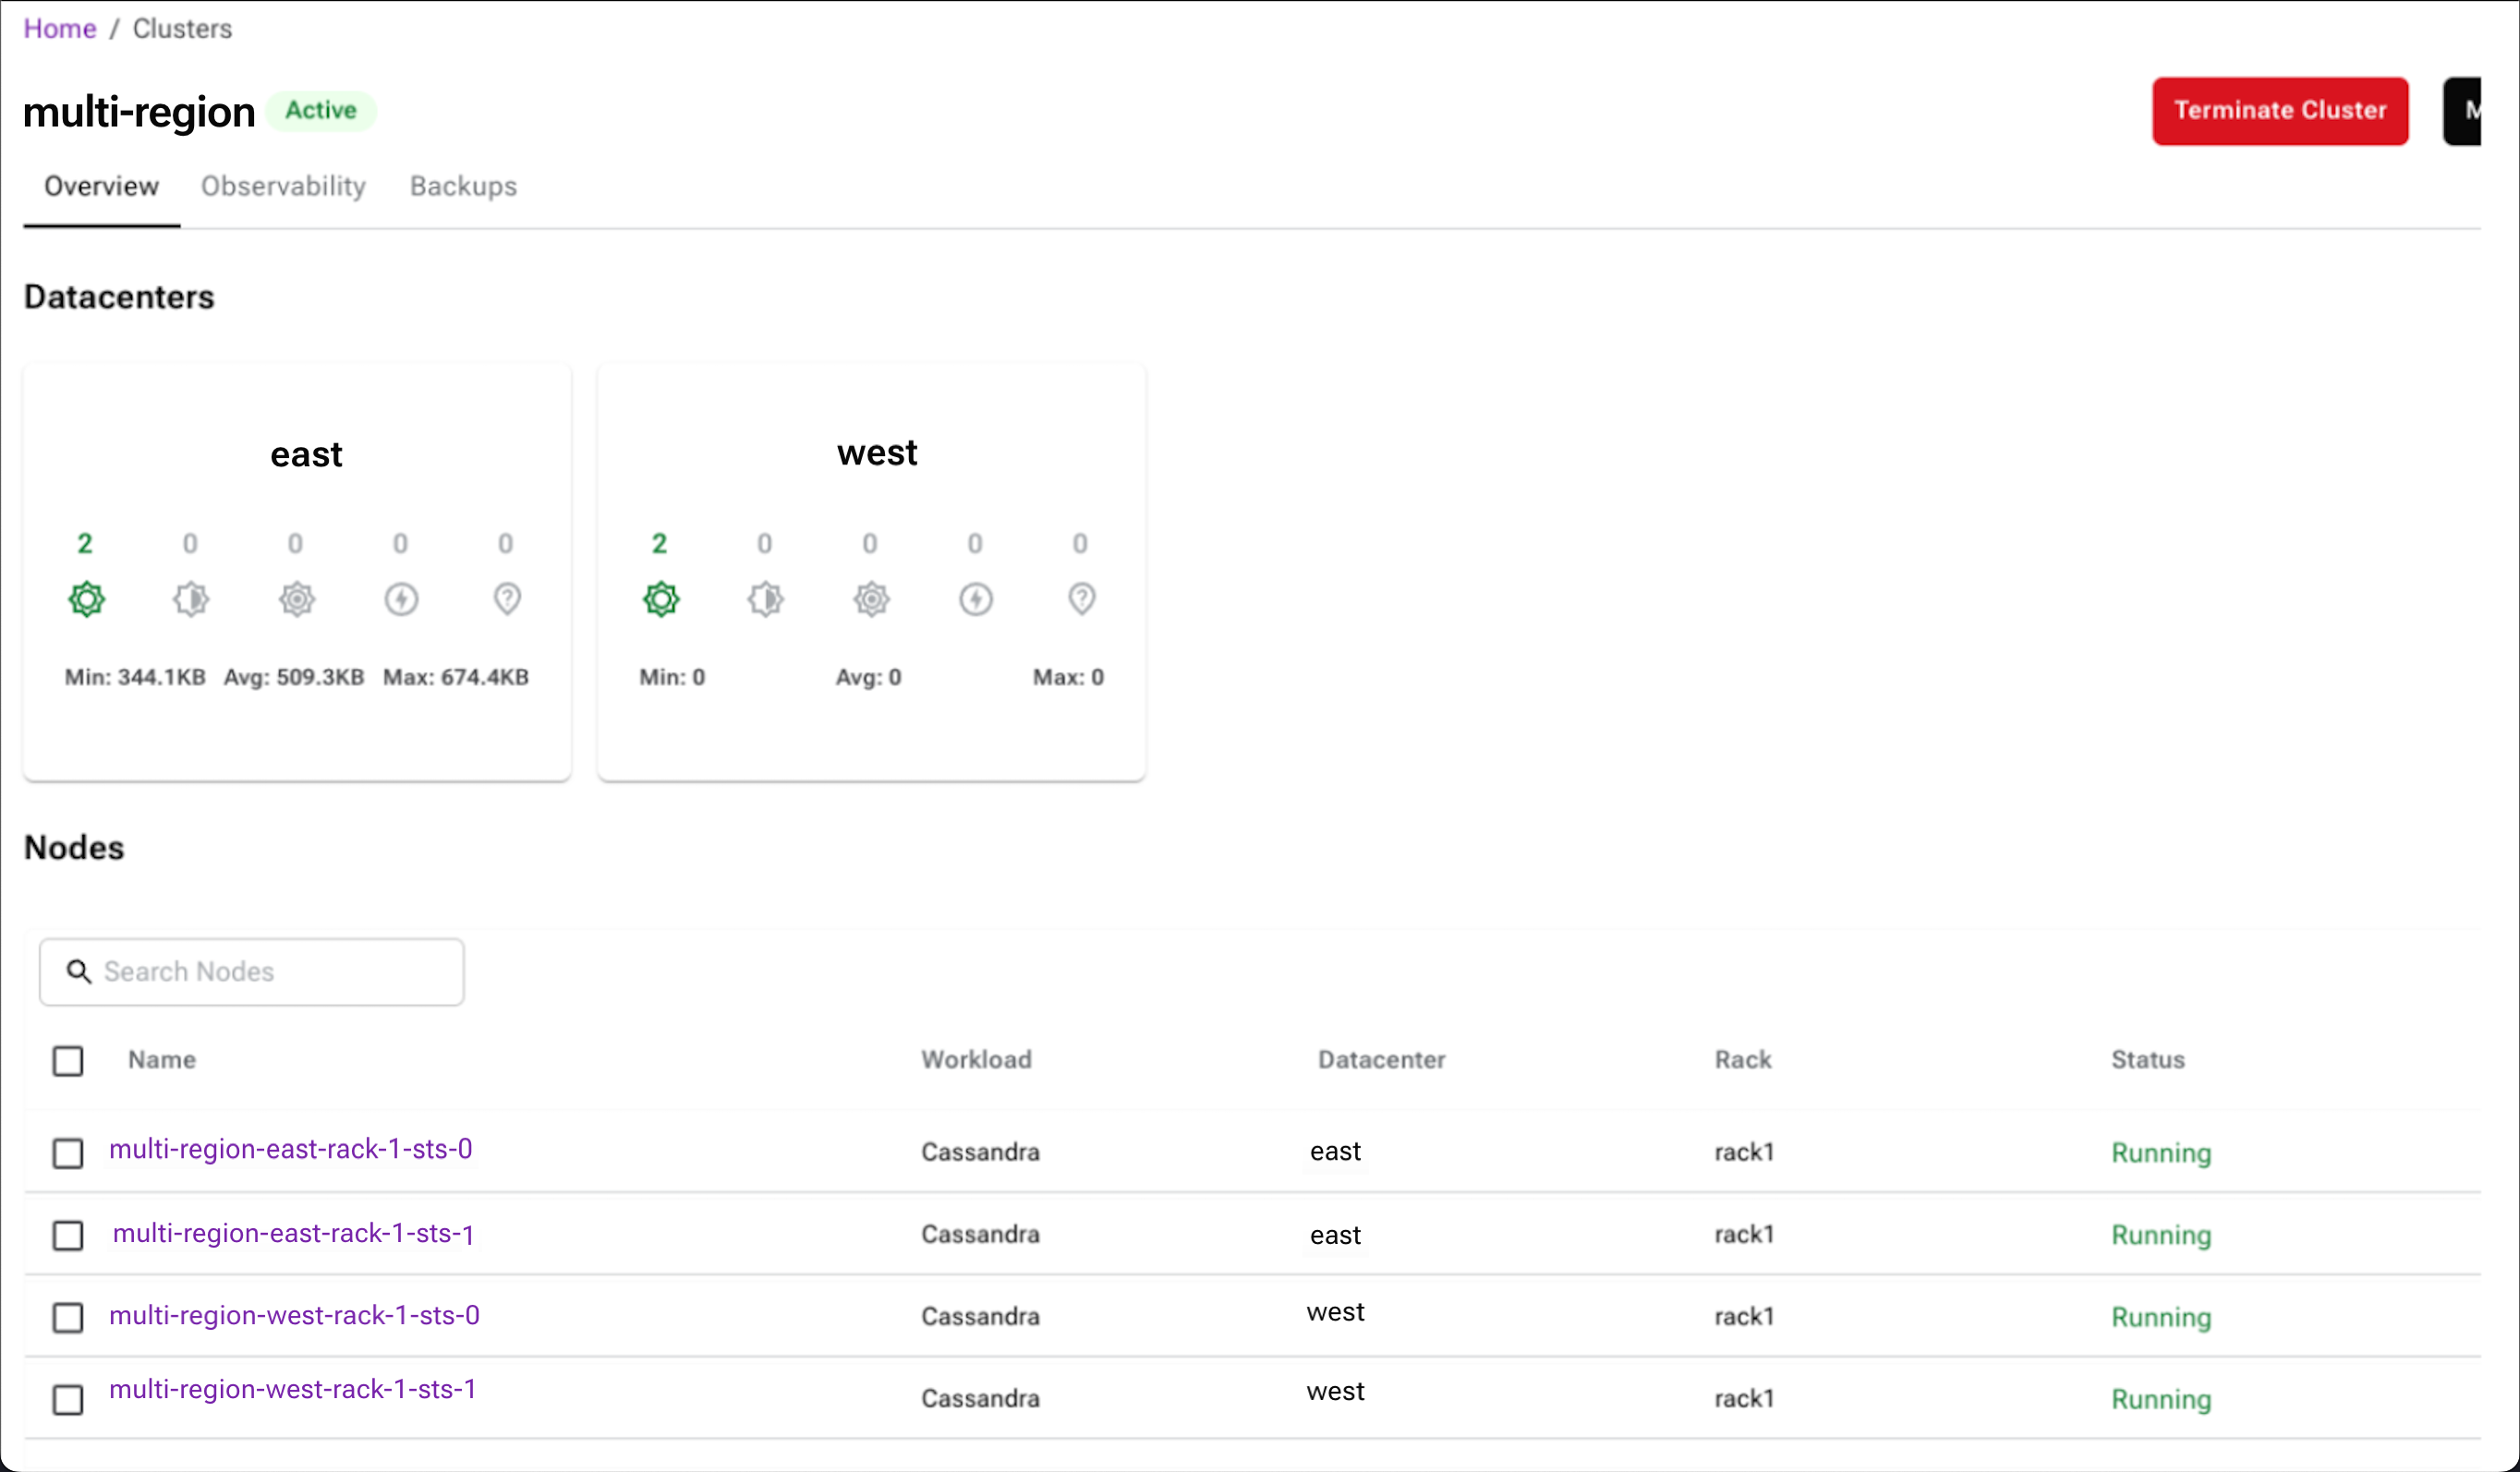
PROJECT_NAME.yamlwith the name of theMissionControlClusterobject manifest file.When the cluster starts, the cluster overview screen in the Mission Control UI displays the datacenters in each region:
Change the cluster CIDR
To change the Classless Inter-Domain Routing (CIDR) of your Kubernetes cluster, you must re-create it with the new CIDR configuration. This process requires stopping the existing cluster, uninstalling the runtime, and reinstalling with the new CIDR.
|
Changing the CIDR requires stopping the cluster, which results in downtime. Back up all important data before proceeding. |
-
To stop the existing cluster, set the
stoppedfield totruein yourMissionControlClusterobject:spec: k8ssandra: cassandra: datacenters: - metadata: name: dc1 stopped: true -
Apply the updated
MissionControlClusterobject:kubectl apply -f PROJECT_NAME.yamlReplace
PROJECT_NAME.yamlwith the name of theMissionControlClusterobject manifest file. -
Uninstall the existing runtime installation:
-
Remove all nodes from the cluster.
-
Uninstall the runtime components.
-
-
Reinstall the runtime with the new CIDR configuration:
-
Download the installation assets:
curl -f https://replicated.app/embedded/mission-control/stable -H "Authorization: LICENSE_ID" -o mission-control-stable.tgz -
Extract the assets:
tar xvzf mission-control-stable.tgz -
Run the installation with the new CIDR configuration:
sudo ./mission-control install --license license.yaml --cidr NEW_CIDRReplace
NEW_CIDRwith your desired CIDR range, for example,10.0.0.0/16.
-
-
Re-create your
MissionControlClusterobject with thestoppedfield set tofalseto start the cluster again.
|
Before changing the CIDR, consider the following:
|
Recover from a failed control plane
If the network is down and the control plane fails, you can recover by following these steps:
-
Scale down the control plane to zero.
-
Make any necessary changes to the control plane object configuration.
-
Scale the control plane back up to the desired number of replicas.
