Insert data in the Astra Portal
After you create a collection or table, you can insert data.
For required permissions to insert data, see Ways to insert data in Astra DB Serverless.
|
If your CSV or JSON file is larger than 40 MB, see Migrate or insert large amounts of data. |
Insert data into Serverless (vector) databases
You can use the Astra Portal to insert data from JSON, CSV, or PDF files into collections in Serverless (vector) databases.
To insert data into tables in the Astra Portal, use the CQL console (embedded CQL shell).
Load a JSON or CSV file into a collection
The following steps are for Serverless (vector) databases only.
-
In the Astra Portal, click the name of the database that you want to modify.
-
Click Data Explorer.
-
Select the keyspace and collection where you want to insert data.
-
Click Load data.
-
To load a JSON or CSV file, click Structured data.
-
Click Select File, and then select the JSON or CSV file that contains your dataset.
After the file uploads, the first ten rows or documents of your data appear in the Data Preview section.
For JSON files, the Data Explorer attempts to detect discrete objects and separate them into individual documents (rows). If the Data Explorer doesn’t parse the documents as you expect, you can reformat your JSON file, convert it to a CSV file, break it into multiple smaller files, use the Data API to insert documents.
If you get a
Selected embedding does not match collection dimensionserror, you need to create a new collection with a Dimension setting that matches your dataset. -
For a vector-enabled collection with an Astra vectorize integration, set Vector Field to the text field that you want to use to automatically generate embeddings.
The data importer renames the selected field to
$vectorize, and the original name is not retained. Embeddings are generated from the text contained in the selected field, and then the resulting embeddings are stored in a new$vectorfield.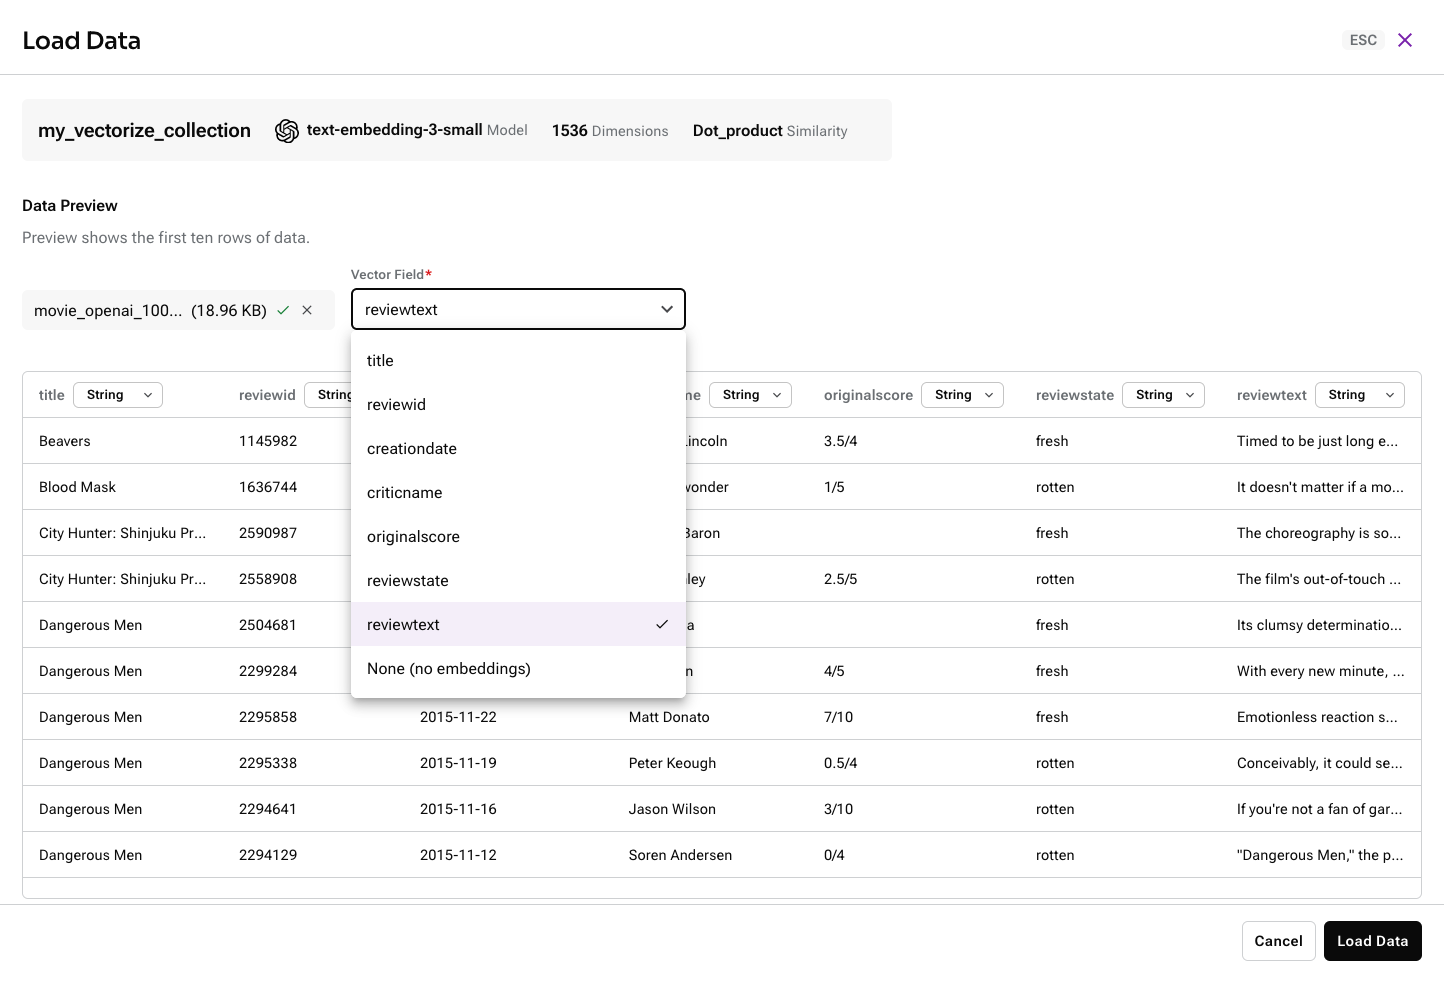
-
Optional: For CSV files, you can select the data type for each field or column in the Data Preview section The available types are String, Number, Array, Object, and Vector (vector-enabled collections only).
For a vector-enabled collection, if the data importer detects embeddings in your dataset, it automatically assigns the Vector data type to that field or column. Each vector-enabled collection can have only one vector field.
These data type selections only apply to the initial data that you load, with the exception of Vector, which permanently maps the field to the reserved key
$vector. Data type selections aren’t fixed in the schema, and they don’t apply to documents inserted later. For example, the same field can be a string in one document and a number in another. You can also have different sets of fields in different documents in the same collection. -
Click Load Data.
Imports can fail if JSON documents don’t comply with the Data API limits for documents.
Load PDF files into a vector-enabled collection
|
This Astra DB Serverless feature is currently in public preview. Development is ongoing, and the features and functionality are subject to change. Astra DB Serverless, and the use of such, is subject to the DataStax Preview Terms. |
The Astra Unstructured.io integration transforms your unstructured PDF files into structured vector data. Astra DB processes your files with Unstructured Open Source and loads the resulting JSON or CSV data into your collection.
The Unstructured data loader integration has the following requirements and limitations:
-
You need a Serverless (vector) database.
-
You need a vector-enabled collection that uses an Astra vectorize integration. This integration is not available for collections where the Embedding generation method is Bring my own.
-
This integration is available in the Astra Portal only.
-
This integration supports PDF files only. It does not extract images in PDFs, but it can extract related text, such as captions.
To process PDFs with the Unstructured data loader integration, do the following:
-
In the Astra Portal, click the name of the database that you want to modify.
-
Click Data Explorer.
-
Select the keyspace and collection where you want to insert data.
-
Click Load data.
-
Click Unstructured data.
-
Click Select File, and then select up to 10 PDF files to process and load.
You can load unstructured and structured vector data into the same collection, but you cannot load JSON and CSV files together with unstructured file types. You must upload JSON and CSV files separately through the Structured data option.
-
Optional: Modify the chunking configuration:
-
Chunk max characters: Set the maximum chunk length. Unstructured splits oversized chunks to fit this limit. The default is
500. For more information, seechunk_max_characters.Your embedding model must support the chunk size you set. If the chunk size is larger than your model supports, an error occurs when you try to insert data.
-
Chunk character overlap: Set a chunk prefix of the last
ncharacters from the prior chunk. This applies to oversized chunks only. The default is0. For more information, seechunk_overlap.
-
-
Click Load Data.
-
Wait while Astra DB processes your files. If necessary, you can cancel processing for any files that have not started processing. Once a file begins processing, you cannot cancel it.
During processing, Astra DB does the following:
-
Uses Unstructured Open Source to process your file into structured data.
-
Loads the resulting JSON or CSV data into your collection.
-
Uses your collection’s Astra vectorize integration to generate embeddings based on the extracted
textfield. -
Discards the original PDF files.
-
Count records in collections
After you insert data, the Data Explorer in the Astra Portal shows a count of Records in the collection:
-
For collections with fewer than 1,000 documents, the Astra Portal shows an exact number.
-
For collections with 1,000 or more documents, the Astra Portal shows an approximate number of records.
The Astra Portal doesn’t count documents in real time. Particularly after loading many documents, allow time for the Records count to refresh.
To run these counts on demand, you can use the Data API countDocuments and estimatedDocumentCount commands.
Load data into a Serverless (non-vector) database
To load data into a Serverless (non-vector) database, you must use a programmatic approach:
-
Use the embedded CQL console in the Astra Portal to run Cassandra Query Language (CQL) and
cqlshcommands on your databases directly from your browser without installing any additional software. For more information, see Cassandra Query Language (CQL) for Astra DB.To load CSV files, use the CQL shell
COPY FROMcommand. -
Run
cqlshremotely with the Astra CLI. -
Use a Cassandra driver or the Data API.
-
Use DataStax Bulk Loader (DSBulk) to load JSON and CSV files.
Use the CQL console
In the Astra Portal, each Astra DB Serverless database has access to the CQL console, which is an embedded CQL shell instance.
You can use the CQL console to run Cassandra Query Language (CQL) and cqlsh commands on your databases directly from your browser without installing any additional software.
For more information, see Cassandra Query Language (CQL) for Astra DB.
