Using the DataStax Installer to install (root permissions required)
Instructions for installing or upgrading DataStax Enterprise (DSE) 5.1 using the DataStax Installer when you have root permissions.
If you don’t have root permissions or want to install in a custom directory, see Using the DataStax Installer to install (root permissions not required) or use the binary tarball.
|
SECURITY RISK When DSE is installed, it creates a superuser called |
Prerequisites
-
Root or sudo access.
-
Configure your operating system to use the latest version of Java 8:
-
Recommended. The latest build of a TCK (Technology Compatibility Kit) Certified OpenJDK version 8. For example, OpenJDK 8 (1.8.0_151 minimum). DataStax’s recommendation changed due to the end of public updates for Oracle JRE/JDK 8. See Oracle Java SE Support Roadmap.
-
Supported. Oracle Java SE 8 (JRE or JDK) (1.8.0_151 minimum)
-
-
Python 2.7.x or 3.6+. Both are supported for
cqlsh. For older RHEL distributions, see Installing Python 2.7 on older RHEL-based package installations.
About DataStax installer
The DataStax installer installs DataStax Enterprise and DataStax Agent. It does not install OpsCenter. If you select Developer Related Tools during installation, DataStax Studio is installed.
The installer sets some but not all cassandra.yaml parameters.
Where is the cassandra.yaml file?
The location of the cassandra.yaml file depends on the type of installation:
| Installation Type | Location |
|---|---|
Package installations + Installer-Services installations |
|
Tarball installations + Installer-No Services installations |
|
The installer does not set dse.yaml properties.
Where is the dse.yaml file?
The location of the dse.yaml file depends on the type of installation:
| Installation Type | Location |
|---|---|
Package installations + Installer-Services installations |
|
Tarball installations + Installer-No Services installations |
|
Set the remaining parameters in the following ways:
-
Manually after installation.
-
To specify pre-configured
cassandra.yamlanddse.yamlfiles, use the unattended install with either command line or property file.
Procedure
|
End User License Agreement (EULA). By downloading this DataStax product, you agree to the terms of the EULA. |
In a terminal window:
-
Download the installer for your computer from the DataStax download page or use the following command:
curl -O https://downloads.datastax.com/enterprise/DataStaxEnterprise-5.1-linux-x64-installer.runTo install earlier versions, replace the version number in the above command. To view the available versions, see the Release notes.
-
From the directory where you downloaded the install file, change the permission to executable:
chmod +x DataStaxEnterprise-5.1-linux-x64-installer.run -
To view the installer help:
./DataStaxEnterprise-5.1-linux-x64-installer.run --helpHelp displays a list of the available options and their default settings.
-
Start the installation:
-
No configuration parameters:
sudo ./DataStaxEnterprise-5.1-linux-x64-installer.runsudo ./DataStaxEnterprise-5.1-linux-x64-installer.run --mode text -
Configuration parameters:
sudo ./DataStaxEnterprise-5.1-linux-x64-installer.run --enable_vnodes 0 ## Command line option.sudo ./DataStaxEnterprise-5.1-linux-x64-installer.run --optionfile ../datastax/DC4-analytics.prop ## Property file option.For configuration parameter information, see the installer options described in Using the DataStax Installer to install using command line or properties file commands.
The installer launches.
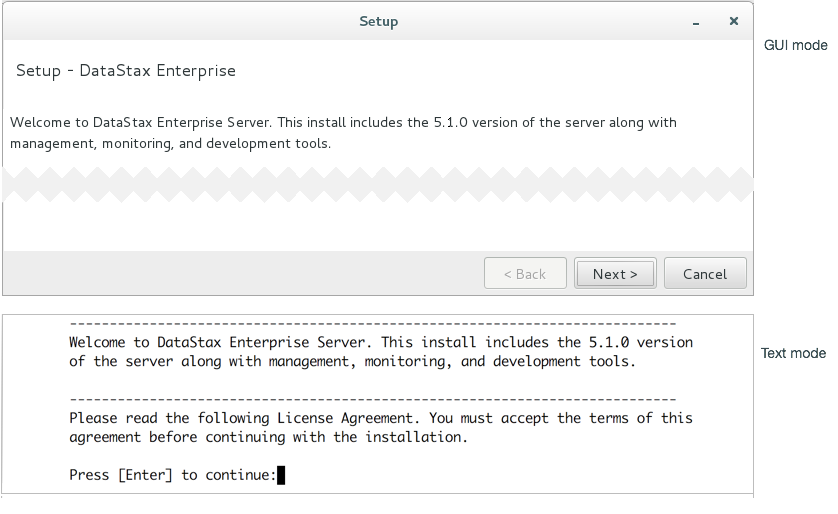 Launching the DSE installer
 -
-
After accepting the License Agreement, select the type of install. In Service Setup, select Services and Utilities.
-
Services and Utilities: Sets up DataStax Enterprise as a service. It installs DataStax Enterprise in system locations.
-
No Services: Sets up DataStax Enterprise as a standalone process. It does not require root or sudo access.
-
-
Select the Install Type:
-
Simple: Installs DataStax Enterprise using the default path names and options:
-
Advanced: Allows you to configure path names and options:
-
-
Set up the node:
Node setup Default Interface
Network interface for the DataStax Enterprise server. Single node clusters: use 127.0.0.0.
Cluster Name
Name of the cluster. You must use the same cluster name for each node in the cluster.
Seeds
All nodes use the seed node list for finding each other and learning the topology of the ring.
Single node clusters: Set to empty.
Multiple node clusters: List of seed nodes. (Do not make all nodes seed nodes.)
Additional information:
Install developer related tools
Includes the following:
-
Javadocs
-
DataStax Enterprise demos
-
-
If an installation of DataStax Enterprise already exists, the installer displays upgrade information and installs DSE in the following locations:
-
Installer-Services installations:
/usr/share/dse -
No Services installations: Previous installation location
Before upgrading an existing cluster, see the DataStax Upgrade Guide.
The important files to review for upgrade are
dse.yaml,cassandra.yaml, and for service installs/etc/default/dse.If
dse.in.shorcassandra.in.shhave been modified, make modifications to thecassandra-env.shor thedse-env.shinstead. Changing these files is not recommended. -
-
Set up the node type:
DSE Setup DSE Analytics
DSE Analytics includes integration with Apache Spark™.
DSE Search
DSE Search includes integration with Apache Solr™.
DSE Graph
DSE Graph is a graph database for managing, analyzing, and searching highly-connected data.
DSE Advanced Replication
DSE Advanced Replication supports configurable distributed data replication from source clusters to destination clusters bi-directionally that can experience sporadic connectivity.
-
Ring Options Enable Virtual Nodes (vnodes)
Enable or disable Virtual nodes.
Number of tokens
Token recommendations for vnodes:
-
Transactional nodes:
128 -
Analytical nodes (Spark):
128 -
Search nodes:
8 -
DSE Graph:
128. When used with DSE Search:8
Listen Address
cassandra.yaml:listen_addressRPC Address
cassandra.yaml:rpc_address -
-
Set up the miscellaneous options:
Misc Options Update Operating System
Update some system packages and dependencies. Does not upgrade or install major components such as Java.
Start services
-
Yes starts all services when the installation is complete.
-
No, select when additional configuration is needed after installation.
OpsCenter Address
Optional. The server name or IP address for OpsCenter.
If performing a Simple installation, go to step 16.
-
The following steps are displayed when Advanced is selected in step 5.
-
Optional: Set up the Preflight Check (Advanced Installations only):
Preflight Check Options Run Preflight Check
A collection of tests that can detect and fix a node’s configuration. The tool can detect and fix many invalid or suboptimal configuration settings. It is not available in No Services installations.
Attempt to Fix Issues
Enable DataStax Enterprise to attempt to fix invalid or suboptimal configuration settings.
SSD Drives
Enter the paths to the Solid State Drives. Separate the drives by a comma.
Drives
Enter the paths to the hard drives. Separate the drives by a comma.
Time to run Disk Benchmarks
Set to simulate a normal load.
Threads per Disk Benchmark
Set to simulate a normal load.
-
Change the default user and user group (Advanced Installations only):
User Setup OS User ID for Service
Default: cassandra. Because the DataStax Agent relies on user cassandra, DataStax does not recommend changing the default. If changed, you must manually install, update, and configure the DataStax Agent.
OS User Group for Service
Default: cassandra. See above.
-
Change the default directory locations (Advanced Installations only):
Directory Locations Data Directory
cassandra.yaml:data_file_directoriesCommitlog Directory
cassandra.yaml:commitlog_directorySaved Caches Directory
cassandra.yaml:saved_caches_directoryHints Directory
cassandra.yaml:hints_directoryLogs Directory
Log data for the database, Spark, and Tomcat. See the default file locations for Installer-Services and package installations or Installer-No Services and tarball installations.
-
Change the default ports (Advanced Installations only):
Ports Storage Port
cassandra.yaml:storage_portSSL Storage Port
cassandra.yaml:ssl_storage_portRPC Port
cassandra.yaml:rpc_port -
In System Configuration, review any warnings about potential issues.
-
After the installation completes, review the installation logs to verify the installation.
If you have closed the logs, see Services or No-Services installer locations.
DataStax Enterprise is ready for additional configuration.
-
Optional: Single-node cluster installations only:
-
If DataStax Enterprise is not already running:
-
Package and Installer-Services installations:
sudo service dse startFor more start options, see Starting DataStax Enterprise as a service.
-
Tarball and Installer-No Services installations:
<installation_location>/bin/dse cassandrawhere the
<installation_location>is either:-
/usr/share/dse -
the directory where you installed DataStax Enterprise.
For more start options, see Starting DataStax Enterprise as a stand-alone process
-
-
-
Verify that DataStax Enterprise is running:
-
Package and Installer-Services installations:
nodetool status -
Tarball and Installer-No Services installations:
<installation_location>/bin/nodetool status
Results using vnodes:
Datacenter: Cassandra
=====================
Status=Up/Down
|/ State=Normal/Leaving/Joining/Moving
--  Address    Load       Tokens  Owns    Host ID                               Rack
UN  127.0.0.1  82.43 KB   128     ?       40725dc8-7843-43ae-9c98-7c532b1f517e  rack1
Results not using vnodes:
Datacenter: Analytics
=====================
Status=Up/Down
|/ State=Normal/Leaving/Joining/Moving
--  Address         Load       Owns    Host ID                               Token                 Rack
UN  172.16.222.136  103.24 KB  ?       3c1d0657-0990-4f78-a3c0-3e0c37fc3a06  1647352612226902707   rack1
-
-
Next steps
-
You must change or delete the
cassandrauser created on installation. See Creating superuser accounts. -
Configure startup options: service | stand-alone.
-
If performing an upgrade, go to the next step in the Upgrade Guide.
-
Configuring DataStax Enterprise - Settings for DSE Advanced Security, In-Memory, DSE Advanced Replication, DSE Multi-Instance, DSE Tiered Storage, and more.
-
Configuration and log file locations - Services and package installations.
-
Configuration and log file locations - No Services and tarball installations.
-
Changing logging locations after installation.
-
Planning and testing DSE and Apache Cassandra™ cluster deployments.
-
Configuring the heap dump directory to avoid server crashes.
-
DataStax Studio documentation.
