Configuring proxy roles for applications
DSE proxy management allows roles to log in and execute CQL queries as other roles. This is particularly useful for secure middleware like web servers; the web server can log in once and proxy execute queries as its clients, keeping the audit log intact and leveraging DSE role-based access control.
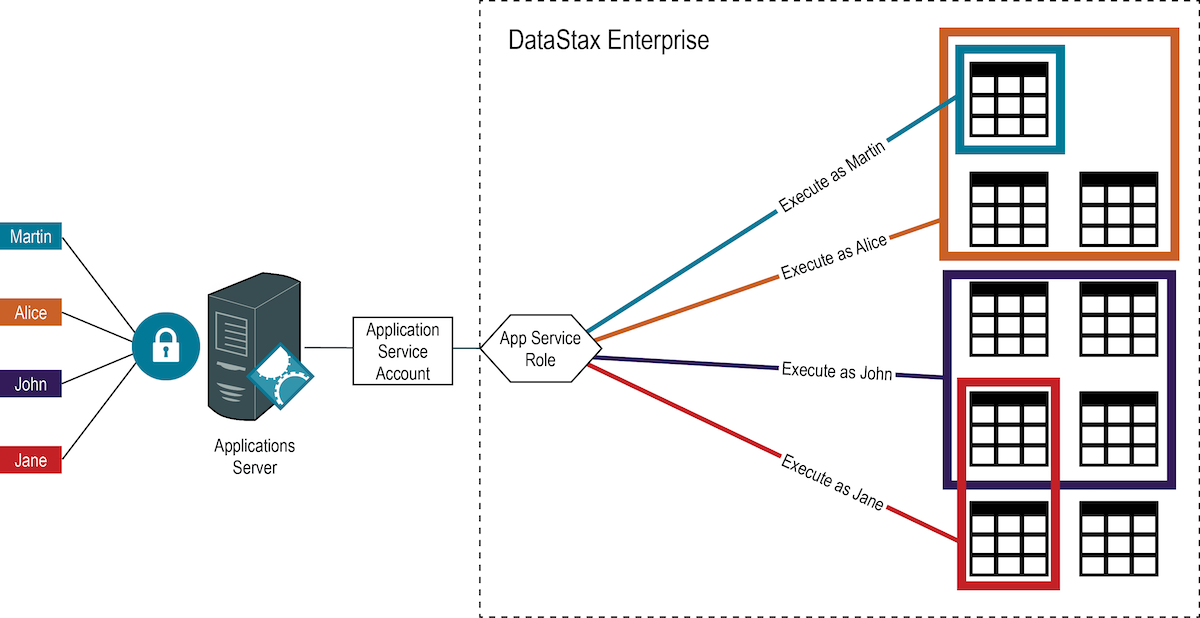
Application authentication and role assignment
The application sends its own credentials, or in the example above a Kerberos ticket, which is validated by DSE. The authenticated user name for the application is passed to DSE Role Manager. The role_management_options mode setting determines how roles are assigned to authenticated users, when using:
-
internalroles are assigned to authenticated users by matching the user name supplied in the credentials to a role name.In the example above, the full principle name for the application including REALM must match the role name.
-
ldaplooks up the authenticated user in LDAP and returns a list of groups, then matches the group names to role names.For LDAP the group names of the application account must match the role that can proxy other roles.
Any members of a group can be assigned the role. When using proxy roles with LDAP group management, create a single group-role pair for the application account. The group in LDAP should only contain one member, the application account.
|
When creating the primary role for the application account, you must ensure that the correct role is matched by Role Manager to that account. |
Auditing role creation and password changes
To audit when roles were created and when passwords were changed:
-
In dse.yaml under the
role_management_options, set thestatsproperty totrue. -
Make the dse.yaml edit on all DSE nodes.
-
Perform a rolling restart of the nodes.
-
Query the role stats.
For example, to query role stats:
SELECT * from dse_security.role_stats; role | created | password_changed
-------+---------------------------------+---------------------------------
test4 | 2020-04-13 00:44:09.221000+0000 | null
test3 | 2020-04-12 23:49:21.457000+0000 | 2020-04-12 23:49:21.457000+0000
(2 rows)|
Role stats are updated only for internal roles. |
Associating proxy roles with the application account
For users that will never directly access DSE, DataStax recommends creating proxy roles that are not bound to an authentication scheme and have no additional options, such as LOGIN, PASSWORD, and SUPERUSER. Therefore, when the authorization_options scheme_permissions are set to true, the role can be used only by the corresponding application account.
To establish an application role using the DSE Role Manager internal mode:
-
Create an application role based on the authentication scheme:
-
Internal scheme:
CREATE ROLE <role_name> WITH LOGIN = true AND PASSWORD = '<password>';
-
LDAP scheme:
CREATE ROLE <LDAP_service_account> WITH LOGIN = true;
where <LDAP_service_account> matches the attribute specified for the authentication_options user_filter, such as UID or samAccountName or when using role management with LDAP a group name assigned to the service account in LDAP.
-
Kerberos scheme:
CREATE ROLE '<user_principal_name>' WITH LOGIN = true;
where <user_principal_name> matches the full case-sensitive user principal name, such as jane@EXAMPLE.COM.
An internally stored password is required when authenticating against the internal scheme. The application role does not require permissions to database objects.
-
-
Create proxy role without login option:
CREATE ROLE <proxy_role_name>;
DataStax recommends managing the proxy accounts as permission sets without LOGIN, SUPERUSER, and PASSWORD (internally stored passwords).
-
Assign permissions on database resources to the proxy role:
GRANT <permission_name> ON <resource_name> TO <proxy_role_name>;
Repeat the GRANT statement for each permission you want to assign. For a complete list of permissions and supported database objects, see the CQL Permissions matrix.
-
Associate the application role with the proxy role:
-
Allow the service role to proxy all requests after authenticating:
GRANT PROXY.LOGIN ON <proxy_role_name> TO <service_role_name>;
-
Allow the service role to proxy each request after authenticating:
GRANT PROXY.EXECUTE ON <proxy_role_name> TO <service_role_name>;
-
-
Test that the application role can run commands with the proxy role:
-
Start CQL shell with the application role credentials:
cqlsh -u <application_role_name>
Password:
Providing the password from the command line using the
-poption provides the password in plain text and may be accessible through the terminal history to any other user with access to the machine. -
Start session using the proxy role:
EXECUTE AS <proxy_role_name>;
-
Run CQL statements to verify permissions.
-
Stop executing CQL statements using the proxy role:
EXECUTE AS
-
Example
Another use case for proxy roles is to track workflows. In this example, create an application account for the cycling web application and corresponding proxy accounts for team management and cyclist expenses workflows.
-
Create a role for the cycling app using internal authentication:
CREATE ROLE cycling_app WITH LOGIN=true AND PASSWORD='password';
GRANT EXECUTE ON INTERNAL SCHEME TO cycling_app;
Binding the role to the authentication scheme is required only when the authentication_options scheme_permissions is set to true.
-
Create role with permissions to manage expenses:
-
Create the proxy role:
CREATE ROLE cycling_expense_management; -
Assign access permissions to the role:
GRANT MODIFY ON cycling.cyclist_expenses to cycling_expense_management;
-
-
Create a role to manage cycling teams:
CREATE ROLE update_teams; GRANT MODIFY ON cycling.cyclist_name TO update_teams; GRANT MODIFY ON cycling.cyclist_teams TO update_teams; GRANT MODIFY ON cycling.cyclist_id TO update_teams; -
Allow the cycling application to run CQL commands using the team management and expense management roles:
GRANT PROXY.EXECUTE ON ROLE cycling_expense_management to cycling_app; GRANT PROXY.EXECUTE ON ROLE update_teams to cycling_app; -
Test execution of commands from cycling application role:
cqlsh -u cycling_app -p 'password' -e "EXECUTE AS cycling_expense_management; INSERT INTO cycling.cyclist_expenses (cyclist_name,expense_id,amount,description) VALUES ('Michael MATTHEWS',47,25,'lunch');"Since inserts only return a message with errors, the only output should be that the query executed with the correct role:
Executing queries as cycling_expense_management.
