Configure OpsCenter role-based security
OpsCenter allows enabling user authentication, defining custom roles, managing users, and designating permissions.
By default, access control is disabled. Any user that knows the OpsCenter URL can view all objects and perform all tasks.
OpsCenter doesn’t support single sign-on (SSO).
OpsCenter access roles overview
DataStax Enterprise (DSE) customers have the ability to define custom, fine-grained access roles for their users. OpsCenter can be configured to require users to log in using OpsCenter authentication. Permissions to perform certain operations can be granted to each role, and a role can be assigned to users. A user can only be assigned one role, and each role applies to all clusters.
Authenticating with LDAP in OpsCenter requires defining roles for LDAP users. If using LDAP authentication, users can have multiple roles. Upon logging in, all permissions for each role a user is assigned to are merged.
Admin role privileges
The admin role is built-in to OpsCenter and cannot be edited or removed. By default, the admin role is the only role created automatically when authentication is enabled. Only users with the admin role can manage users and roles, add new clusters, or manually update definition files.
|
Changing the default admin password is strongly recommended the first time you log in. |
Custom user role privileges
Only those assigned an admin role can manage roles. Each role represents permissions for all clusters managed by OpsCenter. Any functionality in OpsCenter that a user does not have permission for appears as gray and unavailable to that logged in user.
If using the OpsCenter API, users without sufficient permissions will receive an HTTP 401, Unauthorized response from the API.
Adding a cluster does not automatically add permissions for any existing roles. After adding a cluster, apply the permissions to the cluster for each role as appropriate for your organization.
|
In OpsCenter 6.5.3 and later, you must update custom scripts and applications that use the OpsCenter API if you want to use multiple user roles with LDAP authentication.
If a custom script or application that uses the OpsCenter API did not account for multiple user roles, and a user has multiple roles, the script or application will fail because the |
Role permissions
When defining custom roles, each role can have specific permissions enabled for that role. Each user can only be assigned a single role, which contains permissions for all clusters managed by OpsCenter. If using LDAP authentication, users can have multiple roles. Use the Cluster menu to view permissions for each cluster for a selected role. To hide a cluster for users within a selected role, uncheck all permissions.
- Core functionality permissions
-
-
View Cluster: Allows users to view a cluster in the Clusters area of the OpsCenter Monitoring UI.
-
Install Agents: Allows users to install or upgrade agents automatically or manually.
-
Edit Connection Settings: Allows users to edit the cluster connection settings for a DSE cluster monitored in OpsCenter.
-
Manage Alerts: Allows users to add alerts for monitoring conditions in DSE clusters.
-
Cluster Configuration: Allows users to configure the Performance Service.
-
- Services permissions
-
-
Backup Service: Allows users to perform backups and restores.
-
Best Practice Service: Allows users to configure and schedule Best Practice Service rules for managing DSE clusters.
-
Repair Service: Allows users to start, stop, and configure the Repair Service for running repairs on DSE clusters.
-
NodeSync Service: Allows authorized users to access status and configure settings for the NodeSync Service.
-
Performance Service: Allows users to configure the Performance Service.
-
Performance Service CQL Tracing: Allows users to trace slow CQL queries when troubleshooting query issues.
-
- Node operations permissions
-
-
Start and Stop: Allows users to start and stop DSE nodes. Start and stop nodes from the Other Actions menu options available in the List view, or from the Actions menu in the Node Details view.
-
Cleanup: Allows users to run a cleanup on one or more keyspaces.
-
Compact: Allows users to run compaction on a keyspaces and their tables. Major compactions are not recommended unless there is a compelling reason to do so.
-
Drain: Allows users to drain a node. The Drain option is available from the Actions menu in the Node Details dialog view, and also available when restarting DSE on a node.
-
Flush: Allows users to flush a keyspace and its tables. Flushing a keyspace might affect system performance when there are many live, large memtables.
-
Garbage Collection: Allows users to perform garbage collection on nodes. Running GC causes a spike in latency.
-
Repair: Allows users to manually run an ad hoc repair operation on selected nodes in the List view.
-
- Data permissions
-
-
View Schema: Allows users to view the CQL statements for the schema in the Data workspace of OpsCenter Monitoring. Users must have the View Schema permission to view Tables, View UDT, View UDF, and View UDA. Those users without view schema permission are shown a message explaining they must have the role permission for viewing anything in the Data workspace, and to contact their OpsCenter administrator to obtain access privileges.
-
Modify Schema: Allows users to edit keyspace settings, delete keyspaces, or delete tables in the Data workspace of OpsCenter.
-
Truncate Data: Allows users to truncate data from a table. The Truncate link appears as gray and unavailable for users who do not have this permission granted for their role.
-
- Cluster topology permissions
-
-
Add Nodes: Deprecated. Instead, add nodes to an existing DSE cluster using Lifecycle Manager (LCM). Anyone assigned an admin role can use any feature of LCM.
-
Rebalance Cluster (non-vnode): Allows users to rebalance a non-vnode cluster. Not applicable to vnodes.
-
Move: Allows users to move a node, enter a new token, and assign the new token to the node. During a move node operation, the node is unavailable and cluster performance might be affected. Not applicable to vnodes. Access the Move option from the Other Actions menu available in the List view, or from the Actions menu in the Node Details dialog view.
-
Decommission: Allows users to decommission a node from the Actions menu in the Node Details dialog view.
-
Remove Tokens: Allows removing tokens using the APIs.
-
Enable authentication in OpsCenter
OpsCenter offers granular, role-based permission control for user and role management.
By default, authentication is disabled.
The first time authentication is enabled, a default admin account is created with username admin and password admin.
If you enable OpsCenter authentication, DataStax strongly recommends enabling SSL communication between OpsCenter and the agents.
OpsCenter allows you to build your own authentication connectors to third-party authentication systems.
Use the resources in your OpsCenter auth directory, which is at /usr/share/opscenter/auth for package installations, or at INSTALL_DIRECTORY/opscenter/auth for tarball installations.
The API documentation is located at auth/opscenter-auth-docs-opscenter_version.tgz, and the Framework SDK JAR file is located at auth/opscenter-auth-api-opscenter_version.jar.
-
Edit the
opscenterd.conffile. The location of this file depends on the type of installation:-
Package installations:
/etc/opscenter/opscenterd.conf -
Tarball installations:
INSTALL_DIRECTORY/conf/opscenterd.conf
-
-
Enable authentication by setting
enabled=Truein the[authentication]section:opscenterd.conf[authentication] enabled=True -
Before you restart OpsCenter, delete the old database file, and then set the path to its location in the
opscenterd.conffile. OpsCenter creates a new database file when it restarts. -
Log in with the
adminrole. -
Open the OpsCenter user interface in a browser by navigating to
http://localhost:8888. -
Enter the default username of
adminand the passwordadmin.If pluggable authentication is enabled, the default username and password will vary based on the information used when pluggable authentication was enabled.
Changing the default admin password is strongly recommended the first time you log in.
Set up pluggable authentication for OpsCenter
-
Locate the
opscenterd.conffile. The location of this file depends on the type of installation:-
Package installations:
/etc/opscenter/opscenterd.conf -
Tarball installations:
INSTALL_DIRECTORY/conf/opscenterd.conf
-
-
Edit the
opscenterd.conffile and enable authentication, depending on your preferred strategy:- File authentication strategy
-
For the file authentication strategy, create the auth_file with
user:password:role, and one user per line:opscenterd.confuser:$2a$1...wrzmYhmO:superuserThe
passwordmust use a bcrypt 2a variation hash.You must first create the superuser role before creating the auth_file.
Then, set the path to your authentication file in the
opscenterd.conffile:opscenterd.confpassword_db = ./passwd.db enabled = True authentication_method = com.datastax.opscenter.auth.http.impl.FileAuthenticationStrategyProvider [authentication_provider] # auth file configuration auth_file = /apps/test/auth.txt - LDAP authentication strategy
-
opscenterd.conf
password_db = ./passwd.db enabled = True authentication_method = com.datastax.opscenter.auth.http.impl.LDAPAuthenticationStrategyProvider [authentication_provider] # ldap configuration server_host = dev-ldap.datastax.lan # use 389 if you set ldap_security = None server_port = 636 search_dn = cn=admin,dc=devldap,dc=datastax,dc=lan search_password = dseng user_search_base = ou=users,dc=devldap,dc=datastax,dc=lan user_search_filter = (uid={0}) group_search_base = ou=groups,dc=devldap,dc=datastax,dc=lan group_search_filter = (member=cn={0},ou=users,dc=devldap,dc=datastax,dc=lan) group_name_attribute = cn admin_group_name = superusers, superusers2 truststore = ./tests/resources/truststore.ts truststore_pass = secret ldap_security = SSL_TLS truststore_type = jks - Multiple authentication strategy
-
opscenterd.conf
password_db = ./passwd.db enabled = True authentication_method = com.datastax.opscenter.auth.http.impl.MultipleAuthenticationStrategyProvider [authentication_provider] # List of authentication strategies in the order each strategy will be used strategy_chain = com.datastax.opscenter.auth.http.impl.FileAuthenticationStrategyProvider, com.datastax.opscenter.auth.http.impl.LDAPAuthenticationStrategyProvider # auth file configuration auth_file = /apps/test/auth.txt # ldap configuration, formerly in [ldap_section] server_host = dev-ldap.datastax.lan # use 389 if you set ldap_security = None server_port = 636 search_dn = cn=admin,dc=devldap,dc=datastax,dc=lan search_password = dseng user_search_base = ou=users,dc=devldap,dc=datastax,dc=lan user_search_filter = (uid={0}) group_search_base = ou=groups,dc=devldap,dc=datastax,dc=lan group_search_filter = (member=cn={0},ou=users,dc=devldap,dc=datastax,dc=lan) group_name_attribute = cn admin_group_name = superusers, superusers2 truststore = ./tests/resources/truststore.ts truststore_pass = secret ldap_security = SSL_TLS truststore_type = jks - Bring your own class
-
You can bring your own pluggable authentication class and define it in the
authentication_methodinopscenterd.conf.
-
Open the OpsCenter user interface in a browser at
http://localhost:8888. -
Log in with the appropriate credentials.
Grant permission when role-based access control is enabled
When Cassandra role-based access control (RBAC) is enabled, a default account is created with username cassandra and password cassandra.
Create additional roles with permissions for the OpsCenter cluster and the monitored DataStax Enterprise (DSE) cluster.
The Cassandra role used for the agent should have ALL permissions for the OpsCenter keyspace, as well as DESCRIBE and SELECT for the monitored DSE cluster.
Use the following examples to create any roles necessary for your clusters:
-
Create
opscenterrole withSELECTpermissions for the monitored DSE cluster:CREATE ROLE opscenter WITH PASSWORD = 'opscenter' AND SUPERUSER = false AND LOGIN = true; GRANT SELECT ON TABLE system.local TO opscenter; GRANT SELECT ON TABLE system.peers TO opscenter; -
Create
agentrole withSELECTpermissions for the monitored DSE cluster:CREATE ROLE agent WITH PASSWORD = agent AND SUPERUSER = false AND LOGIN = true; GRANT SELECT ON TABLE system.local TO agent; GRANT SELECT ON TABLE system.peers TO agent; GRANT SELECT ON TABLE dse_perf.node_slow_log TO agent; -
Create
opscenterrole withALLpermissions for an OpsCenter keyspace in the monitored DSE cluster:CREATE ROLE opscenter WITH PASSWORD = 'opscenter' AND SUPERUSER = false AND LOGIN = true; GRANT ALL ON KEYSPACE opscenter_keyspace TO opscenter; -
Create
opscenterrole withALLpermissions for a separate OpsCenter storage cluster:CREATE ROLE agent WITH PASSWORD = agent AND SUPERUSER = false AND LOGIN = true; GRANT ALL ON KEYSPACE opscenter_keyspace TO agent; -
If you plan to enable or disable NodeSync for specific tables using DSE OpsCenter NodeSync Service, grant the
opscenterrole withALTERpermissions for those tables:GRANT ALTER ON TABLE keyspace_name.table_name TO opscenter; -
Custom roles for DSE 6.8:
-
To allow OpsCenter to restore DSE Graphs for DSE 6.8, grant the
opscenterrole withUPDATE,SELECT, andALTERpermissions fordse_system.shared_data:GRANT UPDATE, SELECT, ALTER ON TABLE dse_system.shared_data TO opscenter; -
For DSE 6.8 Search clusters, grant the
agentrole withSELECTandUPDATEpermissions forsolr_admin.solr_resources:GRANT SELECT, UPDATE ON TABLE solr_admin.solr_resources TO agent;
-
-
Custom roles for DSE 6.7 and earlier:
-
To allow OpsCenter to restore DSE Graphs for DSE 6.7 and earlier, grant the
opscenterrole withMODIFY,SELECT, andALTERpermissions fordse_system.shared_data:GRANT MODIFY, SELECT, ALTER ON TABLE dse_system.shared_data TO opscenter; -
For DSE 6.7 and earlier Search clusters, grant the
agentrole withSELECTandMODIFYpermissions forsolr_admin.solr_resources:GRANT SELECT, MODIFY ON TABLE solr_admin.solr_resources TO agent;
-
Sign in and out using OpsCenter authentication
If OpsCenter authentication is enabled, follow these instructions to log in and out of OpsCenter.
These steps also explain how to change the default admin password.
-
Go to the main OpsCenter URL in a web browser:
http://localhost:8888. -
On the sign in page, enter your username and password.
The default admin username is
adminand the default admin password isadmin. -
To change the default
adminpassword, do the following:-
Click the
adminusername in the header, and then select Change Password. -
Enter the current password (
admin), and then enter the new password twice. -
Click Save.
-
-
Click Close.
-
To sign out, click your username in the header, and then select Log Out.
Manage users and roles
|
When LDAP authentication is enabled, adding and editing users is disabled. Only role editing is available when LDAP is enabled. |
To manage users and roles permissions in OpsCenter, sign in to OpsCenter as an admin, click Settings, and then select Users & Roles. Then edit users and roles as needed.
All changes to roles and permissions are logged for security auditing purposes.
- Add a user
-
-
Click Add User.
-
Enter the username and password, and select a role for the user.
-
Click Save.
-
- Edit a user
-
-
Click the Edit icon for the user you want to edit.
-
To change the user’s password, enter and confirm the new password, then click Save.
-
To change the user’s role, select the new role from the Roles list and click Save.
-
- Delete a user
-
Click the Delete icon for the user you want to delete, and then click Delete to confirm.
- Edit a role
-
-
Click Manage Roles.
-
Click the Edit icon for the role you want to edit.
-
Select the cluster to apply role permissions to. The first cluster that a role has permissions for is automatically selected in the Cluster list.
-
Select the options the user role has permissions for. To hide a cluster for users within a selected role, uncheck all permissions. Click Select All or Unselect All to quickly enable all or no permissions.
-
Click Save.
-
To apply role permissions for each cluster, repeat the preceding steps for each applicable cluster.
-
- Add a role and assign it to users
-
-
Click Manage Roles.
-
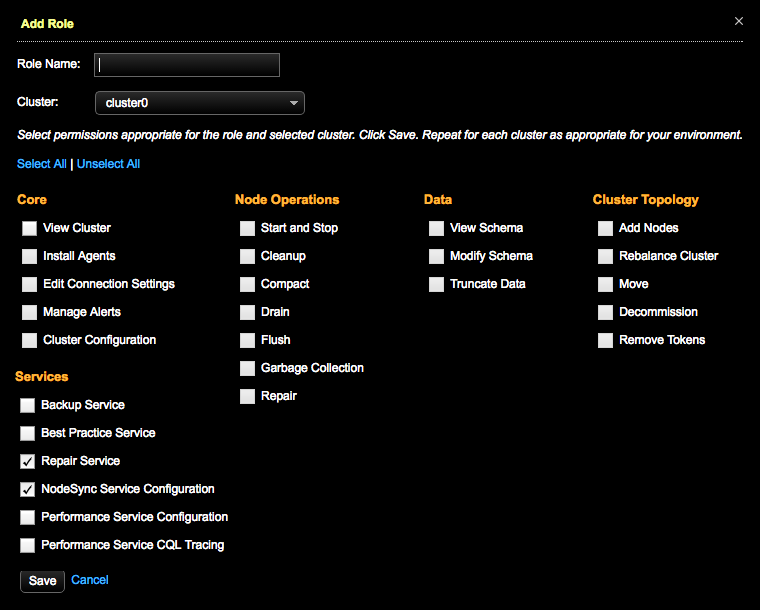
Click Add Role.
-
Enter the name of the role in Role Name, select the permissions from the appropriate feature check boxes, and then click Save. By default, new roles do not have any permissions.
-
Edit the role to apply permissions for each cluster.
-
In the Users dialog, click the Edit icon for the user that you want to grant the role to.
-
In the Role list, select the role, and click Save.
-
- Delete a role
-
Click Manage Roles, select the role you want to delete, and then click the Delete icon.
Change the location of the password database
Change the default location of the password database passwd.db used for OpsCenter authentication if you prefer another location.
The password database is created when authentication is enabled.
|
If you have already enabled authentication, copy the existing The default location of Your organization is responsible for backing up the |
-
Edit the
opscenterd.conffile, which is located at/etc/opscenter/opscenterd.conffor package installations and atINSTALL_DIRECTORY/conf/opscenterd.conffor tarball installations. -
In the
[authentication]section, setpassword_dbto the new location of the password database:opscenterd.conf[authentication] password_db = path/to/new/password/database
Configure the user password hash algorithm
Configure the algorithm to hash user passwords OpsCenter authentication.
The default algorithm is bcrypt+blake2b-512.
-
Edit the
opscenterd.conffile, which is located at/etc/opscenter/opscenterd.conffor package installations and atINSTALL_DIRECTORY/conf/opscenterd.conffor tarball installations. -
In the
[authentication]section, setpassword_hash_typeto the desired hashing option:opscenterd.conf[authentication] password_hash_type = pbkdf2+sha3-256Available
password_hash_typeoptions include the following:-
bcrypt+blake2b-512 -
pbkdf2+blake2b-512 -
pbkdf2+sha512 -
pbkdf2+sha3-256 -
bcrypt+sha512
-
-
Instruct users to sign in again so that OpsCenter can rehash and restore the user passwords. Because password hash algorithms are one-way functions that cannot be reversed, signing in again is necessary to update previously hashed user passwords.
