Add a node
Add nodes to a datacenter to manage install and configuration jobs from Lifecycle Manager (LCM).
LCM does not currently support managing DSE Multi-Instance nodes (also referred to as dense nodes).
Prerequisites
-
If you need an SSH Credential to specify access and privileges at the node level, add an SSH credential for that purpose.
-
If you need a Configuration Profile specialized at the node level, define a node-specific configuration profile.
Repositories are inherited from the cluster.
Procedure
-
Click Clusters in the LCM navigation menu.
-
Select the cluster and datacenter to which you want to add a node.
-
Click the plus sign
 icon above the Nodes pane.
 -
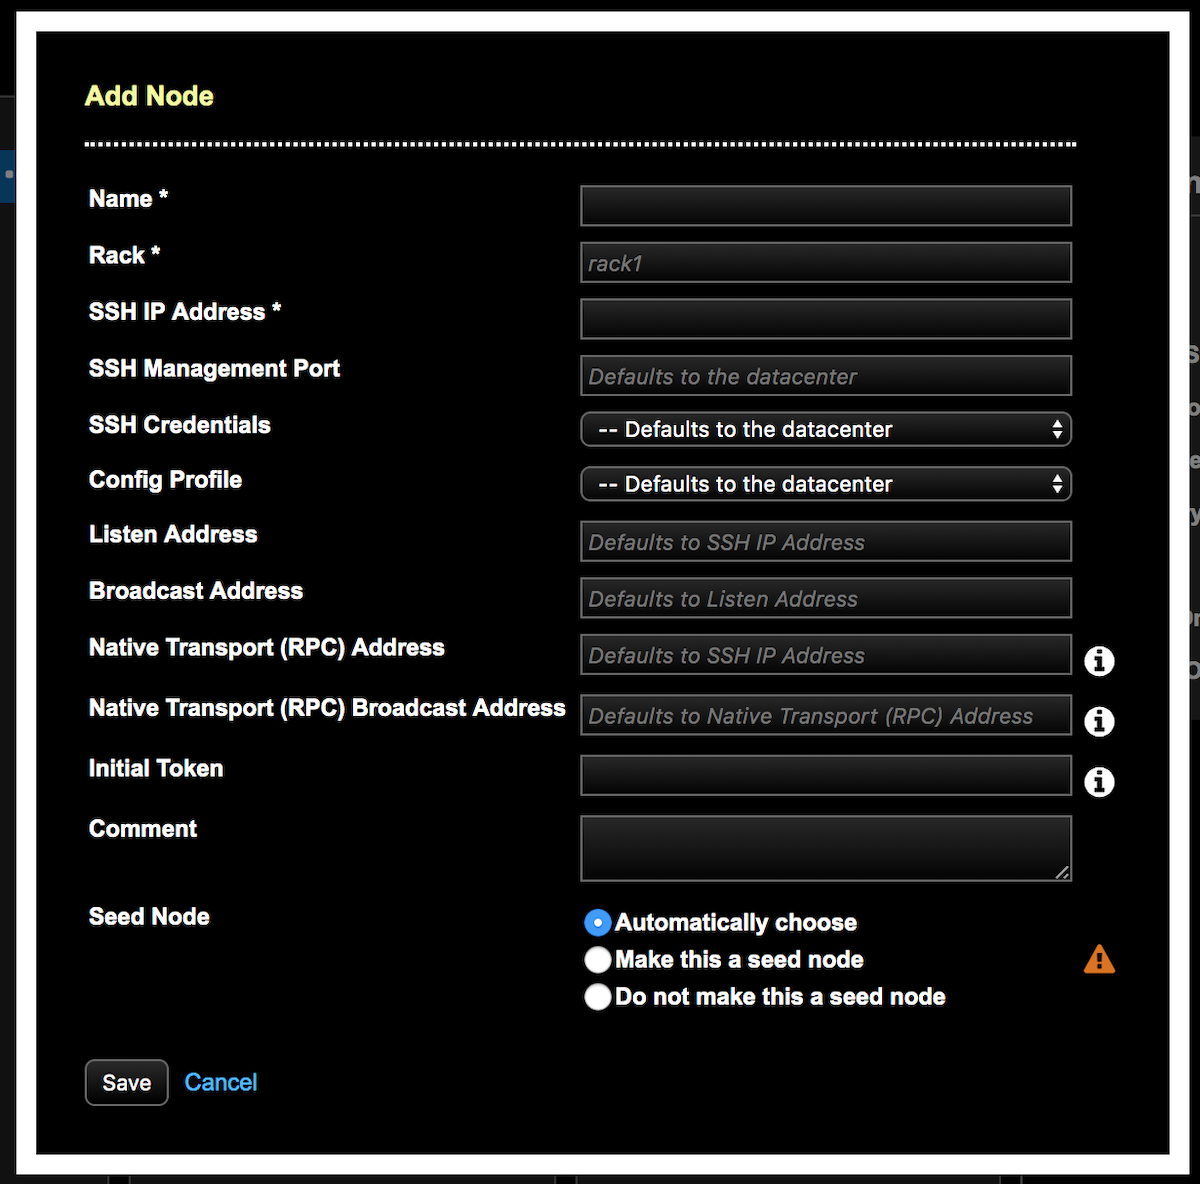
Enter a Name for the node.
The node name must be unique per datacenter ID.
-
Enter the name of the rack in the Rack field if you do not want to accept the default of rack1.
Type a value or use the down arrow key to select any previously entered rack names for a datacenter.
-
Enter the SSH IP Address.
-
Consult the following table for assistance with completing the fields and overriding their defaults:
Node fields Field Description Name*
Enter a name for the node. Nodes names must be unique within a datacenter. Required.
Rack*
Enter the name of the rack. If a rack is not entered, the rack name default is rack1. Example: rack3. Any previously entered rack names for a datacenter are available for selection.
SSH IP Address*
Default: SSH IP Address specified for the cluster. Required.
SSH Management Port
Enter a port value if you do not want to inherit the value from the datacenter. Default value for the SSH port at the cluster level is 22.
SSH Credentials
Select an SSH credential to apply at the node level to override inheriting the credentials from the datacenter level.
Config Profile
Select a configuration profile to apply at the node level, which overrides inheriting the configuration profile from the cluster or datacenter levels. Defaults to the datacenter config profile.
Listen Address
Default: SSH IP Address. The IP address or hostname that Cassandra binds to for connecting to other Cassandra nodes.
Broadcast Address
Default: Listen Address. The broadcast address is the IP address a node tells other nodes in the cluster to contact it by. A broadcast address allows public and private addresses to be different. For example, use the broadcast address in topologies where not all nodes have access to other nodes by their private IP addresses.
Native Transport (formerly RPC) Address
Default: SSH IP Address. - Enter the IP for
native_transport_address.Native Transport (formerly RPC) Broadcast Address
Default: Native Transport (formerly RPC, non-broadcast) Address. - Enter the IP for
native_transport_broadcast_address.Comment
Enter an optional comment about the node.
Seed Node
Select a seed node option:
-
Automatically choose: (Default) Allow LCM to select a seed node. LCM designates one seed per rack in each datacenter. If only a single rack is defined, the first two nodes in each datacenter will be designated as seed nodes. If only a single datacenter is defined, the first three nodes in the cluster will be designated as seeds.
-
Make this a seed node: Select to designate the node as a seed node used by gossip for bootstrapping new nodes joining a cluster.
When adding a node to an existing datacenter that has already been converged (that is, an install job has already been run) in LCM, a tooltip warning appears: New nodes that list themselves as seeds will fail to bootstrap and will require immediately running a repair on the node. DataStax recommends designating the node as a seed after the node has bootstrapped into the cluster.

-
Do not make this a seed node*: Select to explicitly exclude the node from seed node designation, such as the scenario described in the previous warning.
After adding a node but before running a job, the Node Details shows the status as not a seed node. The true seed node status is not shown until after running an install job.
It is a best practice to designate more than one seed node per datacenter (ideally two per datacenter). However, do not make all nodes seed nodes. See Internode communications (gossip).
-
-
Click Save.
The node is added to the Nodes pane of the Clusters page. The Node Details are shown in the details area next to the cluster model panes.
-
Continue adding nodes to the datacenter until done. Repeat the steps in this procedure.
