Drain a node
Drain a node using the Drain option in OpsCenter Nodes administration. Draining a node flushes all memtables from the node to SSTables on disk. Restarting DSE after draining a node is required for the node to start accepting writes again. Typically, a node is drained before upgrading to a new version of DSE.
For information about manually draining a node, see the corresponding nodetool drain command.
Draining a node is not necessary with either the OpsCenter UI or the drain nodetool command when upgrading a node to a minor DSE version using LCM.
To simply flush memtables to disk, use the Flush option in OpsCenter or the corresponding nodetool flush command.
-
If OpsCenter role-based security is enabled, be sure that the Drain Node Operations permission is enabled for the appropriate user roles.
-
In the OpsCenter navigation menu, click your cluster’s name, and then select Nodes.
-
In the Ring or List view, select the node you want to drain.
-
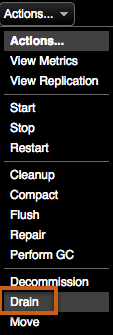
On the Node Details dialog, in the Actions menu, select Drain.
-
Review the warning, and then click Drain Node to begin the drain operation.
-
After the drain operation is complete, perform the operation that required you to drain the node, such as manually upgrading a node.
-
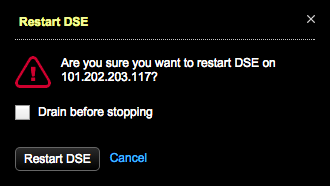
Click Restart from the Node Actions menu.
The node cannot accept writes until DSE is restarted.
-
Click Restart DSE. You don’t need to select the Drain before stopping option again.